On Assignment: Ben Lurye

To some a foot bridge abutment, to others a studio.
I've long kept a picture file of versatile nearby locations for photographing people. This foot bridge abutment on Columbia Road about two miles from my house is a great example, and it actually gets used a lot.
Above it's seen in normal daylight. But with the right light it offers so many different looks.
__________

In late afternoon it picks up the golden light right before sunset. And you can also see how, as the shadow moves across the weathered face from right to left, that you could use it to create a very cool (or warm, actually) light-on-dark chiaroscuro portrait using just the sun:

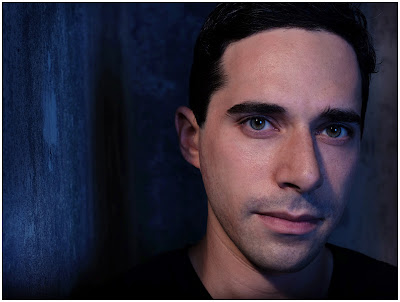
After the sun dips, the concrete picks up the cool tones of blue hour beautifully:

These are light colors that can be enhanced by using your white balance. I had long thought that white balance was for correcting light; making it "white." I now see it as the exact opposite. When I see light that has a color to it, I'll often push that natural color a little more through a white balance tweak.
The abutment is basically an I-beam stood on end. The photo at top was shot in midday light, so you can see the actual, weathered concrete color. As we move around a little more to the right, you can see the little portrait enclave created by the I-beam geometry. I love this kind of stuff:

This photo was shot in neutral light too, at the same time as the scout photo above. Those protruding walls not only give some three-dimensional interest as compared to a flat background, but also act as natural cutters for the light. They can create shadow, which creates mood.
Back to our evening shoot, lets throw an LP180 speedlight on a stand at upper left and fit it with a mini-soft box (a LumiQuest LTP). I am going to warm that light up with a ½ CTO gel, which takes it halfway to tungsten:

So just one light, and a protruding wall to create some shadow, means you could easily create some mood and chiaroscuro any time you want. And for clarity, it is important to know that I am working well above the ambient here. There is no ambient light component to this shot. It's all flash.
I want detail in the shadows, I could add a reflector. Which is fine and a great solution if you are just working with one light. (You could also do that, albeit with less directional control, by opening up the shutter speed and letting in more ambient.)
But since I have a second light I can also do that with full control of my direction, intensity and color by adding a second light as a fill. So I am going to push a second LP180 in from my right. This one is in a small umbrella, and with a full CTB gel, which creates a contrasting cool color:

So now I have a pretty cool little shooting alcove. I could stick him back in there, lurking in the blue shadows. Or I could bring him forward, emerging into the warmer key light:
The BTS shots are straight out of the camera, but the shot above has been tweaked in post for a little more intensity of color. The blue fill coming from camera right also colors the shadows on his face. Which for a long time would have freaked me out (blue skin???) But really, why wouldn't they be blue in that multi-colored environment. We are creating a texture of color and sticking someone into it. He needs to pick up that color.
Here's a pullback that shows the lighting. Remember, there is a ½ CTO gel on the key at upper left and a full CTB on the fill at lower right:
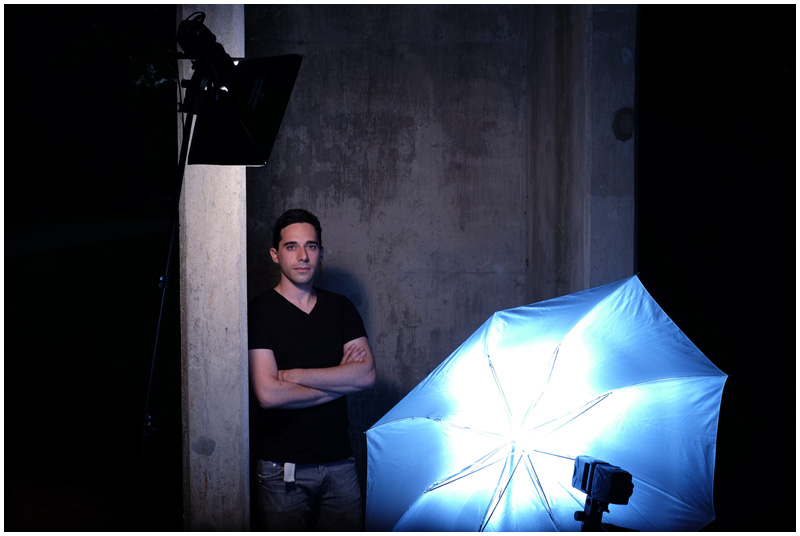
And speaking of which, why is the fill coming from below? Well, I want it to illuminate and color the shadows, which are being cast from above left. So I want it pushing from below right. I could do the same thing from on-axis, but it would be a different look.
I want the fill to reach into the crevices, so I am shooting from right up against the left edge of that fill umbrella. But I can walk around and shoot from the other (right) edge of the fill umbrella and get a completely different look—one that is much more filled with blue. And I shifted this picture more to blue in post to carry those tones into the background.
But his face is still picking up the more powerful key. Even though shot in the exact same environment and light as the head shot above, the camera angle shift creates a pretty different look. Ultimately, Ben preferred this image as it was the one he chose to front his web site.
__________
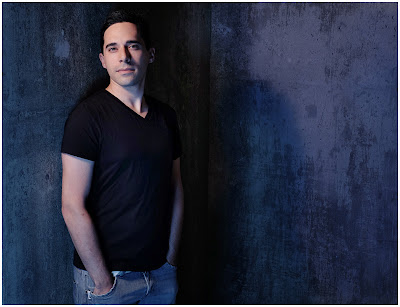
Moving back around to the front facade of the abutment gives us a more standard, two-dimensional backdrop. Like one of those fancy faux "exposed concrete" walls in an expensive rental studio. But it is really exposed, and it is free.

I love both the texture of the facade and his vulnerable expression and body language here. I enjoy working with actors, as they can very seamlessly reach into themselves and pull out a different expression and feel to a portrait. (I wrote about that in detail earlier, in this 2013 OA of actress MaryLee Adams.)
My goal is to keep working with that and to have the confidence to incorporate it more into my portraits of people who are not actors, too.
The light for the above portrait may feel like just one key light, but is really a two-light setup. It's still done with LP180 speedlights, but this time they are both in Westcott double-fold umbrellas. The key (from upper right) has a ¼ CTO warming gel and the fill (opposite axis, lower left) has a ½ CTB cooling gel. But the fill is dialed down a couple stops so that color shift is pretty subtle.
Here is a BTS pic:

To be honest, I kinda like that as a picture, too. And I love, love that backdrop. (Free to use, come on down…)
In these photos, the fill from lower left (which, again, I am right up against with my camera position) is very subtle and would only be noticeable in its absence. For that reason, I have taken out the second (fill) highlight in Ben's eyes. So it really feels now like a one-light photo, albeit one with much more control of the shadows.
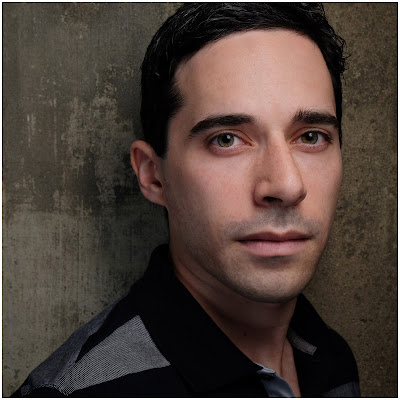
The quality of the fill, as much as anything else, creates a tonal feel that belies the use of a small-chip camera like the Fuji X-E2 I used to make this photo. The lens was Fuji's surprisingly good kit zoom, the 18-55/2.8-4. It is at ~37mm, which translates to roughly 50mm on a full-frame chip.
A lot of people don't like a 50 (or 35 APS equivalent) for head shots. I actually like it a lot, as long as you are far enough back to hold the head shot in a horizontal (or obviously, square) format. If you are so close that you have to go vertical to hold the face, you are also close enough for the focal length to really give you more of a spherical distortion on the face.
But from this far back the 50FF/35APS looks very three-dimensional and intimate to me. That leverages the power of Ben's direct-camera gaze which makes this my favorite of the images we shot that evening.
It's not a standard actor's head shot, but rather more of a portrait of a person who happens to be an actor. Which is obviously more of where I'm coming from with this as a photographer. And ultimately my goal in a shoot is to make photos that appeal to both the subject and to me, even if they are not the same photos.
__________
On Assignment: Ben Lurye is #168 in the long-running On Assignment series, which can be found here.
Discussion? Questions? Via Twitter, use hashtag #StrOA168—and add "@Strobist" at the end of the tweet if is important that I see it.
NEXT: Lighting Like Leo
__________
New to Strobist? Start here | Or jump right to Lighting 101
Got a question? Hit me on Twitter: @Strobist
Have a passport? Join me in Hanoi: X-Peditions Location Workshops
Permalink

<< Home