Brad Trent's Ocean Master Session, Pt. 2
ED. NOTE: This is the final in a series of guest posts, which were so helpful during a very hectic spring. Many thanks to Miller Mobley, Finn O'Hara, John Keatley, Chris Crisman and Brad Trent for the assist. -DH
__________

When last we left Brad, he was waiting patiently for the pool to fill up. Today, he'll walk through that part of the shoot and the post processing he used to get the final image, seen above.
Sortaa cool, IMO, as this is frequently the "black box" part of these kinds of shoots that usually goes unexplained...
__________

Remember the kiddie pool? Well, it was almost 4:00PM and after about 7 hours of filling, it was finally reaching a depth where we could start thinking of throwing Nadia in for a swim.
The idea was to have her floating in ominous, dark, inky water. But it still had to have enough detail so that it wouldn’t come across as just an oily black mess. I had done a shot years ago where I had to do something similar. So using the tricks I learned back then, we went about creating the ocean in a kid’s pool.

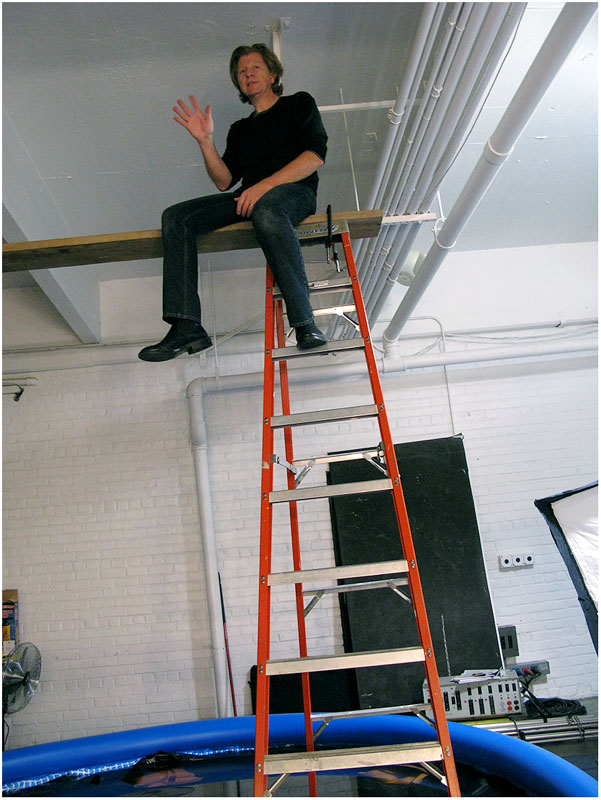
First, we had to line the pool with the heavy black plastic vapor barrier sheeting I got from Home Depot. Next was building a Bargain Basement shooting platform so that I could shoot from directly above where Nadia would be floating. If we had a the money, a real scaffold would be where those two ladders and that board are standing!

Once we had everything heavily sandbagged and tied off (live electricity and water?!!) It was now time for Nadia to get wet and for us to see how the lighting was looking. Initially I thought that keeping it simple with the Beauty Dish as a main light and a 6’ Chimera to act as both fill and create highlights on the water would work.

But the highlights were to subtle, so we swapped out the 6’ bank and went with a couple of smaller strip lights and a third bare head to really get the water sparkling.

The look on my face says a lot…

We still weren’t getting the kind of highlights on the water I was hoping for. But the simple fact was we were already running way overtime, so I made the decision that a lot of this shot was going to be made in post. I processed a couple of files in Photoshop to make sure I had the detail I needed. Then we shot some frames with Nadia out of the pool so that I would have good water effects.
All that was left to do was empty almost 2,000 gallons of water into the street … on one of the coldest nights of the year!
Of course the drain hose wasn’t any help, so we had to resort to bailing the water into the street ourselves.

It took three of us over an hour and a half to get the pool emptied and West 12th street was a skating rink for days.
__________
All that was left to do now was to take this admittedly unremarkable image...

… and through some Photoshop magic make it into the cover. Without getting too technical, here is the Cliff's Notes breakdown of the steps I used to do just that.
1. The canvas size was widened to a 300dpi, 22" x 30" horizontal, and the water was cloned to fill in all that new empty space. Next I added layers of more waves and highlights (over 20 layers in total) from the separate water shots we did at the end of the shoot. I used the ‘skew,' ‘distort’ and ‘warp’ tools to give the wave layers a realistic appearance.

2. With the waves and highlights looking more or less the way they should, I could now concentrate on retouching skin details and pulling up more shadow detail out of Nadia’s hair. For her hair, I copied the area, applied a good dose of shadow detail, then merged it back down to the base image layer.
I then applied even more shadow detail to the entire image area to bring up the shine on the black plastic sheeting at the bottom of the pool. (Remember I said I had processed a few files during the shoot to check for detail? This was the detail I was looking for.) The wrinkles and puckers in the plastic actually helps give the water its rolling, wave-like appearance.
While the overall image looks extremely flat now, I knew that further down the road the increased contrast I planned to add would balance out nicely…

3. The image layer is duplicated, then set to ‘overlay’ mode at 100% opacity, and the High Pass filter set at 150 pixels is applied. This layer is then desaturated.

4. To give the water some color, above the High Pass layer I add an overlay layer with 50% grey added, then I color correct this layer to give it an overall blue tint. I then erase the areas where Nadia is to reveal the correct color below the blue layer so only the water is affected.

5. Adjustment Layers for color correction, selective color, curves and levels are added.

6. I could have stopped with the previous step, but I still wanted to heighten the overall ghostly feel of the shot, so I once again duplicated the base image layer, then moved it above all of the other layers. I then applied a Gaussian Blur (30 pixels) to this layer and set its opacity at 30%. This gave the skin a glowing, opalescent look and also increased the overall contrast even more.
A final color correction adjustment layer is added with a clipping mask to the Gaussian Blur layer and I shifted the overall color further into the blue/green spectrum. Here again is the final image…..
There…simple! 33 layers and a final file size of only 1.32gb(!) And after a more than 15-hour day, 6 different shots, 800 exposures and 2,000 gallons of water left freezing up West 12th Street, we were done!
Nadia’s album, ‘The Ocean Master’ is set to be released any minute. Head over to her website and give her a look!
__________
Indeed. And if you want links to Brad's various channels, they are listed at the bottom of Part 1.
Thanks, Brad!
__________
Next: Concert Pianist
__________

When last we left Brad, he was waiting patiently for the pool to fill up. Today, he'll walk through that part of the shoot and the post processing he used to get the final image, seen above.
Sortaa cool, IMO, as this is frequently the "black box" part of these kinds of shoots that usually goes unexplained...
__________
Remember the kiddie pool? Well, it was almost 4:00PM and after about 7 hours of filling, it was finally reaching a depth where we could start thinking of throwing Nadia in for a swim.
The idea was to have her floating in ominous, dark, inky water. But it still had to have enough detail so that it wouldn’t come across as just an oily black mess. I had done a shot years ago where I had to do something similar. So using the tricks I learned back then, we went about creating the ocean in a kid’s pool.

First, we had to line the pool with the heavy black plastic vapor barrier sheeting I got from Home Depot. Next was building a Bargain Basement shooting platform so that I could shoot from directly above where Nadia would be floating. If we had a the money, a real scaffold would be where those two ladders and that board are standing!

Once we had everything heavily sandbagged and tied off (live electricity and water?!!) It was now time for Nadia to get wet and for us to see how the lighting was looking. Initially I thought that keeping it simple with the Beauty Dish as a main light and a 6’ Chimera to act as both fill and create highlights on the water would work.

But the highlights were to subtle, so we swapped out the 6’ bank and went with a couple of smaller strip lights and a third bare head to really get the water sparkling.

The look on my face says a lot…

We still weren’t getting the kind of highlights on the water I was hoping for. But the simple fact was we were already running way overtime, so I made the decision that a lot of this shot was going to be made in post. I processed a couple of files in Photoshop to make sure I had the detail I needed. Then we shot some frames with Nadia out of the pool so that I would have good water effects.
All that was left to do was empty almost 2,000 gallons of water into the street … on one of the coldest nights of the year!
Of course the drain hose wasn’t any help, so we had to resort to bailing the water into the street ourselves.

It took three of us over an hour and a half to get the pool emptied and West 12th street was a skating rink for days.
__________
All that was left to do now was to take this admittedly unremarkable image...

… and through some Photoshop magic make it into the cover. Without getting too technical, here is the Cliff's Notes breakdown of the steps I used to do just that.
1. The canvas size was widened to a 300dpi, 22" x 30" horizontal, and the water was cloned to fill in all that new empty space. Next I added layers of more waves and highlights (over 20 layers in total) from the separate water shots we did at the end of the shoot. I used the ‘skew,' ‘distort’ and ‘warp’ tools to give the wave layers a realistic appearance.

2. With the waves and highlights looking more or less the way they should, I could now concentrate on retouching skin details and pulling up more shadow detail out of Nadia’s hair. For her hair, I copied the area, applied a good dose of shadow detail, then merged it back down to the base image layer.
I then applied even more shadow detail to the entire image area to bring up the shine on the black plastic sheeting at the bottom of the pool. (Remember I said I had processed a few files during the shoot to check for detail? This was the detail I was looking for.) The wrinkles and puckers in the plastic actually helps give the water its rolling, wave-like appearance.
While the overall image looks extremely flat now, I knew that further down the road the increased contrast I planned to add would balance out nicely…

3. The image layer is duplicated, then set to ‘overlay’ mode at 100% opacity, and the High Pass filter set at 150 pixels is applied. This layer is then desaturated.

4. To give the water some color, above the High Pass layer I add an overlay layer with 50% grey added, then I color correct this layer to give it an overall blue tint. I then erase the areas where Nadia is to reveal the correct color below the blue layer so only the water is affected.

5. Adjustment Layers for color correction, selective color, curves and levels are added.

6. I could have stopped with the previous step, but I still wanted to heighten the overall ghostly feel of the shot, so I once again duplicated the base image layer, then moved it above all of the other layers. I then applied a Gaussian Blur (30 pixels) to this layer and set its opacity at 30%. This gave the skin a glowing, opalescent look and also increased the overall contrast even more.
A final color correction adjustment layer is added with a clipping mask to the Gaussian Blur layer and I shifted the overall color further into the blue/green spectrum. Here again is the final image…..
There…simple! 33 layers and a final file size of only 1.32gb(!) And after a more than 15-hour day, 6 different shots, 800 exposures and 2,000 gallons of water left freezing up West 12th Street, we were done!
Nadia’s album, ‘The Ocean Master’ is set to be released any minute. Head over to her website and give her a look!
__________
Indeed. And if you want links to Brad's various channels, they are listed at the bottom of Part 1.
Thanks, Brad!
__________
Next: Concert Pianist
__________
New to Strobist? Start here | Or jump right to Lighting 101
My new book: The Traveling Photograher's Manifesto
Permalink
<< Home