SLC-2L-01: Owning the Sun with Two Speedlights

When working with one speedlight outdoors in daylight, logic dictates that you need to find the shade if you want to create a nice quality of light.
This is because you only have one light, which a) needs to do all of the heavy lifting, and b) is not very powerful. Which means that you tend to go soft—and close—with your one light.
So one light can be limiting. But as you'll see, a second light can open up some pretty neat options.
__________
One Light for Shape, Another for Detail
We learned this in Lighting 102. Put another way, when lighting someone with two lights, your key light defines the shape of your subject and your fill light controls the level of the shadows. Ironically, it's the fill light that makes a subject look less "lit," and more natural.
Now fast forward to Lighting 103, where we also learned that...
White Light is a Lie
In Lighting 103, we learned that our flashes spit out white light, but that color is not a good proxy for the real world. When it comes to the color of light, hues are cues. The color of a light is a tell for what it is doing. Shadows, for example, tend to be cooler than highlights. Because that is the way light works in the wild.
What if we combined these two ideas, and did so in a way that allowed us to light with a high level of control without using a softening modifier?
By doing that, we greatly expand our working range in the sunny outdoors with our small flashes. Meaning, we would not need to find full shade—or jam our umbrella up into our subject's face.
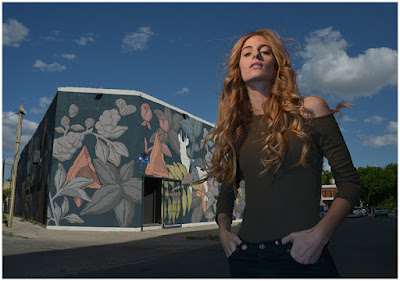
The photo up top is an example. And even though it is shot in shade, we are working at a comfortable light-to-subject distance, and at low power (~1/8th) settings on our bare speedlights.
Once More, with Rocio
Like the one-light example, this is also from Buenos Aires, and of Rocio. I was shooting with Nikon D4, because the class was sponsored by Nikon.
Also, Rocio is a model. I.e., not my normal subject matter. (Click: new Model Pose, click: new Model Pose...) And given some language barrier and time constraints, I just went with that.
Sun? Wind? Small Flashes? No Prob.
So as before, I went to the shadow of a building to control my ambient. But as you'll see in a minute, we don't have to do that when shooting with more than one light.
But here, I am underexposing my background by about a stop to get rich tones. So Rocio is going to be very dark. And I am going to light her with two bare speedlights.
First, about the bare. This gives me some big advantages. One, I don't worry about wind. There is no umbrella or soft box to catch a breeze and take a spill. (Or to carry around.)
Second, because the lights are bare (save some gels, which we'll talk about in a moment) they are also much more powerful. This means that I can have more range of distance from which to light, and/or work at lower (faster) power settings on my speedlights.
In other words, better flexibility and shooting rhythm.
First Light: On-Axis Fill

If she's in shadow and I am underexposing the full sun in the background, she is pretty much silhouetted before we start. So with my first light, I want to create detail in the shadows—including shadows created by my key light.
So I am going to place a bare flash right next to the lens, as demonstrated above. I'll also cover it with a 1/2 CTB to cool it down. Since this is fill light, we'll underexpose by about two stops.
A few of things to remember:
1. This will not only fill the shadows, but also make them cooler. Which will help to chromatically define them as shadows and make the actual lighting ratio not as critical.
2. I really want this right next to the lens, as opposed to even mounted on the hot shoe. (Just the distance between the hot shoe flash and the lens will leave a small, sharp "full shadow" under her chin, which I don't want.)
3. I can map out that shadow depth on different parts of her body by zooming the flash and angling it up some. I.e., I can make her hands less bright than the shadows in her face if I want. (And I should/would have, if not just speed-demoing this setup while pressed for time.)
4. If I change my working distance, I'll need to tweak the power level of this flash to compensate.
Next, Add Your Key
Now that my shadow desity and color are set (i.e., legible, and cooler) I can come in and add the key light. It is a second bare speedlight, high and camera left, with a 1/4 CTO warming gel. I can zoom this light for more power and/or beam falloff, which I did.
This kind of light, fired with a subject in full shadow, can quickly become a train wreck because of the harshness and depth of the shadows. But when the shadows are lifted—and cooler—the effect somehow becomes softer.
But I still get to keep the advantages (power, speed, imperviousness to breeze) of working with a bare speedlight in a sun environment.
But we are not really in the sun, are we? We are shooting in the shade of the building, and the background is in full sun.
Okay, then. Let's go out into the sun.
Turn Around to Create Shade

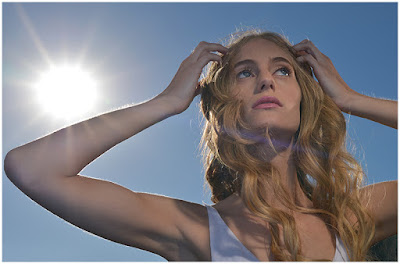
So here is Rocio out in the sun, but turned away from it. You can always put someone's face in shadow by rotating them away from the sun. And note that without flash, she would be in full silhouette. We're at a low ISO, at 1/250th at f/16, if memory serves.
It's honestly pretty remarkable to me that two bare speedlights can create a palette (from black) that is this creamy. It almost doesn't make sense.
But that is exactly what it happening: on-axis bare fill (next to lens) with a 1/2 CTB gel; high camera right key with a Rosco 08 gel. Both bare, both speedlights, both lighting her from a starting point of silhouette.
I mean, I am shooting right into the sun. There's even a sun flare on her arm and scraping across her neck.
Is this cool or what? And it is the high density and cool color of the shadows that is making this look happen. You don't even notice that the shadows are cooled down until you look closely.
That's because in real life shadows are cooler than highlights. So they look more natural—and less lit—when they are cooled down. This definition-by-color of the shadow areas allows you to raise their absolute exposure value for a more flattering light ratio.
Look at her camera-left arm, biceps vs. triceps. There is not a lot of absolute lighting ratio here. The shape of her arm is mostly defined by a color transition. It looks less lit, even though it is lit from a starting point of black by two bare speedlights.
A disclosure: there are two more lights at play here. Both are back/rims, bare, and 1/2 CTO'd. But they are so low in value, they are only adding a little three-dimensionality (and color) to her hair.
Everything from the front is coming from the two bare speedlights.
But What Does it All Mean, Man
For me, this was a little bit of an epiphany. A way to work with bare speedlights outdoors, in full sun, while easily erasing that harsh signature look. A way to travel super light—you only even need one stand.
And there are so many layers of control here. Think about how you could modulate the shadow light away from the areas close to the camera.
Or how you could play with the warmth and coolness of the color of the highlights and shadows to pick up cues from the environment, if included. Or how you could gobo off the key light a bit to just call attention to a face.
Or how you could use your new, expanded working distance (no light-robbing softeners) to be more ambitious outdoors with your speedlights. Like, for instance, could you light a 16-person group shot outdoors in a sophisticated way with just a couple of speedlights and a focal plane shutter?
Hell yeah, you could. And we'll do that, next.
FROM: Strobist Lighting Cookbook, Two or More Lights
__________
New to Strobist? Start here | Or jump right to Lighting 101
Now available in audiobook: The Traveling Photograher's Manifesto
Permalink

<< Home