
On Assignment: Big Gym, Little Lights
 Building a little on the basketball lighting technique we talked about earlier (open "Lighting Prep Basketball" in a new window) I wanted to explore another example of using one small light to illuminate a large, long-throw area - and adding a second to improve it.
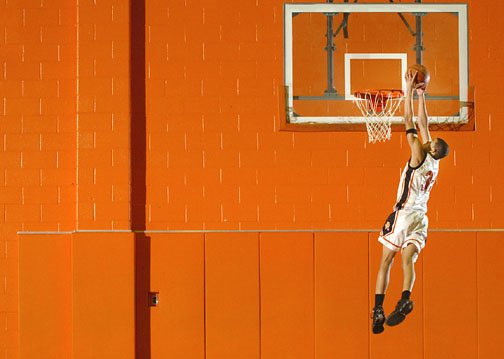
All of the heavy lifting in the top photo is being done with one Nikon SB-28. It is on full power, and placed in the top center of the bleachers at half court on camera left.
The flash zoom setting is on 85mm. This not only gives me increased efficiency, but also serves to help to "feather" the light on the left side of the photo.
What is feathering? The left area of the photo is closer to the flash and should have been brighter. But the area was also starting to fall outside of the "beam spread" of the light, which was aimed at the basket. This helped me to balance the exposure across the background very easily.
Getting back to the light setup, we have one strobe lighting the whole scene. That's asking a lot for a small strobe at this distance - even at full power. And the ASA still had to be pushed to 800. But the quality of the light will fool you and make you think it was shot at a lower ASA. (In my opinion at least.)
The look is helped by two little tricks which finesse the light a bit.
First, the dunker's shadow is far enough to the right to be out of the frame. This disguises the fact that it is being lit by one hard, long-throw light. He's pretty close to the back wall, so his shadow would have been distracting.
Second, and more important, there is another strobe on a stand at camera right (just outside of the frame, close to the subject) set to 1/32 power. This strobe is cross lighting him, which erases much of the tell-tale "hard light shadow side" of the dunker. At the same time it gives him a nice highlight on the right side, creating a more three-dimensional shape.
This is basically one-half of the basketball lighting technique posted earlier, with the second strobe now being used as a low-power, cross-light kicker instead of second light at 45 degrees from the other side's bleachers.
The dunk photo was the inside lead for The Sun's "Varsity" section, which highlights standout prep athletes from different suburbs around Baltimore. (The photographers love this new section because it gives us guaranteed good play and a chance to play.) The second, vertical photo was used as the cover. Both were shot in a total of about 15 minutes.
 Now, before I explain the light on the cover photo, try to reverse engineer it. I will tell you that the bleacher light (lighting what is now the background) is unchanged. And, by now you should know I am pretty lazy when it comes to setting (and re-setting) a bunch of gear.
The cover shot was an easy switch, lighting-wise. I just walked the 1/32 power light stand on the right and stuck it close to mid court on the left. I had to bump it up two stops, to 1/8 power, to light the basketball player as he dribbled. The light stand was set to camera left and in front of the player. So, both the background light and the main light (for the player) are now coming from camera left.
I was so grateful to the people who had painted the whole gym wall "Scorpion Orange" that I got down on my belly to give thanks.
This, if course, made the polished wood floor reflect the wall. Which made the player almost seem to float on a background of orange. You'll need to put the camera directly on the floor to maximize this effect.
Two small lights. One big area. Two setups. Fifteen minutes.
Easy as pie.
When you get used to doing this small-flash lighting thing, you will be amazed at (a) how quickly an lighting idea will come together, and (b) how fast you can set up and execute it.
Next: Light the Little Stuff
__________
New to Strobist? Start here | Or jump right to Lighting 101
Now available in audiobook: The Traveling Photograher's Manifesto
Permalink
<< Home