On Assignment: 5-Minute Test Shot
 As I was heading home from work the other day, I was getting into the elevator at work as my boss and a features photo editor were getting out.
"I am down to one project," I mentioned to them. "You got anything?"
(I like having a few things going at once, in different stages of development. So I am not shy about asking what may be available to stick in the pipeline.)
"I got a food shoot next week," the picture editor said.
It's not a project, but it is a one-shot deal that I can hit with a little advance thinking, so I'll take it. I'd tell you what it is, but it's not cool to give any local competition a heads-up as to what we have in the on-deck circle. But it's a basic food item, which will need a tabletop illustration.
And for the purposes of this post, it really does not matter what it is, anyway. The point is that I spent the rest of the 30-minute drive home figuring out how I wanted to shoot it.
I decided to try out the technique of light painting for the first time. I've seen lots of cool stuff done with it, and this subject could use a little visual dressing up.
Long story short, after dinner I am in the darkened upstairs hall of my house with my camera on a tripod and a Nikon SB-800 speedlight in my hands.
The Nikon SB-800 has a neat "modeling light," which is really about a 100hz stroboscopic flash function. The flashes fire so fast that it effectively turns the flash into a very powerful flashlight that lights up for about a second at a time.
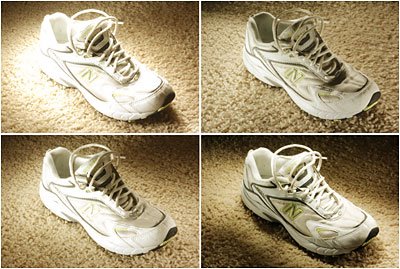
What I wanted to do was to very quickly test this modeling light function to see if it would work for light painting a small object. So I shot a tennis shoe in the dark at f/11 for 30 secs at ASA 200 and played with the strobe, aiming it at the sneaker and firing bursts from a variety of directions during the 30-sec exposures.
The goal here is not to make a great photo. It was to quickly test a "proof-of-concept" to confirm that the flash could be used as a light source for light painting small objects.
I made four frames in about 5 minutes, refining my technique every time. They are represented by the four-shot montage at top. They are in order -1, 2 are at the top; 3, 4 are on the bottom. The first shot was overexposed because (1) I was working without a meter, and (2) a meter would not have been very helpful anyway, given the number of variables in a moving lightsource time exposure.
The idea is to get it reasonably close, and then quickly zero in on what you want.
By the time I had shot fourth frame, I was confident that I could get a nice photo out of the technique by using the SB-800 as a light painting wand. It's surprisingly easy to get a cool, 3-d type of look with just the one small lightsource.
So I put my gear away and began the more difficult process of convincing my 5-year-old that taking a bath would actually be in his best interest for the evening.
(That's rather like presenting an argument before the Supreme Court.)
Getting the technique down enough to prove it will work left me with figuring out just what look I want for the final food shot, and how I will go about getting it.
Which is what I am thinking about right now.
Always think of a big problem as a series of easily solvable smaller problems. Just crank through the little issues, one by one, and the photos will fall into place.
I can't wait to play with the technique at length. And I will post the food picture after it is shot and published.
Next: Shiny, Pretty Things
__________
New to Strobist? Start here | Or jump right to Lighting 101
My new book: The Traveling Photograher's Manifesto
Permalink
<< Home