
Lighting 102 - 3.1 Balancing Light: Twilight
 For the available-light photographer, the idea of exposure is a fairly simple and static concept.
 There is a correct exposure for a given ambient light scene. Sure, you can tweak it, say, half a stop up or down. But go much beyond that, and you move beyond "artistic license" to "I screwed up."
But what is the correct exposure when your photo can have as many different zones of varying light levels as you have flashes? The correct exposure is what you say it is. And you say it by establishing a zone of (traditionally) correct exposure on your main subject using the flash.
If you are looking for a touchstone in this process, that's it. Establishing a correct exposure on your primary subject allows you to do whatever you want with the exposure levels in the rest of the frame. And you can go far beyond the "correct exposure" range of an ambient-only, evenly lit scene. And look like you knew what you were doing.
In short, "screwed up" becomes "artistic license" when you have established an exposure reference point with your light on your main subject. (More after the jump.)
To really understand the concept of balancing light, many of you will have to expand your concept of a so-called proper exposure. After all, you are creating a scene that has precisely the tonal range that you want it to. You can use this ability to compress the tonal range of a photo, or to expand it. It's up to you.
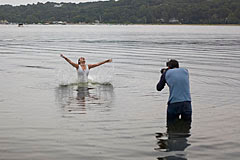 Take this scene photo which includes long-time Strobist reader Ryan Brenizer. Exposing for the model, the sky is washed out. Exposing for the sky, the model would be too dark.
 But with flash, you can expose correctly for both. By adjusting the shutter speed and aperture to get exactly the desired tone in the sky and then filling the model with flash sufficient to raise her exposure to the aperture you happen to be using, you get this:
 In addition to turning the water into diamonds with his flash, Ryan has compressed the tonal range of this scene to where everything fits in the histogram rather nicely, thank you.
So, is Ryan shooting at the correct exposure? Yes. Or no, depending on exactly how he wants the background to look.
Ryan shot this photo at 1/250th at f/3.2 at ASA 160. He could easily open his shutter speed up to, say, 1/125 and lighten the background. Or, he could up the power on his flash by a stop, close his aperture down a stop (to f/5.0 - a partial stop between f/4.0 and f/5.6) and reset his shutter to 250th to darken the background.
How does that work? Let's look more closely.
The background is lit by ambient light. It is controlled by a combination of the aperture and the shutter speed. The model is exposed by the flash. (She would be significantly underexposed without the flash.) So as long as the model is receiving the correct amount of light from the flash, the background can be placed at whatever tone the photographer wants.
What if Ryan cranked up the power on his flash 2 and 1/3 stops to where it lit the model to f/8? (He would then set his aperture to f/8 to correctly expose her.)
But what about the shutter speed? The new shutter speed to get the same effect on the background would be 1/50th of a second. (We simply open up the shutter 2 1/3 stops to neutralize the fact that we closed down the aperture 2 1/3 stops.) Thus, the exposure on the background has not changed.
We did this step to get away from our 1/250th of a second sync speed, and give us some "playing around" room with the shutter speed.
So now, imagine you are Ryan, wading in the water, shooting at 1/50th at f/8 and getting the same tones as we see above. Now, say you drop the shutter to 1/100th. What happens?
Model lady does not change. She wants f/8 from the flash and that is what she is getting. But the background gets one stop darker. You have just increased the contrast range of the photo. Darker, moodier and looking completely different. And I'm thinking those water diamonds are really popping now.
Drop the shutter down to 1/200th. Darker still -- but not black yet. Completely different feel to this photo than with the other two.
Which is correct? They all are -- just different. "Correct" is determined by the exposure on the model -- and that is set by the flash (and choosing the corresponding aperture that makes her look well-exposed.)
But the sky? That's up to you. Airy, normal, moody, black -- it's all good. And it is all available to you.
What you have is two different photos -- each with its own exposure -- being compressed into one scene. There is a flash exposure, which happens instantaneously and is controlled with the aperture. Then you have an ambient exposure which happens over time and is controlled by a combination of the aperture and the shutter speed.
_____________________
Now, You Do it
Our first light balancing exercise will be very similar to Ryan's setup, except that you will probably stay dry and you probably won't have a beautiful model to work with. (If you want to stick a gorgeous model into the water to do this, knock yourself out.)
Drag a partner out to an area where you have a fairly low horizon and a view of the western sky. Go out at about sunset and wait for the twilight sky to meter (continuous light level) at your sync speed (probably a 250th) at f/5.6 at a reasonable ASA (ASA 200 or 400.)
Now shoot a photo of your model using the correctly exposed twilight sky as a backdrop. He/she will be too dark.
Next, light your subject with a flash so that he/she is correctly exposed at f/5.6. You can do this with hard or soft light, on-camera or off-camera light -- I don't care. We are working on balancing light here.
Shoot a few frames of your subject this way. Talk with them. Tell them how good they look. Show them the images on the back of the camera. You are doing this to (a) build rapport and (b) to keep them around for a few more minutes.
Pretty soon the twilight background will drop to 1/125. Adjust your shutter and keep shooting. Next it'll go to 1/60th. Adjust your shutter and keep shooting.
 But now, also shoot some frames at 1/125, to underexpose the background by a stop. And try a few at 1/250th to underexpose by two stops. You should see a very different feel in these photos, but they should all look okay, as does the underexposed sky in this photo, by Jonathan Shears.
When the background drops to 1/30th instead of opening up the shutter to compensate, turn the power on your flash down by one stop. (If you were shooting at 1/4 power, move to 1/8.) Now, instead of opening up from 1/60th at f/5/6 to 1/30th at f/5.6, you're opening to 1/60 at f/4 and adjusting your flash to compensate. This buys you more shooting time before you get into the "Hail Mary" range of shutter speeds.
The next time the sky drops another stop in exposure, power down your flash another stop and move to f/2.8. if this sounds difficult, it is not. Try it.
As your light drops lower still, keep opening up your shutter. Play with different speeds to see the effect on the background. But remember to choose the correct aperture to expose your subject correctly with the flash.
You will soon have too little light to focus. But before that happens, you'll have a lot of cool photos, with a range of background looks.
If you want to post some, tag them:
Strobist
Lighting102
Balance
Twilight
You can see the tagged photos here. If you would like to talk about it, I have set up a thread here.
There's lots more coming on the light balancing front, so no need to get fancy yet. Next week, we'll be looking at how to do this kind of thing in full daylight.
________________________
Related post:
:: On Assignment: Custom Backdrops Delivered Daily ::
NEXT: Crosslight: Balancing With the Sun
__________
New to Strobist? Start here | Or jump right to Lighting 101
Now available in audiobook: The Traveling Photograher's Manifesto
Permalink
<< Home