Upgrade Your Rims
Rim lights and key lights might start out the same, but they end up behaving very differently. That's because the key light hits your subject and bounces back in a scattered, diffuse way. Not so with a rim light, which typically caroms off of your subject at a very efficient angle. Which means a little bit of light, used as a rim, goes a very, very long way.
Have you every dropped your rim intensity down -- waaaay down -- to see what happens?
You might like the results.
__________

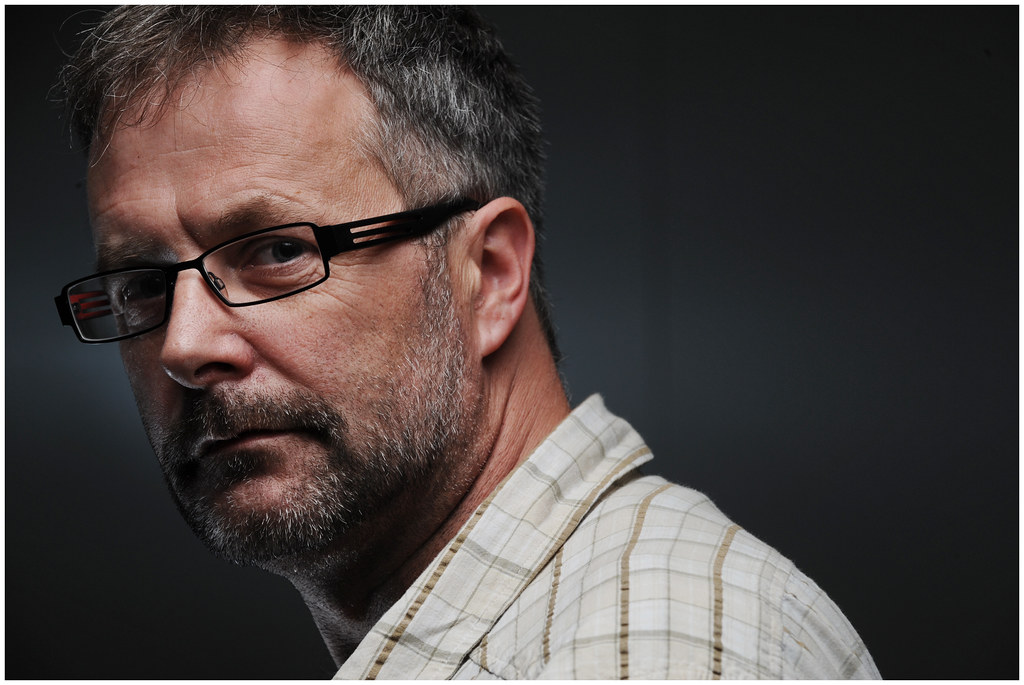
Here is a detail of the relevant area of the photo above, or you can see it larger, here (photo opens in a new window or tab).
See how the rim is not so much blasting off of Monty's (pictured) skin as it is creating cool, three-dimensional detail? That is because it is dialed way down from where we typically set them.
Another example, for this photo of Jordan we left a little more intensity in the rims than we did for Monty, above. Still, check out these numbers for an idea of just how little light is used:The rims in this case are courtesy two SB-800s in Lumiquest SB-III's, three feet away. The flashes are set to 1/64th power. And we shot at f/10 at ISO 200.
You figure the SB-III eats two stops of light, so that is the equivalent of 1/256th power and still shooting at f/10. That's a teeny weeny amount of light. (Click the pic for bigger.)
To finish off the light, we keyed his face with an SB-800 in a tight grid, with an Orbis for on-axis fill.
Size Matters
If you like this look, there are a couple of things to remember if you are trying to get it. First off, this kind of rim is not a job for a bare speedlight. Those are very small (in area) light sources. And even dialed way down you'll get a very sharp line to the rim light -affected area.
It helps if you have a little transition area in your rim. A little -- but not too much.
A soft box or strip light is probably gonna look a little wishy-washy use it for this. The sweet spot, if you are working in close, is to have something that approximates a normal reflector's size on a big light.
So with a speedlight (that's what we used) you might want to run it through a Lumiquest SB-III, a Honl traveller8 or even an (off-camera) Orbis, as we did here in a pinch.
Anything that softens your light a little bit will work. The particular mod is not so important as increasing the size of the bare light into something in the ~8-10" range. Not too hard, not too soft -- just right.
How Low Can You Go?
And if you do happen to be using a big light, good luck on getting it down low enough. (Well, at least without some serious neutral density stacked onto the head.) This kind of thing takes sooo little light that you may even have trouble coaxing your speedlight down low enough.
So much so, in fact, that you might want to set the rim lights first (with flashes dialed down as much as possible) and adjust your aperture until it looks right. Then build your other lights to hit that exposure. This is bottom-of-the-range stuff.
Rim lights are cool in that they look good at almost any intensity, Different, but good.
I think of rims as being a little like pizza: When they are good, they're good. But when they are bad -- well, they're still pretty good.
And if you like the ultra-low-power rim look -- 3-D and textural and unlike anything else you'll get with a rim in the normal power range -- give it a whirl. This kind of rim is worth a spin.
__________
New to Strobist, or lighting? Start here.
Now shipping, in DVD box set or download: Lighting in Layers
Connect: Discussion Threads | Reader Photos | Twitter


38 Comments:
Great post David, very informative! I'm going to try to incorporate it into my next shoot!
Anything that softens the light just a little bit? Like, say... a Strobella?
You are super correct, using rim light is much more effective, I need way less power from my sb-9s to do sequences like this-> http://www.flickr.com/photos/zgriswoldphoto/4545650481/ where as if I want to fill the body I have to use a higher power setting, which either raises my iso, or lengthens the recycle time.
Great tip once again - thx.
Thanks. That first portrait is very appealing, can you give us the setup for it?
Great idea - a typical 'must-try' thing for any amateurs like me, thanks for the post!
(Also good shot of Monty - though i'd say to this pic he looks a bit 'Jack-Bauer-like' with this rim light in his right eye and on the darker side of his face - his look just emphasizes this :-))
A stupid question / idea on doing this with 'big' flash dial-down: what if just using the continuous set-up light instead of the much stronger flash-bulb for this kind of shot?
Can it work?
Thanks, David, for another excellent post that helps us fine tune our lighting techniques.
Hi David,
I've been a fan of the high power rims for a while now but have never considered the use of a low power glance.
Until now.
Cheers for the food for thought. I have a client to shoot in the next few weeks that I think will include this method in my lighting/shooting plan...
This subdued (if you'll allow me to call it that) look from the low-powered rim light/s looks really dramatic. I will give it a whirl, sir.
Thanks, David.
WOO FIRST POST!
But seriously, just thought i'd say that reading your blog has helped me to think so much more about what i'm doing with my camera in any situation. I'm 2nd year at uni with 2 weeks to exams and mostly all i think about is wanting to try new shots. Thank you
I'm loving the look this creates. I gotta try this.
I personally love to add rims to a photo to add some instant intensity. The work of Joel Grimes (www.joelgrimes.com) is an excellent example of how dramatic a simple three light setup (two rims and fill) can be.
"I think of rims as being a little like pizza: When they are good, they're good. But when they are bad -- well, they're still pretty good."
So true!
Thanks so much for the help and inspiration.
Great post Mr Hobby. I have a question however (if you spot this).
You said that your rims were 3 feet away. So if you find yourself with a bit too much power what would happen if you just moved them a bit further away to kill off some of it. Do they need to be in close for this look? What about moving them back and using a slightly larger softbox (say 24", which I have a few of ;) ).
Thanks...
Hi Mr. H: I took some set up shots of the London picture if you are interested: I emailed them to you a week or so back if you are interested in them... wasn't sure what your view of atendees publicly posting pictures taken at your commercial teaching session... so wouldn't do so without your say so. It's your game so should be your rules !
Great day: thank you !
Very cool post and some great shots! I also like your B&W conversions.
I love using rim lights but have not thought to dial them down so low. This will be a cool thing to try on my next shoot.
Thanks for the tips!
Excellent technique, cant wait to try it as soon as I get home from work today.
Jaimie,
That should work if you increase the size of the softbox relative to the distance the light moves away from the subject. Close lights = big lights. Thanks for a great post and an example of a no-glare glasses shot.
Thanks for a great post. It just nails it. Question from a learner: What's the bonus of the gridded sb? wouldn't the ring had been enough?
Thanks again for sharing and being so inspiring!
Perfect timing for a shoot I'm doing tomorrow!
Hey, if you're using something like a Lumiquest III, and you needed to dial down the power even more (without moving them back), you could always get out the gaffer tape, and mimic a true "strip" shape while you're at it.
How did you find lens flare, David?
I love using rim lights, and have recently been kinda nuking them a little. It's a phase I'm going through, but I can definitely see the benefit of ramping them way down. Another great use for the Lumi III too.
I use a rim light in most of my work, but I like it very strong. In fact I find it pleasing to me when it is almost brighter than the key. you can see a lot of examples on my blog, and the most recent one is unique because I also had to pull dark material out of a dark background.
www.lightshootedit.com
So, the rim should be a soft source, about 8", and it doesn't need to be uber-efficient? Sounds like shooting an sb through a sheet of regular printer paper would so just the job as long as you manage the spill...
First off, let me say that this site has been a huge inspiration for me and has greatly improved my photography in the 6 months or so that I've been shooting. I owe you a huge debt of gratitude.
I think I stumbled onto something like this by accident. Since getting inspired by this site, I've been trying out some two-speedlight setups lately and took this shot: http://stephencaissiephoto.daportfolio.com/gallery/196394
The way I got the little bit of rim light was by having an SB-800 aimed at the wall behind him to camera left, but with the out-of-the-box diffuser on it, which allowed just a little light to spill over onto his face. He ended up moving over to camera left, which meant that I lost the effect of the light on the wall behind him, but I'm actually not upset by that.
I appreciate the super informative post, but I do have a question.
Do you use a gobo on the softened rim lights? If so, what kind of equipment do you use to make this happen?
-Will
Great posting, David! One thought--your comment "A soft box or strip light is probably gonna look a little wishy-washy use it for this" immediately brought to mind this photo that used strip lights, and is anything but wishy-washy:
http://strobist.blogspot.com/2008/07/rembrandt-lighting-um-no.html
In fact, I found it instantly by searching on your memorable phrase "went straight to Badass." :)
I think the key thing here, as Jaimie and Steve discussed, is that those strip lights must be a bit farther away than your Lumiquest, bringing back their relative size to something comparable, and allowing for more power. And, FWIW, Blair Bunting obviously nuked those rims quite a bit more...your post was about dialing them back for more subtlety.
Keep up the great work!
Hi
Nice thing, looks good, but please, tell me, how to use light meter to get such result? Often times I work on film, and I need to meter all my lights, how to meter that "dark" rims?
thanks
Jack
@JohnM-
Click on the small pic. Setup shots on Flickr.
@Andy-
Absolutely, if you were working in an otherwise-dark environment.
@Jamie-
I'm David. My dad is Mr, Hobby. And yes, you could burn power by adding distance.
@Jonathan-
Ixnay on the Istermay ObbyHay. :) Thanks for the setups -- way behind on email and working that down now. Always cool to add setup shots from group events to the comments on the Flickr pic. THanks!
@Emmanuel -
The ring was a base fill. The gridded key focused some full-exposure light on his eyes and face only.
@JS-
Yes, I tape my LQ SB-III's up a lot to get tiny strips. Maybe should post on that...
@Paul-
Yep, that'd work.
@Will-
Nay, I let 'em spill over. They were enough out of the frame so was not a problem.
@Gary-
Exactly. Blair was working a little further back, so his lights look smaller to the subject. I was working in close -- strips would have not given me the effect I wanted.
Here's an example of a nuked-with-rim-light portrait:
http://www.flickr.com/photos/levycarneiro/4144428707
While I like the general look of this picture, now I would rather have shot it with a very low power. It's way more classy :)
I guess it's something one learns with practice and the wonderful advice from you, Mr. Strobist.
Thanks a lot!
Levy
Whats up with the line to the left side of the face in the BG?
@Derek-
There is an SB on the back wall to create a little interest/variance. I do that a lot to break up even tones on the BG.
Thanks David. I love this. You're an amazing mentor to those who are ready to learn, including myself!!!!
Really enjoying this lighting style, I had a go at reverse engineering these shots since they were posted on Flickr so its nice to see a full post on them. Would you only use this technique for 'cool, edgy, dramatic' light, or do think it has other uses? It's great for making someone look like a badass punk, but how about other portrait styles?
i absolutely love this shot David.
I had to flickr mail Monty to ask him about the details because I could not wait for the write up.
the subtle rim and the hint of separation in the BG is pure quality.
Sorry David, I must be a dumbo, I click on the small image and just get the image on flikr, but no setup explanation.........
Great post, love the outcome!
I do have to say though, not all pizza is created equal, I've had good bad pizza, and then I've had BAD bad pizza. I think our goal as photographers is to make sure we make, at the very least, the good bad pizza, if not the great good pizza. OK, now I'm hungry...
Inspired by the recommendation for small softboxes for rimlighting (e.g., Honl Traveller8), I set off to my local home improvement store and found a plastic gutter funnel that works PERFECTLY as a 3x9-inch rectangular "box" for the Nikon SB800. I added a ripstop nylon sock and the diffusion is just right...used about 3-feet from subject... Suh-weet! Thanks for the idea! Details of construction, setup, and sample images on my blog today at:
http://jchphotography.wordpress.com/2010/06/07/mini-striplight-softboxes-for-the-nikon-sb-800-flash/
Thanks David. I learn something new every time I visit... (several times a day!)
Jon
You can also use a reflector for this even though it would usually be rather large. I used to have a silver reflector pointing back towards the person and a regular white reflector as a... regular reflector.
Jeff
Post a Comment
<< Home