
Cheap, Powerful On-Axis Fill

Here's a quick little tip for the next time you find yourself in need of a little impromptu on-axis fill and you do not have a ring light: Use a direct speedlight instead.
It's small, hand-holdable -- and very powerful. The trick is getting it off of top of the camera, and even closer to the lens.
__________
On-Camera vs. On-Axis
The problem with on-camera flash is that the flash is mounted in possibly the very worst position possible. It's too close to the lens to offer any real shape, and yet far enough away that it leaves gnarly shadows under the chin of your subject.
But if you get it right next to the lens, everything changes. That's why your point & shoot sometimes makes some pretty glam-looking direct flash photos. Because the flash is about an inch from the lens.
Compare that to a typical DSLR, where the direct flash head can be ~6 inches from the lens and you see the difference. Pop-up flashes on DSLRs are better than shoe-mounted flashes for this reason, too (example here.) But right next to the lens -- as in touching it -- is best.
The trick is knowing where to position it (i.e., where on the clock face) around the lens. Here is how I hold it when filling another light, and why:

I put it on the exact opposite side as the direction of my key, and right next to the lens. I usually just hand-hold it, but I am actually thinking of building a little bracket that would do the same thing and allow me to position the flash on either side of the lens.
Here is the thinking: The fill is gonna be a couple stops down, so the tiny (almost non-existent) shadows created would appear on the side of the subject getting the key light. So the key light (at full exposure) will easily erase them.
The shot at top (of opera singer Rolando Sanz) is filled in this way. And it's almost hard to tell the fill is there, until you see the photo without it:
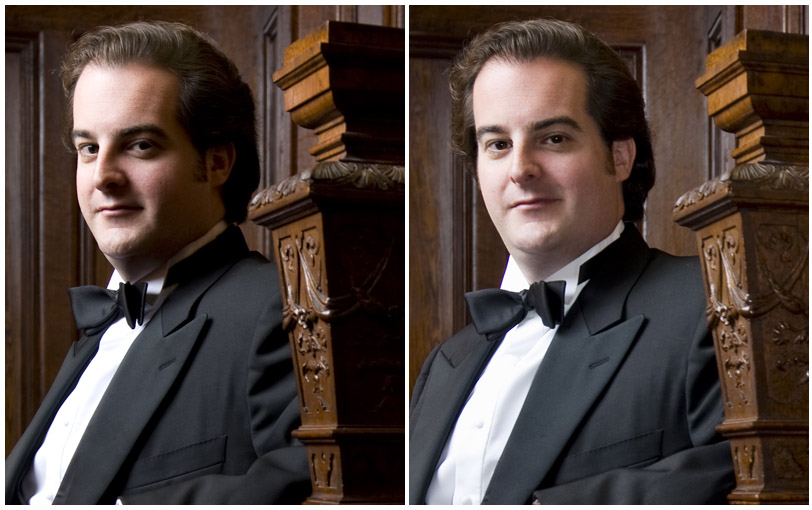
You can make it as subtle as you want, obviously. I usually just do it by eye -- dial it in until I like it. Take this fill down another stop and the photo would look completely different. Not better or worse -- just different.
Power to Burn
Say you are working outside with a big mono (or some ganged speedlights) as a key. You are underexposing the ambient by a good stop, with the sun coming from behind. That key is lighting your subject from one side, but leaving pitch black shadows on the other side.
A speedlight, fired direct, only has to fill your subject to about two stops down -- three, if you're a badass and/or if your publication medium can handle the subtlety. That is not asking a whole lot out of a small flash. Firing direct (zoomed, even,) any speedlight can handle that in full sun out to a distance of a dozen feet or more. Go ahead -- try it.
But that little kiss of light in the key light's shadows will give you depth and detail and more control over your subject. And right up against the camera, the sliver of a shadow it would have created will be wiped away by the key light.
Syncing Options
When shooting inside, I usually remote the key and slave the fill. Having a speedlight with a built-in slave is a godsend for this. But if you are outside, you may well need to remote them both depending on the position of the lights.
If your key light has a slave, it is simpler yet. Use an off-camera cord (as shown in the diagram above) for the fill light and slave the key. As a rule, I generally do not buy a flash unless it has a built-in slave -- a good one -- just for this flexibility. (More on slaves coming next week.)
So the next time you are shooting an off-camera flash-against-sunset photo, stick a little direct flash right up against that lens on the opposite side, dial it down two or three stops, and see if that doesn't give you a more nuanced look -- no fancy modifiers needed, and with power to burn.
__________
New to Strobist? Start here | Or jump right to Lighting 101
Now available in audiobook: The Traveling Photograher's Manifesto
Permalink
<< Home