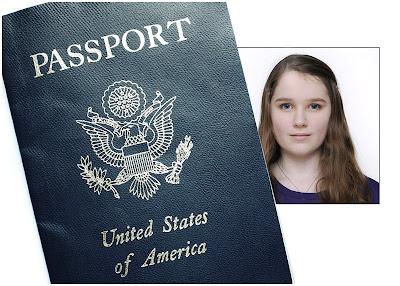
How to Look Great on Your Passport

Fact: most people on the planet—including roughly two-thirds of Americans—do not have a passport.
Without a passport, you won't be traveling internationally any time soon. And even if you have no immediate travel plans, just having a passport is kinda like having a muscle car at a red light. You won't always squeal tires when the light turns green, but you know you could.
If you have never held a passport before, it's a neat feeling when it arrives in the mail. For perhaps the first time, you feel like a citizen of the world. Merely having the possibility of international travel is better than not having a passport and being guaranteed you can't go.
Even better, unlike your crappy driver's license or student I.D. mugshot, your passport photo is something you can control. So if you are gonna be a jet-set traveler, you may as well look good doing it.
__________
Details Matter
First off, don't screw up. Make sure you follow the rules so your photo won't be rejected. The official rules for U.S. passport photos are here. If you are from another country, make sure you check that country's rules. For instance, Canada is pretty hardass: it needs to have a guarantor, and they have a thing about ... ears.
For the US, it is mostly it is common sense stuff: Look straight ahead, shoot without glasses if possible (makes things easier for us, too) no smiles, sizing requirements, etc. But be sure to check the rules.
How To Take an Awesome Passport Photo
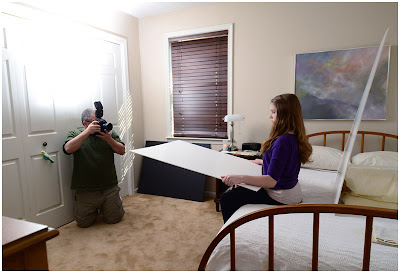
To do this you'll need a camera, a light source and two pieces of white poster board. If you can get 30x40 inch board (or foam core) that will work better than the smaller stuff. Here's my simple setup:

I used an on-camera flash, rotated and pointed at the white ceiling and closet door above/behind me. But you could just as easily use a north-light, (i.e., open shade) window as your light source behind the camera. If you don't have a shade window, drape a white sheet over a sun-filled window. It'll look great.
For window light users: since most windows are at eye level, you'll get better results if you both sit down in front of the window. This will get the light source higher relative to your subject. If you are using bounced flash, angle it up and behind you as shown for the same reason. If your flash does not swivel to aim behind the camera, aim it straight up into a white ceiling. The bounce card (more on that below) will fill in the shadows.
As you can see, we have used one of the poster boards as a backdrop, and another as a subject-held fill card. You may find it helpful to recruit someone to hold the poster board backdrop. Or you can just stack some pillows as I did.
If using a window I'd shoot at a wide open aperture (or reasonably close to it) at 400 ISO to get a decent shutter speed. If you are using a flash, shoot at your sync speed (1/250th or 1/200th) at a middle aperture (say, f/5.6) and adjust your flash exposure as you normally would. This will control any weird ambient light and allow you to craft your look with just the light from your flash.
Whether using flash or window light, if you are shooting in any kind of automatic mode that white board is going to fool the camera and make it want to underexpose a little bit. Adjust your exposure compensation accordingly. (For instance, try adding +⅔ to +1 stop compensation.) That should get you pretty close. If using manual, simply adjust your flash's power setting until it the subject looks well-exposed.
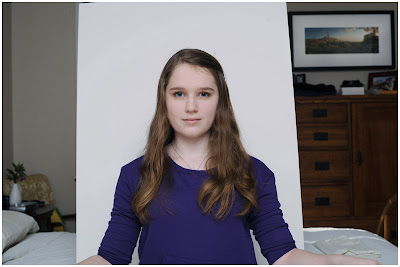
Here's how it looks from the front—and make sure to shoot it this loose so you can crop it correctly for the sizing requirements later:

The fill card is important. It's the secret sauce that works with the main light and turns this from a passport/DMV-style mugshot to a pretty nice nice head shot. (I shouldn't say mug shot, I guess. These days, some police departments are actually pretty good portraitists.)
Have your subject hold and adjust the fill card until the shadows on their neck and eyes fill in a bit and look great. It's easy, because you can check your results as you go when shooting digital. The angle will be something close to what is shown above.
This is a simple way to get clamshell light, which is commonly used for beauty shots. Trust me, you'll look way better than you would had you gone to the drug store or post office for the photo. But again, remember to give yourself enough room to crop it down to a 2x2 headshot with the appropriate framing.
Allowing for Sizing Rules
Physically, your shot will end up being a 2x2" photo. But be sure to check your country's relative sizing requirements. In the US, it says:
Your head should be between 1 inch and 1-3/8 inches (between 25 and 35 mm) from the bottom of your chin to the top of your hair. If you are submitting a digital image, then your head should be between 50% and 69% of the image's total height from the top of the head, including the hair, to the bottom of the chin.
They quantify things to keep you from doing something stupid. But it'll end up being a basic square headshot, reasonably framed. Just remember that the top of the hair to the bottom of the chin should take up half to two-thirds of the image height. And seriously, follow the rules.
Don't Forget the Most Important Part
If you are going to the trouble to set this up (and it really is very little trouble) don't shortchange yourself. Take lots of photos. Yes, there are rules (horizontally centered, facing camera, neutral expression, both eyes open, etc.). But unlike at the drug store, you get more than one chance to look great.
So take plenty of photos. You can't smile, but you can look confident. You won't look so great when you arrive in Istanbul on an overnight redeye flight, but your passport photo can look awesome.
Don't choose a frame where you look like a smartass (they may well reject it) but choose one where you look good. Sit up straight. Fix those chins. Smile with your eyes. Aim for a shot that makes you look and feel like the savvy world traveler you will one day be—but doesn't invite an interrogation at the border.
How to Prep Your Picture for Use as a Passport Photo
If shooting direct to output (i.e., no image handling software such as LightRoom or Photoshop) you'll have to pay close attention to your sizing and framing in-camera. But it you normally tweak/crop/etc. your digital images before printing, it's pretty simple to do that in this case.
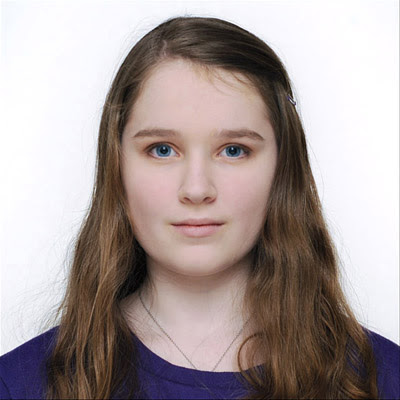
Basically, you'll adjust the tones in your image handling program until it looks right and crop it to exactly 2 inches x 2 inches, like this:

If you are really picky you can then add a one-point black line in Photoshop (or whatever) for a cutting guide. So later, when you cut that line away you are left with a perfect size and straight edges. Either way, then expand your canvas to your final print size (either 3.5x5 or 4x6) like this so it will size perfectly when you get your print made:

And depending on how many copies you need, you can arrange 2x2 photo 1-, 2-, 4-, or 6-up on a 4x6 print.
Remember, this photo will be used for not only visual identification but biometric facial recognition, etc. So don't pull out the liquify filter to shave a few pounds or anything like that. They say no digital alteration in the requirements. If you have a temporary, north-star pimple on your forehead and you do not want to immortalize it, that's probably okay (and how would they know.) But I wouldn't do anything else other then levels, curves and color correction.
Twenty cents or so later at the local drugstore, you're all set. Make sure you get the same size print (3.5x5 or 4x6) as you sized your canvas for, so your proportions won't be off.
__________
Head Shots 101
If you are just now getting ideas about how well you could do head shots with just a window and two pieces of poster board, welcome to the centuries-old north-light studio club. Your fill card should be white, but your background can be anything.
Having done these easy-bake passport photos, I am already experimenting with on-camera flash (I know, I know) head shots and using my entire hallway as a lighting mod. More on that soon.
Until then, maybe I'll see you in the international terminal at the airport.
From: Strobist Lighting Cookbook
__________
New to Strobist? Start here | Or jump right to Lighting 101
My new book: The Traveling Photograher's Manifesto
Permalink
<< Home