On Assignment: Radiance

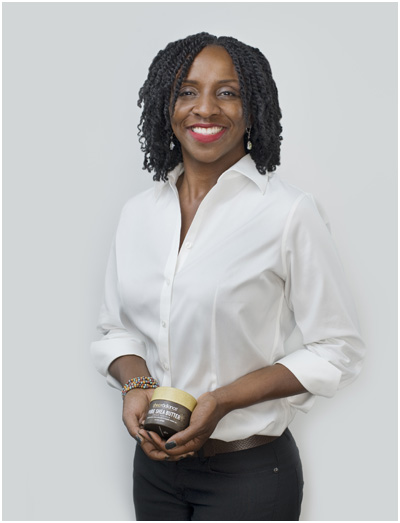
"What should I wear?" asked Funlayo Alabi when we were touching base the day before I was to photograph her for the Howard County EDA.
"A white shirt if you have one," I said, wanting to distill the photo and feature her skin given she that she runs a boutique beauty products company.
Twenty years ago I might have said, "anything but white." But the more you work with lighting, the easier it is for you to control not only the contrast range but also the specific tone of a person's skin.
Even darker skin against a white shirt.
__________
Funlayo is a cofounder at Shea Radiance, which specializes in fair-trade shea butter products between the US and women from her native Nigeria. I love that the compass point for the company is as praiseworthy as are their products. I wish everything I bought had this kind of beneficial upstream result:
As for their traditionally prepared shea butter, I can't really speak to it. The only thing I rub onto my skin is the occasional barbecue sauce, and that is usually by accident.
But upon trying this stuff, my wife and daughter both reviewed it thusly: OMG.
Clicking on the Shea Radiance about page lands you at one of the first stops I hit while researching Funlayo before the shoot. By happenstance, the top shot of her is taken at the company's front door which is in open shade. As a result, her face is bathed in a large, indirect light source. So the reflections of the light source are in play.
Scroll down a bit and you'll see her in different light, direct-flashed (small light source) along with her husband Shola. The difference between the two is all down to light. The size and closeness of the light source — and the relative fill — both work together to create the tonal range of her skin in the photos.
Any time you light a three-dimensional object, the light will interact with it and produce three zones of reference. The area the light is hitting is called the diffused highlight. Exposed correctly, the object will return its true tonal value.
The area where the light is not falling is the shadow area (duh) and it will be darker. The reflection of the light source as seen in the object is called a specular highlight. (You can learn more about this in Lighting 102.)
Relatively speaking, and for lack of a better analogy, I'll go with a musical parallel. After all, there is a lot of crossover between music and lighting.)
So let's think of the shadows the bass, the diffused highlight as the midrange and the specular highlights as the treble. When lighting dark skin against a white context, I usually minimize the shadows and play more in the midrange and treble parts of the scale.
Just like with a piano and music, the result is that you shift the entire apparent tonal range upward, allowing it to easily fit well within your chip's sensitivity range. Even in the context of a white shirt and white background.
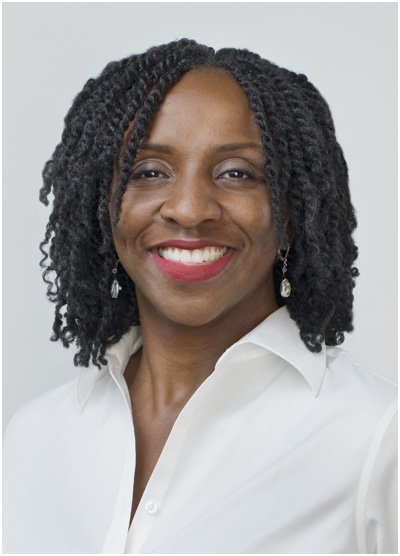
This is not an exposure thing, it is a specular management thing. Let's look more closely. Here is a zoomed-in version of the above photo:

As you can see, there are no deep shadows. The darkest area under her chin is still getting some fill from an on-axis light.
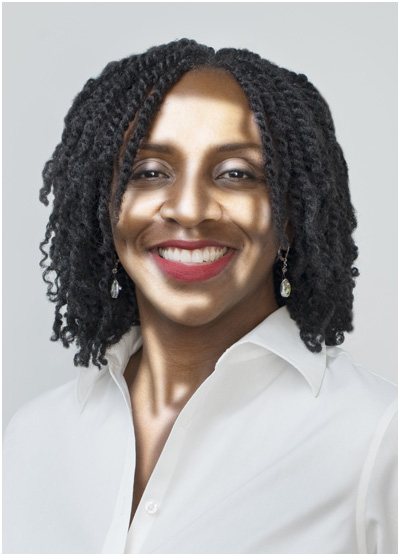
Her skin's radiance, to use a convenient word, is all about the speculars. And they are big and pretty much everywhere. Let's lasso them and bring them up (even if it temporarily results in an alien version of Funlayo) to emphasis the different zones:

This kind of stuff is important to us lighting geeks. The majority of the face is actually in specular highlight. It's almost as if the diffused highlight is the new shadow. But it's not — we have just shifted the whole tonal scale up while preserving detail in the white shirt and backdrop.
Interestingly, the specular is so wide that Funlayo's hair is actually interrupting it on the sides of her face. That is creating what looks like a shadow but is in fact just a missing specular highlight. In other words, it is an area of properly exposed diffused highlight. I.e., her true tonality.
It looks like a shadow, but is really a reflection of her hair in her skin which is in this case acting as a mirror of sorts.
__________

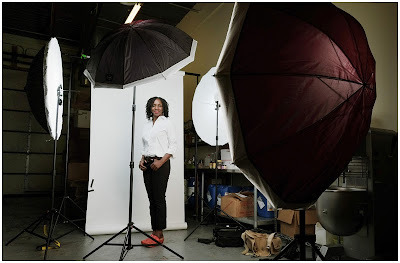
To create those huge, wide specular zones I am pretty much wrapping her with diffuse light, as you can see above. Note: this is from the same set but we have swapped the key from camera right (in the pics) to camera left (in the BTS). Just so no one is confused.
This is all speedlights — one inside each diffused umbrella, to be exact. The diffusion panels on the lights (Photek Softlighters in the front, Paul Buff PLMs on the sides) are important as they both even out the light and give it an edge to be able to control.
If you look at the side lights, they are tilted a little towards the camera to keep them from influencing the backdrop. I need that shadow to separate her, given the white vs. white.
The side/back lights are also wrapping speculars around her black hair, which would not have had nearly the visible texture and detail without them. Again, speculars as tonal shift.
And the amount of which you want to do this is both arbitrary and very controllable. It is all about apparent light source size (how big the source "looks" to the subject) which in this case is about light-to-subject distance.
As you bring them closer, the speculars will get bigger and the same light will get spread out over a bigger specular. Thus will each specular appear dimmer per square inch. Total control.
And to be sure, you might well choose to do it differently. It's really an arbitrary choice; there is no true right or wrong.
__________
So, just a little lighting sleight-of-hand to manage and compress the tonal range and reflections. After all, skin is the subtext of this photo and radiance is the word of the day.
__________
New to Strobist? Start here | Or jump right to Lighting 101
My new book: The Traveling Photograher's Manifesto
Permalink
<< Home