Lighting 103: Use Color to Evoke Time and Place
Abstract: It can be scary to add a lot of color to your light. But it's easy to underestimate how much color it takes to transform a scene and set a mood. Don't be shy. Those gels won't bite.
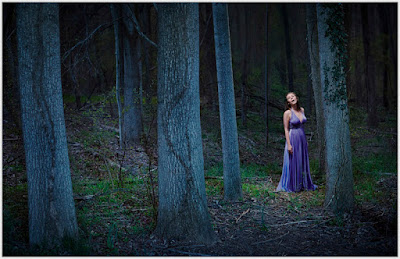
This nighttime portrait of soprano Alexandra Rodrick was a big step for me. It was made about five years ago, when I was just starting to realize how color-fluid real light could be. I kinda knew it, but I still didn't have the nerve to actually do it.
So I took a deep breath and threw way more blue into the environment than I normally would. And not only did I come out alive on the other side, but I ended up pretty happy.
__________
I prevsiouly wrote in more detail about how we made the photo in On Assignment. It's a two-part post, if you're interested. So I won't fully rehash that here.
We wanted to evoke nighttime, but you can't really shoot this photo at night. Especially with the PhaseOne camera I shot this with. (You can see a full-sized version here.) The Phase effectively maxes out at ISO 100, and we wanted to get some depth and detail going way back into the scene. So we shot at twilight, and underexposed the ambient before adding three light sources into the mix.
Looking back, this photo was big leap forward for me. I took a chance and pushed a lot of CTB into the scene—full CTB, to be exact. We had to move the lights way back to light the scene evenly. In fact, here's my fill light coming from my second floor dining room, here:
Before this point, I would have weenied around with a 1/2 CTB, or even a 1/4 CTB.
The result would have been very much muted. Safer, maybe. But not nearly as evocative.
This is the first time I had really tried to connote the feeling of full night in a photo and actually had been willing to push some real color. Am I fully happy with it now? Not totally, and more on that in a minute.
But my advice is, while it is very tempting to try partial/interim color shifts, do yourself a favor and experiment with pushing some real color density into your frame. You may be pleasantly surprised at the result.
In the past I tried lesser color densities and ended up with pictures that were okay, but didn't really live up to what I pictured in my mind's eye. (Fortunately, no one else had access to my mind's eye, so my comparative failures were private affairs.)
What I am learning going forward is that the 1/4- and 1/2-measure color shifts come across as subtle in the final image. In fact, in many cases they would only be noticeable in their absence via side-by-side comparison.
And that subtlety is actually pretty cool and useful. Because as we have seen with portraiture, you can define what is in shadow with color as much as you can with density.
Think about it. By using a 1/2 CTB (maybe with a little green in there) in the shadows of a portrait against a 1/2 CTO key light in the highlights, you are defining shadows with color as much as you are with light levels.
This means you can not only get a more evocative palette of light on your subject, but you can vastly expand the range of visible detail in your photo. Because it is the color of light that is informing you in the shadow, rather than a harsher underexposure—and a corresponding lack of detail.
Our brain reads that relatively subtle blue shift also as signaling the transition to shadow. So if you are going to shift a whole scene to evoke a time and place—night in the woods, for instance—you'd better be willing to bring more color density to the party.
Don't be shy. Take a chance. You can always back off if you don't like it.
What I Would Do Differently Now
Back to Alexandra, I look at this frame and see that I was being relatively couragious (for me, then) in some parts of the photo, and a weenie in other parts.
Let's talk about the light on her face, courtesy a 1/4 CTO'd speedlight in a China ball.
Yes, it separates from all that blue night woodsy light. But why is it warm? I told myself at the time that it felt more theatrical (warm spotlight in cool environment and all). But really, it was also me long being comfortable throwing a warm light at my subject's face.
If I were shooting this today, I'd be more looking to integrate that key light into the scene. Less spotlight, more moonlight. As if she was catching a moon ray in the clearing.
I'd probably start with a 1/4 CTB. Cool her down, but as much as the night woods. After all, moonlight is just reflected daylight.
And to that 1/4 CTB, I might consider adding a little green. Maybe 1/4 PlusGreen? Dunno, until I try it. But the idea would be to blend the moonlight with the influence of the green grass and leaves that would be filtering/reflecting it.
Would it be scary to try? Yeah, a little. I'm not used to blue-green faces in my photos. Not even a little bit. But it wouldn't be nearly as scary now as it would have been for me back in 2012.
And to be honest, 2017 me thinks the slight blue-green face would look better. Which is the point of taking chances with your light, finding new things that work and the result being growth as a photographer.
NEXT: Learning From Your Couch

This nighttime portrait of soprano Alexandra Rodrick was a big step for me. It was made about five years ago, when I was just starting to realize how color-fluid real light could be. I kinda knew it, but I still didn't have the nerve to actually do it.
So I took a deep breath and threw way more blue into the environment than I normally would. And not only did I come out alive on the other side, but I ended up pretty happy.
__________
I prevsiouly wrote in more detail about how we made the photo in On Assignment. It's a two-part post, if you're interested. So I won't fully rehash that here.
We wanted to evoke nighttime, but you can't really shoot this photo at night. Especially with the PhaseOne camera I shot this with. (You can see a full-sized version here.) The Phase effectively maxes out at ISO 100, and we wanted to get some depth and detail going way back into the scene. So we shot at twilight, and underexposed the ambient before adding three light sources into the mix.
Looking back, this photo was big leap forward for me. I took a chance and pushed a lot of CTB into the scene—full CTB, to be exact. We had to move the lights way back to light the scene evenly. In fact, here's my fill light coming from my second floor dining room, here:

Before this point, I would have weenied around with a 1/2 CTB, or even a 1/4 CTB.
The result would have been very much muted. Safer, maybe. But not nearly as evocative.
This is the first time I had really tried to connote the feeling of full night in a photo and actually had been willing to push some real color. Am I fully happy with it now? Not totally, and more on that in a minute.
But my advice is, while it is very tempting to try partial/interim color shifts, do yourself a favor and experiment with pushing some real color density into your frame. You may be pleasantly surprised at the result.
In the past I tried lesser color densities and ended up with pictures that were okay, but didn't really live up to what I pictured in my mind's eye. (Fortunately, no one else had access to my mind's eye, so my comparative failures were private affairs.)
What I am learning going forward is that the 1/4- and 1/2-measure color shifts come across as subtle in the final image. In fact, in many cases they would only be noticeable in their absence via side-by-side comparison.
And that subtlety is actually pretty cool and useful. Because as we have seen with portraiture, you can define what is in shadow with color as much as you can with density.
Think about it. By using a 1/2 CTB (maybe with a little green in there) in the shadows of a portrait against a 1/2 CTO key light in the highlights, you are defining shadows with color as much as you are with light levels.
This means you can not only get a more evocative palette of light on your subject, but you can vastly expand the range of visible detail in your photo. Because it is the color of light that is informing you in the shadow, rather than a harsher underexposure—and a corresponding lack of detail.
Our brain reads that relatively subtle blue shift also as signaling the transition to shadow. So if you are going to shift a whole scene to evoke a time and place—night in the woods, for instance—you'd better be willing to bring more color density to the party.
Don't be shy. Take a chance. You can always back off if you don't like it.
What I Would Do Differently Now
Back to Alexandra, I look at this frame and see that I was being relatively couragious (for me, then) in some parts of the photo, and a weenie in other parts.
Let's talk about the light on her face, courtesy a 1/4 CTO'd speedlight in a China ball.
Yes, it separates from all that blue night woodsy light. But why is it warm? I told myself at the time that it felt more theatrical (warm spotlight in cool environment and all). But really, it was also me long being comfortable throwing a warm light at my subject's face.
If I were shooting this today, I'd be more looking to integrate that key light into the scene. Less spotlight, more moonlight. As if she was catching a moon ray in the clearing.
I'd probably start with a 1/4 CTB. Cool her down, but as much as the night woods. After all, moonlight is just reflected daylight.
And to that 1/4 CTB, I might consider adding a little green. Maybe 1/4 PlusGreen? Dunno, until I try it. But the idea would be to blend the moonlight with the influence of the green grass and leaves that would be filtering/reflecting it.
Would it be scary to try? Yeah, a little. I'm not used to blue-green faces in my photos. Not even a little bit. But it wouldn't be nearly as scary now as it would have been for me back in 2012.
And to be honest, 2017 me thinks the slight blue-green face would look better. Which is the point of taking chances with your light, finding new things that work and the result being growth as a photographer.
NEXT: Learning From Your Couch
__________
New to Strobist? Start here | Or jump right to Lighting 101
My new book: The Traveling Photograher's Manifesto
Permalink
<< Home