SLC-0L-05: Lighting's Gateway Drug
Quick, guess the lighting.
If you said two lights, and use of high-speed sync to get the shallow depth of field, that's a pretty good guess.
If you said zero lights and a rigid high-efficiency reflector, that's an even better (and correct) guess.
When working with an inexperienced assistant — or looking to introduce someone to the world of off-camera lighting — a rigid/high-efficiency reflector is a fantastic and inexpensive place to start.
_______________
As photographers we (and I include myself in this statement) can easily get hung up in the gear it takes to make a photo. But often, less/simpler is more/better. And never is this more true than when working with someone who is new to the game.
For example, take this senior portrait of one of my neighbors, Eric, above, who is navigating his very weird COVID senior year at our local high school.
I recently did both this photo and a family portrait for them. And while I lit the family portrait, it seemed both better and more efficient to just use a reflector on the single shot of Eric.
Assuming you can shoot when the sun is at a lowish angle (wintertime for the win here) reflectors can often work better than flashes. This is true for several reasons.
One, you can shoot at any aperture. Two, recycle time is instantaneous. And three, it's super easy to transport and set up your gear.
First, a caveat. What we are talking about here is a stiff, high-efficiency reflector. Not the floppy potato chip flex-fill reflectors. My go-to for the collapsible version of this is a Sunbounce Sun-Mover, in silver. It's similar to a typical collapsible reflector, but with one big difference: the internal spring/frame is super strong. So when it pops open is it more akin to a drum head than to a Pringle potato chip.
Normal reflectors bounce the sun back in a diffuse sort of way. Rigid reflectors, given the right reflective surface, move the sun more like a somewhat fuzzy mirror.
Fortunately, you can also easily and cheaply make this type of a reflector, also known as a "Brooklyn reflector," at home. The main thing is you want it to be rigid and highly reflective. Because the control and efficiency give you lots of options and range. Mind you, the DIY version is not collapsible. But it is super cheap.
What I love most about this type of reflector as a main light source is that it is immediately apparent to any assistant, experienced or not, how to use it. You just put them where you want them, and tell them to point the reflector at the sun. Then rotate the reflector towards your subject until they see the face light up.
"Grab the light, move it to the subject."
Simple as that. In this case, my lighting tech du jour is Susan, Eric's mom. Here's a pullback, showing her relative location to me and to the sun:
 |
As you can see, when I move back up closer in my regular shooting position I am also using the reflector to block the sun from adding flare to my photo — another added benefit. Crisp color and contrast galore.
Susan, a total newb as an assistant at the beginning of the shoot, immediately got it. She was even amenable to lighting tweaks (i.e., "Give me a little more light on the far eye," etc.)
By the end of the quick shoot, she was ready to go on the road as an assistant.
So we are not using flash, and the assistant is a total rookie. Nonetheless, the photo looks both lit and polished. Reflectors generally tend to punch above their weight.
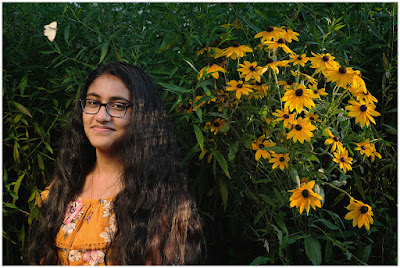
The photo is of Debbie D., a fellow high schooler and volunteer at the Conservancy. The portrait works as-is; the cabbage moth fluttering by kicks it up a notch.
As a young photographer, Azka also immediately got the value of the reflector in practice. The ambient light for this photo is near sunset, coming in from hard camera-right. So your first thought might be to use the direct sunlight as a key. But with the reflector you can use the sunlight to give the flowers and plants more texture, then reflect it back to use as a crosslit key.
Azka is a budding young photographer, with a phone as her only camera. Which means that practically speaking, the use of flash is not available to her. But a reflector fill board nonetheless opens up a new world of control to her photos.
After finishing this shoot, she went home and immediately made her own DIY version. I am looking forward to see what she does with it. She shoots a lot of macro shots — bugs, flowers and the like. So lighting-on-the-cheap opens up possibilities for her as even an unassisted photographer — phone in one hand, reflector in the other.
If you have kids that you think might be interested in upping their iPhone photography game, a high-efficiency reflector is a great place to start. It's much easier to learn and to use than portable flash. And the former is a natural gateway drug for the latter.
This article was published as an entry in the Strobist Lighting Cookbook. New articles and how-to's appear monthly. To receive notifications for new posts, you can follow via email or via Instagram.
__________
New to Strobist? Start here | Or jump right to Lighting 101
My new book: The Traveling Photograher's Manifesto
Permalink


<< Home