Lacrosse Head Shot: v2.0

This week's cover shoot featured a lacrosse player in a helmet, and the strip lights were just the ticket to get some light up in there in a controllable way.
Additionally, this assignment is a good example of being flexible while shooting a pre-conceived shot. So I want to go through the shot process in a fair amount of detail.
Each feature assignment offers a full-page cover and a large inside photo that runs with the story. So we know just what kind of play we are going to get, and can plan the shots accordingly.
That tends to lead to a decent amount of preconception on my part, as I usually do not have a lot of time and want to be able to pull off both shots without spending too much time with on-site planning.
So, with several ideas floating around in my head, I arrived at the high school to shoot the cover. The pre-conceived ideas all involved using lights in an action shot on the field. Alas, I arrived just in time for the afternoon showers. Which nixed all of the on-field light ideas right away.
A hastily arranged "plan B" was to shoot him in a small portico that was very dark, except for an orange-ish sodium vapor security light up and to camera right. The background was a shade-lit brick wall in the distance.
I threw an 80-200/2.8, which is my bread-and-butter portrait lens, on a D2h and set up in the portico.
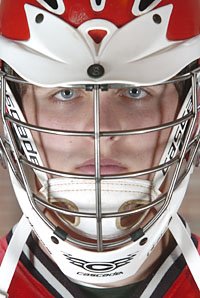
 For the first attempt, I positioned two Nikon SB-26's on manual (in the strip lights) oriented vertically. I quickly saw that including the lacrosse stick ruined the symmetry of the picture. So we lost the stick right away.
The lights got up under the helmet, but looked better when lowered and shot at an upward angle into his face. I exposed the ambient for the brick wall (in back) at 1/250th, to get my easiest aperture for the flash to balance. He was heavily shaded by the portico, so the flashes were lighting a relatively darkened subject, which made the two different planes very easy to control.
Next, the flashes were balanced with the ambient background, which put me at 1/4 power (on manual.)
Everything fit, exposure-wise. But I did not like the bricks being so literal in the background.
 The easy solution was to crop in some. I am a big advocate of getting anything out of your photo that does not help it.
This worked, but I didn't like losing the context and lines of the full helmet. And the background was in the same color family as the guy's school colors, so it seemed a shame to waste it.
 The portico was dark enough to allow me to open the shutter on the background with little foreground effect, so I opened up to 1/30th to abstract the bricks a little.
I could see that I was getting closer, but still no cigar. I liked the colors, but I did not like the idea of an easily identifiable brick wall background in an iconic head shot.
 So I started jerking the camera left to right as I shot. This brought the expected odd looks from the subject. But after I explained that I was doing it for effect (and not having a seizure) he understood.
Closer, but not there yet.
The next change was to try to zoom the lens during the exposure instead of jerking it.
That worked, and produced the photo you saw up top. It connoted motion, and made the bricks an abstract design that kept the school color scheme.
 Here is the lighting set-up, shot static at 1/250th.
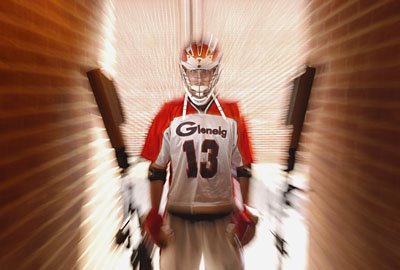 And here is the same tell-all shot with the shutter opened up, and with a "zoom pull" during the exposure. Note that I went from wide-to-tele while zooming. Also, you'll want to start a little too wide, and be in the process of zooming while you press the shutter.
Total time to set up lights was about 5 mins. Total time to complete the shoot after that was another 4 mins.
When you are working with small, light equipment that needs no A/C power, you really can do something cool in next to no time.
I am happy with this shot for a few reasons.
First, I liked the idea of pulling together a "plan B" when the rain came.
Second, I like the progression of keeping what was good and changing what was bad about the photo on a quick, real-time basis.
Third, I love the dual strip reflection on the face mask. Takes a problem with lit helmet shots and turns it into an asset. Look almost gladatorial, if that's a word.
Room for improvement? Yup. Always is.
On a do-over, I would have worked his expression a little, to go with the dynamic lighting theme.
I might have warmed the flashes up a little with a 1/2 CTO, too. Just personal preference. I warmed his face up a tad in Photoshop for the final. But this is one of those shots where you could have gone a little over-the-top with the gels.
So, that's it. All over but the commenting. Questions? Answers? Rants?
Fire at will.
Next: Free Custom Backdrops: Using Flash into a Sunset
__________
New to Strobist? Start here | Or jump right to Lighting 101
My new book: The Traveling Photograher's Manifesto
Permalink
<< Home