
DIY Macro Strip Lights
UPDATE: Here are these macro strip lights in action, used on a sports section cover shoot.
__________
 I am batting around an idea for a pretty cool illustration. It's a macro shot, and it involves some fairly tricky lighting. I could give you more detail, but then I'd have to kill you.
Since I haven't shot (much less had published in the paper) the illustration, I can't really throw the idea or photo out here yet. My kids do so enjoy eating, and you guys don't pay squat. So the paper still makes the rules. And Rule Numero Uno is that it runs in The Sun before it shows up on Strobist.
But that's not to say that I can't do a little thinking out loud on the problem-solving process. And this shot sure has plenty of problems to solve. Here is my take on one of those problems.
I am going to light it on three planes. And the light from each plane will need to be kept from spilling onto the other planes.
To that end, I need light for the bottom/sides of the subject that will wrap around it horizontally, yet not spill up towards the top vertically.
I need a light that is hard (and "featherable") in the vertical direction, yet soft in the horizontal direction. In short, I need a tiny little strip light.
At times like this I call the entire Strobist R&D team into action, with orders to spare no expense in the creation of this one-off (actually, two-off) lighting tool.
Thus, only the finest cardboard (that I can find in my closet) and gaffer's tape was used. Not trying to impress you here, but the budget for a custom lighting tool such as this can run upwards of forty to fifty cents.
Hey, good light ain't free.
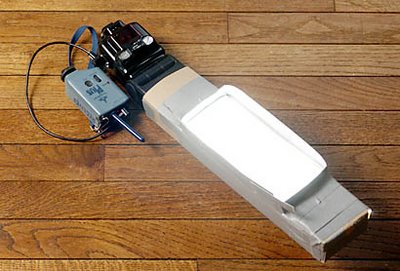
 All kidding aside, what we have here is basically a set of modified cardboard snoots. I made them out of a shirt box (used, of course) a sheet of typing paper and some gaffer's tape.
I made them "inside out" so that that shiny white cardboard side of the shirt box would be on the inside, to bounce the light around more efficiently.
I basically made a set of rectangular snoot-type tubes and closed off one end of each tube (to keep the light from spilling out.) Then I cut a rectangular window in each, and covered that with a sheet of typing paper to act as a diffuser.
A little tape was used to hold the thing together. This was the last of my grey gaffer's tape - I'm getting black next time.
The tape ridges on the side are my best approximation of what I will need in terms of light spill control. This will likely be adjusted and/or augmented while I am shooting.
I like doing macro stuff because it is easy to make whatever kind or shape of light source you need on the fly, for next to no money.
Oh, and remembering that I am going to orient these things horizontally, I would point out that that is a really crappy thing to do to a hot shoe mount. And we are trying to keep those little buggars from breaking, remember?
The solution is to not use the hot shoes to mount the flash. I will likely bend them to about a 45-degree angle and bungee them to a light stand, using the interior angle of the bend to hold it to the stand with the ball bungee. I'll do pix of the set up with the time comes, and blog it when the story runs.
Now to solve my next problem: Making the object appear to float in mid-air...
__________
 I am batting around an idea for a pretty cool illustration. It's a macro shot, and it involves some fairly tricky lighting. I could give you more detail, but then I'd have to kill you.
Since I haven't shot (much less had published in the paper) the illustration, I can't really throw the idea or photo out here yet. My kids do so enjoy eating, and you guys don't pay squat. So the paper still makes the rules. And Rule Numero Uno is that it runs in The Sun before it shows up on Strobist.
But that's not to say that I can't do a little thinking out loud on the problem-solving process. And this shot sure has plenty of problems to solve. Here is my take on one of those problems.
I am going to light it on three planes. And the light from each plane will need to be kept from spilling onto the other planes.
To that end, I need light for the bottom/sides of the subject that will wrap around it horizontally, yet not spill up towards the top vertically.
I need a light that is hard (and "featherable") in the vertical direction, yet soft in the horizontal direction. In short, I need a tiny little strip light.
At times like this I call the entire Strobist R&D team into action, with orders to spare no expense in the creation of this one-off (actually, two-off) lighting tool.
Thus, only the finest cardboard (that I can find in my closet) and gaffer's tape was used. Not trying to impress you here, but the budget for a custom lighting tool such as this can run upwards of forty to fifty cents.
Hey, good light ain't free.
 All kidding aside, what we have here is basically a set of modified cardboard snoots. I made them out of a shirt box (used, of course) a sheet of typing paper and some gaffer's tape.
 I made them "inside out" so that that shiny white cardboard side of the shirt box would be on the inside, to bounce the light around more efficiently.
I basically made a set of rectangular snoot-type tubes and closed off one end of each tube (to keep the light from spilling out.) Then I cut a rectangular window in each, and covered that with a sheet of typing paper to act as a diffuser.
A little tape was used to hold the thing together. This was the last of my grey gaffer's tape - I'm getting black next time.
The tape ridges on the side are my best approximation of what I will need in terms of light spill control. This will likely be adjusted and/or augmented while I am shooting.
I like doing macro stuff because it is easy to make whatever kind or shape of light source you need on the fly, for next to no money.
Oh, and remembering that I am going to orient these things horizontally, I would point out that that is a really crappy thing to do to a hot shoe mount. And we are trying to keep those little buggars from breaking, remember?
The solution is to not use the hot shoes to mount the flash. I will likely bend them to about a 45-degree angle and bungee them to a light stand, using the interior angle of the bend to hold it to the stand with the ball bungee. I'll do pix of the set up with the time comes, and blog it when the story runs.
Now to solve my next problem: Making the object appear to float in mid-air...
__________
New to Strobist? Start here | Or jump right to Lighting 101
Now available in audiobook: The Traveling Photograher's Manifesto
Permalink
<< Home