
Lighting 101: Hard Light
Abstract: You don't always have to make soft light! Hard light can be cool, too. Just get the light away from your camera.
So, we have spent a decent amount of time on soft light modifiers. Soft light generally comes from physically large sources or modifiers—think umbrellas, walls, overhead clouds, etc. But hard lights—which come from small sources—can look really cool, too. It's just that hard flash gets a bad rap because of how mad it looks when mounted right on top of your camera.
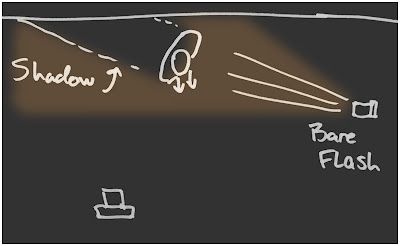
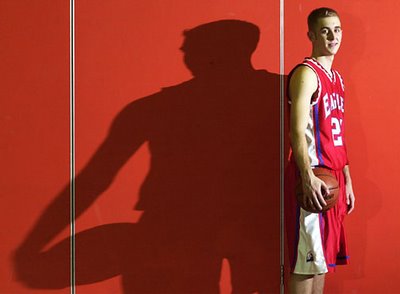
Take the quickie portrait I did of the basketball player, above, done for my newspaper. I have the flash off of the camera, way over to the right. This creates a shadow that I then used as a graphic element in the photo. Still just the one flash, just in a different location.
Mind you, this photo would have looked pretty bad if my flash were mounted on the camera. But it would not have been the hardness of the light, but rather the location that did the damage.
After 25+ years as a lighting photographer, hard light is to me far more interesting than soft light. Especially when you are able to use multiple hard light sources. Take this product shot for instance:
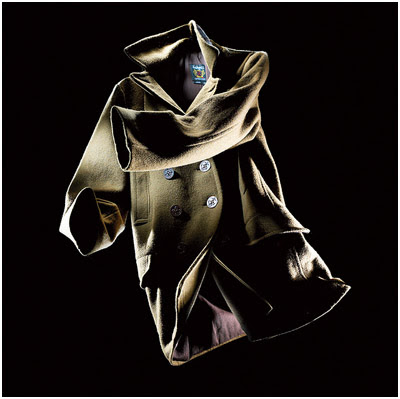
(Photo by Strobist reader Danny Bird)
This product shot looks completely different (and, to my eye, more interesting) for having been shot with hard light sources. They sculpt the jacket and reveal form and texture. Let's look at another:
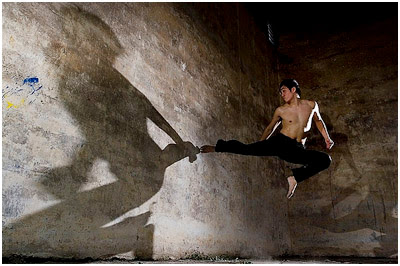
(Photo by Strobist reader Christopher Tan)
And just as in the photo up top, this photo uses a subject and a wall, but more than one hard light. (For details, click the photo.) The hard lights combine to partially reveal and sculpt the subject. And they are far more appropriate than would be a soft, portrait-looking umbrella or the like.
Often the key to success with your hard light images is to control the lighting ratio (i.e., relative levels of brightness) between the lights and shadows. Think of that hard shadow created by the hard light in the photo up top. It is harsh and abrupt, but not completely black. I can still see detail in the shadows, such as in the wall and on the shadow side of his face.
I like to think of a hard shadow as the equivalent of the light abruptly falling off of a ledge. To briefly press the ledge analogy: The depth of that ledge you just fell off of is the difference an interesting experience and, well, a fatal one. It's not about the ledge. It's about the depth.
If you want to dip your toe in the hard light water, try balancing your flash close to the ambient (i.e., normal continuous) light level. The fact that the hard shadows will have good detail in them will lessen the chances of getting a bad result with hard light. But the edgy effect will still be there.
__________
Okay, so we have looked at soft light (umbrellas, wall-bouncing, etc.) and hard light. But we are still just lighting with our flash. Did you know you can mix your flash with the continuous, ambient light in your environment?
Let's learn how to do that!
Next: Balancing Flash and Ambient, Pt. 1

So, we have spent a decent amount of time on soft light modifiers. Soft light generally comes from physically large sources or modifiers—think umbrellas, walls, overhead clouds, etc. But hard lights—which come from small sources—can look really cool, too. It's just that hard flash gets a bad rap because of how mad it looks when mounted right on top of your camera.

Take the quickie portrait I did of the basketball player, above, done for my newspaper. I have the flash off of the camera, way over to the right. This creates a shadow that I then used as a graphic element in the photo. Still just the one flash, just in a different location.
Mind you, this photo would have looked pretty bad if my flash were mounted on the camera. But it would not have been the hardness of the light, but rather the location that did the damage.
After 25+ years as a lighting photographer, hard light is to me far more interesting than soft light. Especially when you are able to use multiple hard light sources. Take this product shot for instance:
(Photo by Strobist reader Danny Bird)
This product shot looks completely different (and, to my eye, more interesting) for having been shot with hard light sources. They sculpt the jacket and reveal form and texture. Let's look at another:
(Photo by Strobist reader Christopher Tan)
And just as in the photo up top, this photo uses a subject and a wall, but more than one hard light. (For details, click the photo.) The hard lights combine to partially reveal and sculpt the subject. And they are far more appropriate than would be a soft, portrait-looking umbrella or the like.
Often the key to success with your hard light images is to control the lighting ratio (i.e., relative levels of brightness) between the lights and shadows. Think of that hard shadow created by the hard light in the photo up top. It is harsh and abrupt, but not completely black. I can still see detail in the shadows, such as in the wall and on the shadow side of his face.
I like to think of a hard shadow as the equivalent of the light abruptly falling off of a ledge. To briefly press the ledge analogy: The depth of that ledge you just fell off of is the difference an interesting experience and, well, a fatal one. It's not about the ledge. It's about the depth.
If you want to dip your toe in the hard light water, try balancing your flash close to the ambient (i.e., normal continuous) light level. The fact that the hard shadows will have good detail in them will lessen the chances of getting a bad result with hard light. But the edgy effect will still be there.
__________
Okay, so we have looked at soft light (umbrellas, wall-bouncing, etc.) and hard light. But we are still just lighting with our flash. Did you know you can mix your flash with the continuous, ambient light in your environment?
Let's learn how to do that!
Next: Balancing Flash and Ambient, Pt. 1
__________
New to Strobist? Start here | Or jump right to Lighting 101
Now available in audiobook: The Traveling Photograher's Manifesto
Permalink
<< Home