
Lighting 101: Textural Lighting for Detail Shots
Abstract: When you light it at the right angle, pretty much everything is three-dimensional. Even a piece of paper.
 This is one technique I like to use when I am looking for one or two more photos to glean from an assignment.
Designers appreciate the flexibility of being able to use a well-done detail shot in a layout, and you will sometimes be surprised by how well they are used. This is especially the case when they have strong relevance to the story or are executed particularly well.
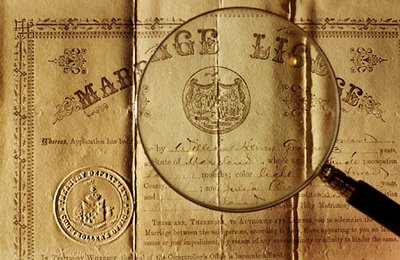
The key is adding depth and texture to what may be a boring, two-dimensional object. To do this, you'll be placing the item somewhere so that you can get the strobe to exectly the same height to let the hard light rake across your object. You can use a table, or you can simply set the item on a floor and place the flash on the floor a few feet away.

By far, your biggest variable will be the height of the flash to your object. Nail this variable down first. Little moves make big differences n the way a seemingly two-dimensional object expresses its true three-dimensionality. For that reason (and more flexibility) I sometimes like to use a table to get the subject I am shooting off of the ground (and place the flash on a nearby light stand. That way I can control the relative angle and height very precisely.
 You'll be surprised at how much texture you can bring out in a "2-D" object this way.
Move the flash away a little. You have power to burn - you are shooting with direct, hard light - so there is no sense in getting light fall-off if you do not want it.
Use a warming gel to mimic late-day light if you wish. Place books strategically between your light and the objects to create interesting shadows.
(If you do this, consider having the light come in from the direction of on of the corners of your frame. That makes for more interesting compositional lines.)
Actually, I use this "single plane" kind of lighting for more three-dimensional objects, too. You can get more complex with it, adding multiple light sources and pieces of paper to diffuse the light:

As with anything else related to lighting, the only limit is your imagination and creativity.
Are you a freelance editorial shooter? This table-top (or floor) lighting is a technique that can quickly quickly boost your income.
Most assignments are billed on a day-rate-against-space basis, meaning you get paid more if they run more pictures. Page designers love adding detail shots to layouts. You'll be surprised how often spending 5 minutes on making a nice one can net you another hundred bucks on the day.
Next: Lighting 101: Cross Lighting
 This is one technique I like to use when I am looking for one or two more photos to glean from an assignment.
 Designers appreciate the flexibility of being able to use a well-done detail shot in a layout, and you will sometimes be surprised by how well they are used. This is especially the case when they have strong relevance to the story or are executed particularly well.
The key is adding depth and texture to what may be a boring, two-dimensional object. To do this, you'll be placing the item somewhere so that you can get the strobe to exectly the same height to let the hard light rake across your object. You can use a table, or you can simply set the item on a floor and place the flash on the floor a few feet away.

By far, your biggest variable will be the height of the flash to your object. Nail this variable down first. Little moves make big differences n the way a seemingly two-dimensional object expresses its true three-dimensionality. For that reason (and more flexibility) I sometimes like to use a table to get the subject I am shooting off of the ground (and place the flash on a nearby light stand. That way I can control the relative angle and height very precisely.
 You'll be surprised at how much texture you can bring out in a "2-D" object this way.
Move the flash away a little. You have power to burn - you are shooting with direct, hard light - so there is no sense in getting light fall-off if you do not want it.
Use a warming gel to mimic late-day light if you wish. Place books strategically between your light and the objects to create interesting shadows.
(If you do this, consider having the light come in from the direction of on of the corners of your frame. That makes for more interesting compositional lines.)
Actually, I use this "single plane" kind of lighting for more three-dimensional objects, too. You can get more complex with it, adding multiple light sources and pieces of paper to diffuse the light:

As with anything else related to lighting, the only limit is your imagination and creativity.
Are you a freelance editorial shooter? This table-top (or floor) lighting is a technique that can quickly quickly boost your income.
Most assignments are billed on a day-rate-against-space basis, meaning you get paid more if they run more pictures. Page designers love adding detail shots to layouts. You'll be surprised how often spending 5 minutes on making a nice one can net you another hundred bucks on the day.
Next: Lighting 101: Cross Lighting
__________
New to Strobist? Start here | Or jump right to Lighting 101
Now available in audiobook: The Traveling Photograher's Manifesto
Permalink
<< Home