On Assignment: Michael in Paris
During the shooting portion of last month's seminar I decided to use only found backdrops (i.e., walls, tables, a cool piece of wooden art, etc.) instead of using any of the brought-in items that we had available. The room had some neat angles, and several possibilities, so why not take advantage of them?The first one, of attendee Michael, touches on a few points that we have talked about lately. The shot is a good example of lighting on two planes, gelling a backdrop for added color, and using a diffuser to alter the beam of a flash. So I thought I would write it up and expand on the concepts a bit.
(More after the jump.)
Shooting in front of a roomful of people is always a different experience than doing an assignment with just myself and the
Our room in Paris was full of neat opportunities. The first one to catch my eye was a little interior alcove at the doorway. By overpowering the ambient, I could make the room dark. Then, it would be an easy matter to separately light up the two zones I wanted: The alcove and Michael.
During lunch I placed a speedlight in the alcove. To this I added a CTO gel and a bare bulb diffuser (a Sto-fen, in this case.) The former was to amp the already-warm color of the alcove. The latter was to make the light from the flash cover the entire alcove from within it.
I almost never (well, never, actually) use a Sto-fen diffuser on camera. They suck up light, and only really help if you are in very tight quarters with properly white walls and ceilings. But they are great for making a poor man's bare bulb flash.
This turns the flash into essentially an open light bulb, reaching out in all directions. With the CTO gel added, it was even more like a real light bulb, as it was tungsten-colored.
What was the setting? I honestly can't remember. And it really isn't important.
What is important is that I used my hand to shield the flash from being visible and popped a test frame to adjust my camera to the working aperture. Then it would just be a matter of adjusting the strength of the light on Michael to balance with that.This wide test shot was taken at f/4 at a 500th. So, I knew I would be working at or near f/4 for the portrait. Easy.
So I brought Michael in and stuck an umbrella near him -- very near, actually -- and adjusted the output of the flash to work at my already-chosen aperture. In the end, I darkened he doorway background a little by shifting down to f/5, but that was just a subjective choice. By altering my foreground flash and compensating with my aperture, I could make the BG tone whatever I wanted it to be without walking back there.
For the top photo, I also opened up my shutter some to better capture some of the ambient light, which was also tungsten. I like the spotlight bulbs up there. Kind of a my-favorite-martian thing.
For reference, here is a frame when the alcove light did not fire. (The flash was asleep.) Using this as an example, you can see how the front light is not influencing the background at all. So the two areas are completely controllable, as they are lit on two planes.Because of that, I could really have made the alcove any color I wanted it to be.
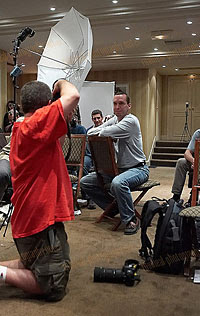
Here is a wideangle setup shot, by Rui M. Leal. You can see just how close the shoot-through umbrella is to Michael. This accomplishes three things:• Maximizes the power efficiency of the light source.
• Creates a huge, soft light.
• Makes Michael's light fall off long before it contaminates the background.
This is a quickie, no-big-deal, ten-minute portrait -- including setup. It's the kind of thing you can do almost anywhere with just a couple of small flashes, anytime you want.
NEXT: Eke in Paris
__________
Brand new to Strobist, or lighting? Start here.
Or, jump right into our free Lighting 101 course.
Connect: Discussion Threads | Reader Photos | Twitter


21 Comments:
This post, between Rui's setup shot and the actual final photo, reminds me of how astounded I was when I first realized how things in the real picture are nothing like what you actually see, when using strobes. It was then that I became an avid reader of Strobist.
As a new Strobist reader I am re-learning everything I learned in school. You sir, are a much better communicator and teacher. Thanks for walking through how this picture was created on a detailed level.
very interesting post - good to see how you work, think, set-up, etc
thanks for sharing
(btw. that should be "In the end, I darkened "t"he doorway background a little by shifting down to f/5" )
I like the way you make things about flashlight photography easy. It doesn't only look easy, but when you practice it, it becomes easy and second nature.
Since following your blog, my flash photography improved dramatically and my wife gets more used to become the guinea pig for any new techniques that I learn... :-) She still keeps on smiling.
When are you planning to do a weekend seminar in Cape Town?
Thanks for this interesting and insightful post! I sometimes catch myself forgetting the little details which make a portrait really stand out.
(Unfortunately I couldn't attend the Paris seminar)
Tip:Quick method to learn aperture, shutterspeed for newbies.
My first Digital Camera was a Canon Powershot G3, 4 years ago. When the LCD display stopped working I in essence lost the ability to preview images.
This was good !
Why ? Because it meant I had to think a bit more about what I was doing. ( Until I could find a place that offered a repair )
So if you really want to learn....
SWITCH THE LCD OFF
Adjust one variable at a time, say take three four shots of the same setup and vary the aperture.
What do you expect to see occur ?
( Aperture affects flash and ambient )
Then download the images and look at them. Go over what happened :
'Less ambient here because ...'
'more flash here because ...'
Repeat this exercise and you'll find it helps you remember.
This is especially useful for those of us who were not togs in the dark, sorry film-ages. ;-)
You film guys are lucky as you had to really think, consequently its in your thought process.
Great post, thanks! I am slowly beginning to see how you manipulate light to take something mundane and make it dramatic. I really need to sit down with my SB-800 manual and learn to control that darned thing, I can see that for sure!
Please tell us when the DVD will be available David!
Paul
Thanks for the break down David. I saw this photo last Saturday and really liked the use of the background. I used my wicked crazy reverse flash engineering skills I learned here to create my own version. My portrait was a three part blend: 1. mixture of your background 2nd plane lighting. 2. Do to its lack of interest I used Bert Stephani's method of throwing it out of focus to make more interesting or less distracting (may have failed this part?) 3. The flash setup from the specular highlight control portrait work.
Photo
David,
there is something I don't understand. I read somewhere that the eye is drawn to the warmer colors. Wouldn't it make a lot more sense to turn the background color into something cooler and have the subject warm(ish).
With the warm background the colors looks like what you get with a straight ungelled flash, WB set to flash and the background lit by tungsten with a slow shutter speed.
Cheers,
Peter S
I'm glad to see you ressurect the "on assignment" series, Dave. It's what hooked me on the Strobist site to begin with, and it's a very effective way of sharing your knowledge. More, please!
I disagree with Rams. You SHOULD use your LCD. It helps you learn as you go. You can see immediate results and make corrections accordingly. If you don't use it you better write down what you did for each frame so you can learn from your mistake.
Better to learn on the fly than to go back and try to figure out what it was you did wrong.
I like the way these posts make me think a bit harder. For example - I'm at work right now, in a "breakout area" that has some nice big windows and comfortable furniture - I bring the laptop in to get away from the cube.
After reading this (and seeing the wide angle shot of what the room looked like David was shooting in), I immediately started scanning MY room, wondering what I could do in the same situation. It's amazing how multiple backdrops materialize out of nowhere when you hit the mode-switch on your brain to "creative foward thinking"...
Thanks for the insight, Hobby.
Nice little tutorial. It demonstrates some key concepts very well. Love the blog. Keep it coming.
What camera are you using to sync at 1/500th?
Cheers
Kev.
Thanks again for an informative post. I would be interested to know how, in your daily newspaper assignments, you have used some of the lighting techniques you discuss on this site when people are moving. I almost always shoot in low-light and almost always people are constantly moving or doing something. I rarely get to sit people down for a portrait. Thanks.
Question for David,
can you clarify exactly what the clam shell set up is, using two white umbrellas? is that two flashes into two separate umbrellas one low and one high? thanks in advance .
Posts like this are the reason that I am on this site everyday. I still have to read things 2 or 3 times until it sinks in, but Im getting there. Thanks again, and thanks for the set up pics (always a help)
Chris
Not to pile on, but thanks for the great post. I've been here since about a month after the beginning. Maybe your style has changed, or maybe all this stuff is starting to make sense, but I know 18 months ago I wouldn't have been able to follow this.
To the earlier question about 1/500 sync - my guess is he was shooting a D70 which has an electronic shutter that'll sync to insane speeds.
Hey, I have a question for David. This is randomly placed, but I've been visiting Strobist for several months now.
On my student budget I cant afford a digital camera, so I'm using a Canon T90 for now. Id like to participate in some of the assignments if i can. What can I do about this? Or is there a way i can get like digital Rebel for cheap?
Thanks
Nick
There are two blown distracting hot spots on the side walls of the alcove, at approximately the level of Michael's ears. They are obvious in the picture taken with the background flash only. Probably some strategic application of gaffer's tape on the sto-fen would have removed them. Michel's skin acquires a greenish cast in the final picture that is not present in that taken with the main light only. Was the AWB on for the final shot?
Regards,
Revision
Both Nikon and Canon (I think) now have high speed sync with their dedicated speedlights. The D70/s may be able to do this with any strobe... t
Post a Comment
<< Home