
Lighting 103: Becoming More Intuitive with Color
Abstract: Even an on-camera flash grab shot can be elevated by an intuitive understanding of light and color.
As your understanding of light and color grows, how does it affect your daily shooting? Like most things that seem complex at first, color pretty quickly becomes a secondary thought process, just like tying your shoes.
I just had the above archive photo picked up by a nonprofit, to promote children's books. Looking at it, I'm reminded that creating a natural looking color need not be complicated at all.
This was a little more than a snapshot, done with on-camera flash, and no gels. And the thought process behind the light is a good example of how you'll start to see and control color, even if you're just grabbing a snapshot.
__________
I wrote about this photo earlier, from a framework of light quantity: balancing flash and ambient. In this case, the ambient is the key and the flash is the fill. So, the reverse of normal.
In Lighting 103, now we can talk about this shot from from a perspective of understanding what color that fill needed to be, and how to create it almost subconsciously without any fancy gear.
Color Temperature is a Continuum
Remember when Greg Heisler said give him a sheet of 1/2 CTO and a white balance control, and he could do pretty much anything he needed? That was a fantastic distillation of his understanding of color.
You have control of your ambient color across a wide scale via your camera's white balance. The same goes for your white flash, via gels. And you can work those variables against each other, not unlike we can independently alter the exposure relationship of our flash and ambient by merely tweaking our aperture and shutter speeds.
In both cases you pick one variable, adjust your camera to get the desired result, and then make a second adjustment to establish the relationship with the second variable. In balancing flash with ambient, you might adjust your aperture to get the desired result from your manual flash, then adjust your shutter speed to bring the ambient light to the level that you want.
You can think about the relationship of the color temperature of both your ambient and flash in the same way. Let's walk through this photo and look at this process with respect to adjusting the color balance of our ambient and flash.
Warm and Dark
I see my wife and daughter (a tween in this photo, a college sophomore now) are out reading on the front porch. The scene is dark, lit by splashes of light of different colors. There are color shifts in both the highlights and the shadows that inform your brain about the visual environment. We process all of this across an incredible contrast range, instantaneously and subconsciously.
Seeing this, I went back into my house and grabbed a (then) Nikon D3 and a speedlight. I'm not going to bring light stands and multiple flashes out here, because it will ruin the moment. Which would mean that even a nice photo would have no sentimental value. So why even make it?
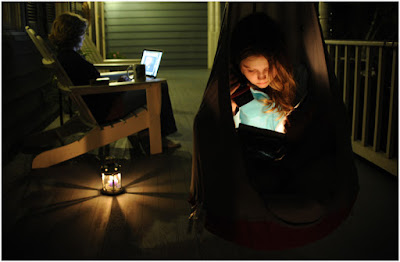
Without flash to fill the shadows, the camera sees only some highlights and a lot of black. My eye can see the whole scene, but my camera can't.
The most important highlights are all warm. And fortunately, they are all super warm: a warm flashlight reflected off of cream-colored pages, a candle burning right in the middle of the frame, the CFL porch light out of frame in the background is warm/greenish and the computer screen is cool white.
Seeing an excess of warmth, I shift my camera's white balance to tungsten. That injects some blue into the mix. Fortunately, my main key sources are overly warm. So not only can they handle this shift, they actually look more natural in the tungsten white balance. And that is what you see in the (available light only) shot above.
So now I have tamed my super-warm sources. The porch light and the computer are also more blue, but I don't really care about them. And now I need to put some legibility into my shadows.
By bouncing a daylight-balanced, on-camera flash off of the (white) porch ceiling, my fill light will shift to blue because of the camera's tungsten white balance setting. Because it is fill, I'll underexpose light from this flash by a couple stops or so. So not only am I getting legibility (but not full exposure) in the shadows, but the light is also a deep, cool color. Which is camera-ready, ambient nighttime light. It lets my camera see the scene the way my eye sees it.
I didn't need a gel on my flash, because I shifted anything that is daylight-colored to blue by adjusting to tungsten white balance. But the effect of the flash illumination is as if I used daylight white balance and had CTB-gelled the flash.
__________
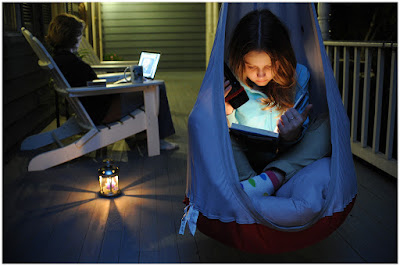
Here is the blue-filled version again. (Click to see bigger.)
Look at everything that is going on throughout the depth of the frame as the blue fill flash both supports and mixes with the warm key lights.
1. The shadows on Em and the chair are now both legible and cool. It just looks natural.
2. The chair is also catching some spill from that warm flashlight. You see it on the inside of the right side, and a hint of transluscence on the left. I love this. It's very three-dimensional and integrates Em into the scene.
3. The candle light radiating into the floor now mixes with detailed blue shadows rather than backness. I love this, too.
4. The blue fill creates detail on the shadow sides of the chair and porch rails. Then it falls away as it is taken over by the just out-of-frame green CFL porch light in the background. As an unintended bonus, this falloff creates a natural-looking color separation between Em and the background. I'll take it.
5. Lastly, Susan is picking up some in-frame illumination from the laptop.
So that's three internal light sources—and one more just out of frame—in addition to blue-shifted fill flash. This is a snapshot of a wonderfully lit (to my eye) scene that we just had to fix a little bit so our camera could record it. But the tungsten color shift both tames the excessive warmth and makes the shadow-filling flash blue.
Understanding this process is very important. Why? Because if you understand how and why this package of multi-colored ambient light works, you also understand how to create it from whole-cloth blackness.
You could easily duplicate this feel anywhere, just with flashes, if you understood you would need to create all of those independent light source colors. For instance, you could shoot it on ISO 200 and daylight white balance on a dark porch.
The fake flashlight would need a CTO (on daylight balance). The fake candle (now, probably a bare-bulbed Morris Mini flash) would also be CTO'd. The porch light flash gets a window green gel, maybe with some CTB thrown in. And the soft fill flash gets a CTB. The computer screen could stay daylight, and actually look better than the color-shifted real-light version.
Would you think to add this much color to all of those sources? You should, because that's is what they would need to look real. And if you were to light this with white flashes, it would not look right no matter what you did.
Light and Color in a Nutshell
To understand light and color is first to consciously see and appreciate it, then to be able to tweak it, and finally, to be able to create it convincingly from scratch. This progression is why some photographers' color flash photos feel lit and sterile, while other photographers' lit photos feel natural and organic.
NEXT: Lighting 103: Takeaways

As your understanding of light and color grows, how does it affect your daily shooting? Like most things that seem complex at first, color pretty quickly becomes a secondary thought process, just like tying your shoes.
I just had the above archive photo picked up by a nonprofit, to promote children's books. Looking at it, I'm reminded that creating a natural looking color need not be complicated at all.
This was a little more than a snapshot, done with on-camera flash, and no gels. And the thought process behind the light is a good example of how you'll start to see and control color, even if you're just grabbing a snapshot.
__________
I wrote about this photo earlier, from a framework of light quantity: balancing flash and ambient. In this case, the ambient is the key and the flash is the fill. So, the reverse of normal.
In Lighting 103, now we can talk about this shot from from a perspective of understanding what color that fill needed to be, and how to create it almost subconsciously without any fancy gear.
Color Temperature is a Continuum
Remember when Greg Heisler said give him a sheet of 1/2 CTO and a white balance control, and he could do pretty much anything he needed? That was a fantastic distillation of his understanding of color.
You have control of your ambient color across a wide scale via your camera's white balance. The same goes for your white flash, via gels. And you can work those variables against each other, not unlike we can independently alter the exposure relationship of our flash and ambient by merely tweaking our aperture and shutter speeds.
In both cases you pick one variable, adjust your camera to get the desired result, and then make a second adjustment to establish the relationship with the second variable. In balancing flash with ambient, you might adjust your aperture to get the desired result from your manual flash, then adjust your shutter speed to bring the ambient light to the level that you want.
You can think about the relationship of the color temperature of both your ambient and flash in the same way. Let's walk through this photo and look at this process with respect to adjusting the color balance of our ambient and flash.
Warm and Dark

I see my wife and daughter (a tween in this photo, a college sophomore now) are out reading on the front porch. The scene is dark, lit by splashes of light of different colors. There are color shifts in both the highlights and the shadows that inform your brain about the visual environment. We process all of this across an incredible contrast range, instantaneously and subconsciously.
Seeing this, I went back into my house and grabbed a (then) Nikon D3 and a speedlight. I'm not going to bring light stands and multiple flashes out here, because it will ruin the moment. Which would mean that even a nice photo would have no sentimental value. So why even make it?
Without flash to fill the shadows, the camera sees only some highlights and a lot of black. My eye can see the whole scene, but my camera can't.
The most important highlights are all warm. And fortunately, they are all super warm: a warm flashlight reflected off of cream-colored pages, a candle burning right in the middle of the frame, the CFL porch light out of frame in the background is warm/greenish and the computer screen is cool white.
Seeing an excess of warmth, I shift my camera's white balance to tungsten. That injects some blue into the mix. Fortunately, my main key sources are overly warm. So not only can they handle this shift, they actually look more natural in the tungsten white balance. And that is what you see in the (available light only) shot above.
So now I have tamed my super-warm sources. The porch light and the computer are also more blue, but I don't really care about them. And now I need to put some legibility into my shadows.
By bouncing a daylight-balanced, on-camera flash off of the (white) porch ceiling, my fill light will shift to blue because of the camera's tungsten white balance setting. Because it is fill, I'll underexpose light from this flash by a couple stops or so. So not only am I getting legibility (but not full exposure) in the shadows, but the light is also a deep, cool color. Which is camera-ready, ambient nighttime light. It lets my camera see the scene the way my eye sees it.
I didn't need a gel on my flash, because I shifted anything that is daylight-colored to blue by adjusting to tungsten white balance. But the effect of the flash illumination is as if I used daylight white balance and had CTB-gelled the flash.
__________
Here is the blue-filled version again. (Click to see bigger.)
Look at everything that is going on throughout the depth of the frame as the blue fill flash both supports and mixes with the warm key lights.
1. The shadows on Em and the chair are now both legible and cool. It just looks natural.
2. The chair is also catching some spill from that warm flashlight. You see it on the inside of the right side, and a hint of transluscence on the left. I love this. It's very three-dimensional and integrates Em into the scene.
3. The candle light radiating into the floor now mixes with detailed blue shadows rather than backness. I love this, too.
4. The blue fill creates detail on the shadow sides of the chair and porch rails. Then it falls away as it is taken over by the just out-of-frame green CFL porch light in the background. As an unintended bonus, this falloff creates a natural-looking color separation between Em and the background. I'll take it.
5. Lastly, Susan is picking up some in-frame illumination from the laptop.
So that's three internal light sources—and one more just out of frame—in addition to blue-shifted fill flash. This is a snapshot of a wonderfully lit (to my eye) scene that we just had to fix a little bit so our camera could record it. But the tungsten color shift both tames the excessive warmth and makes the shadow-filling flash blue.
Understanding this process is very important. Why? Because if you understand how and why this package of multi-colored ambient light works, you also understand how to create it from whole-cloth blackness.
You could easily duplicate this feel anywhere, just with flashes, if you understood you would need to create all of those independent light source colors. For instance, you could shoot it on ISO 200 and daylight white balance on a dark porch.
The fake flashlight would need a CTO (on daylight balance). The fake candle (now, probably a bare-bulbed Morris Mini flash) would also be CTO'd. The porch light flash gets a window green gel, maybe with some CTB thrown in. And the soft fill flash gets a CTB. The computer screen could stay daylight, and actually look better than the color-shifted real-light version.
Would you think to add this much color to all of those sources? You should, because that's is what they would need to look real. And if you were to light this with white flashes, it would not look right no matter what you did.
Light and Color in a Nutshell
To understand light and color is first to consciously see and appreciate it, then to be able to tweak it, and finally, to be able to create it convincingly from scratch. This progression is why some photographers' color flash photos feel lit and sterile, while other photographers' lit photos feel natural and organic.
NEXT: Lighting 103: Takeaways
__________
New to Strobist? Start here | Or jump right to Lighting 101
Now available in audiobook: The Traveling Photograher's Manifesto
Permalink
<< Home