SLC-1L-09: Compressing Tonal Range
With Specular Highlights

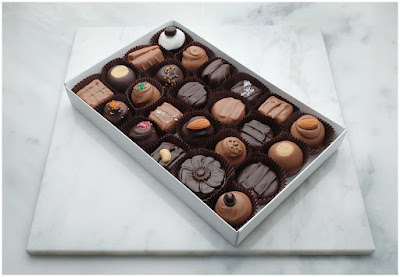
White marble, dark chocolate, one light source. Problem?
Not at all. Because pretty much everything you can actually see across the top of that box is not really the "correct" tonality of the chocolate. It's all specular highlights.
Controlling the density of specular highlights is what compresses the subject's wide tonal range and unifies everything into one smooth exposure.
__________
You may remember Charm City Chocolates from an earlier post in Lighting Cookbook where we built a continuous light macro studio for them to photograph their chocolates. While there, we also did some product shots for them to refresh their website and use on Instagram.
Simple-but-thoughtful lighting allowed us to create cascading zones of both real and false tones that not only show off the texture of the chocolate but also help to tame a contrasty subject (dark chocolate on white marble) into a range that will reproduce nicely.
To shoot the chocolates we are using a single speedlight in an inexpensive, 24x36" soft box. This box is modestly sized and perfect for head shots. But to a piece of chocolate, close in, it looks huge.
That apparent size is important, because the reflection of the light source in the surface of the chocolates is what creates the three-dimensional detail that expresses the surface quality and texture of the chocolate.

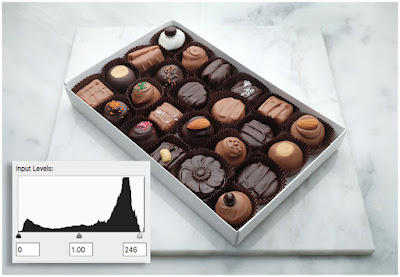
Here's a screen grab of the photo with a histogram overlaid. Given our subject's tonal range, that's pretty smooth. There is a spike at far right edge. But that just represents the thin white border that had already been added to the photo at this point. The internal tones are all nice and contained.
Almost everything you are seeing on the chocolate is really a specular highlight, or the shadow of a specular highlight. That relationship between specular highlights and their shadows expresses the 3-D form and texture of the chocolate.
But here's the thing: the shadows amongst the specular highlights aren't really shadows. Those are actually diffused highlights. That is how dark the chocolates would be if they were exposed correctly and not generating any reflections.
So this photo employs an upward shift of the low end of the tonal curve: what was a true highlight, now appears to be shadows. And the reflections of the light source (i.e., specular highlights) are our new apparent highlights. This shifts everything up closer to the white tones of the marble counter top and the white box.
Presto, you have now compressed the tonal range.
Controlling the Speculars

Let's move in closer. Here, the specular highlight is smooth and visible all across the dark chocolate on a mixed-nut candy bar. (And yes, this tastes every bit as good as you might think...)

Here is my setup. It's pretty simple. And we can control the ratio of specular to diffused highlight by simply moving the soft box closer or further away from the chocolate.
Move it back, and the "pool" of specular highlights will not only shrink, but will get brighter in comparison to the diffused highlights all around it once our exposure is adjusted to compensate for the move. So your photo will be more contrasty.
Move it closer, and the pool of specular highlights will get physically bigger. And because the chocolate is now "seeing" a much bigger light source (producing the same amount of light after we reduce our exposure to compensate for the move) the reflection of each square inch of light source will be reduced in intensity.
So our pool of specular highlights becomes not only broader, but more subdued. More liquid looking. It's the same concept we saw with the catchlight in our photo of Hope Kahn.
Closer Still

Let's bring it in a little tighter and look at a single chocolate. If you wanna take a moment, I'll wait.
Note to self: I really should not be writing this post while doing intermittent fasting.
Anyway. Look first at the almond. It has no real specular reflectance, so it is mostly diffused highlight with a little shadow at camera bottom.
Moving down into the dark chocolate, a new tonality and surface reflectance takes over. So what we get is a cascade of tones.
Starting up top, moving down:
• Almond diffused highlight
• Almond shadow
• Specular highlight from the main light source on the chocolate
• Diffused highlight of chocolate
• Specular highlight of fill card placed in front of chocolate
• Diffused highlight
• Next tier specular highlight from light source
• Diffused highlight
...and so on.
It's basically a liquid chocolate fountain of various types of highlights. And by controlling the size and distance of the soft box (top back) and fill card (in front, just out of frame—a sheet of A4 paper) you can easily define all of those peaks and valleys and swirls.
Nothing Fancy
I'm neither a product nor a food photographer. Those guys are serious and meticulous. This is a cattle-call of a product shoot to quickly create a library of photos of their best sellers for use as visuals for web and social.
But even so, you can get a lot of the way there on a shoestring budget (one speedlight, a cheap soft box, and A4 paper for both fill cards and our "white seamless" background.)
I think of this as 80:20 photography: 80% of the result for 20% of the effort/budget. As a newspaper shooter, that was my sweet spot given the time and budget constraints we usually operated under. And it has stuck with me ever since.
And if you are shooting something small and dark, always make sure to allocate some of that 20% effort towards positioning your light source in a way where the reflection of the source is what defines the surface.
Once you find that spot, most of your problems will melt away, and you're pretty much home free.
FROM: Strobist Lighting Cookbook
__________
New to Strobist? Start here | Or jump right to Lighting 101
My new book: The Traveling Photograher's Manifesto
Permalink
<< Home