
Developing an Idea, Part One
 Even though you guys are off shooting your Boot Camp headshots, I am going to try to shoehorn something else into your brain as an exercise in learning to be a thinking photographer. After all, you have loads of free time on your hands, right?
With the On Assignment post on Ant Upton's Paris soccer shot, I included a lot of color about the process he went through to fine tune and then nail his photo. Today, I want to take that concept a little further.
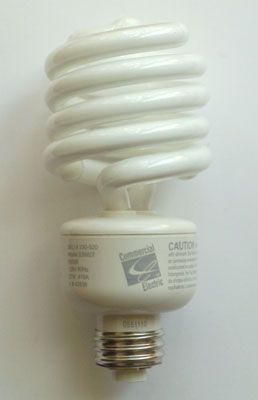
If you will remember back when we made the DIY macro strip lights, I said that I was planning what was (for me) a relatively difficult close-up shot. As it turns out, the photo was to be of a compact fluorescent bulb, or CFL, as seen above. Note that this is not the final photo. (Hey, give me a little more credit than that...)
I am throwing this up today to try to introduce you to the idea of the long-range fermenting process that can yield a high-impact photo. The idea it to let it pickle in your brain until you are ready to shoot it. Long-range thinking is quite different than a 20-minute brainstorming session. For me, it is the only way to get around some of the engineering "curve balls" a more complex photo can present.
But, before that, this:
Incandescent light bulbs are positively neanderthal in their energy consumption. A 60-watt light bulb is denoted as such because it uses, continuously, 60 watts of electricity to produce light. The light itself is measured in lumens, not watts.
A typical CFL will put out the same number of lumens as a 60-watt incandescent bulb, but only use about 14 watts. Given that about 30% of the average household electric bill (and energy usage) comes from lighting - if you use incandescents - you can see what a difference reducing that portion of your consumption by 77% can make.
Want to know more? Look here, here and here. Some countries are even considering dumping all of the incandescents. Not a terrible idea, IMO.
We are all going there eventually. It makes too much sense not to. And after that, LED array bulbs are on the horizon (already available but still very expensive) that can light your whole house for less than then energy consumed by a 60-watt old-style bulb. Sweet.
That's the good news. The bad news is that, for us photogs, the day of the "30cc-green," standard fluorescent are going away. These CFLs are all over the map, color-wise. You'll have to white-balance and pray. Or gel your flash with a CTO and go with the tungsten setting for white balance, which will get you pretty close on color.
And speaking of color, some of the new CFL's are flippin' gorgeous. You just have to try them out until you find one you like. In the USA, try Home Depot's "Consumer Electric" bulbs. They are only $10 for 6 bulbs in a multi-pack. I have changed over my whole house, and do not miss the tungstens one bit. And, as you might imagine, I am pretty picky when it comes to the quality of light.
OK, the sermon's over. You can wake up now. Back to the long-range, percolating idea thing.
In presenting the story on the benefits of CFL's, I wanted to make a stopper of a photo. The money/energy savings are stunning, so I wanted the picture to grab the reader to make him/her soak in the numbers.
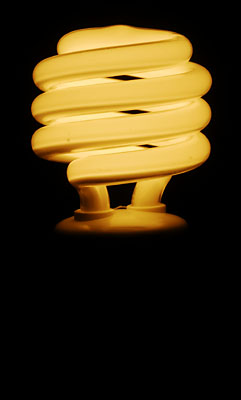 Here is a shot, stopped way down, of a lit bulb in a fixture. You can see that (a) they really are getting pretty close to tungsten, and (b) this CFL really takes on a lovely, neon-sculpture look when exposed as an internally-lit object instead of used as a light source.
This little grab shot in my basement laundry room got me thinking. Given that you can use fill flash to compress the tonal range of a sunny day (filling in dark shadows) could you use flash to compress the tonal range of the lit and unlit portions of the light bulb?
Sure you could.
But look at the light again (up top.) It's white, shiny, filled with complex, convex curves. It is gonna pick up any strobe fired near it. And the strobe-lit, white bulb parts will then be contaminated with frontal strobe light, which will ruin the internally lit color intensity that drew me to the shot in the first place.
Then, we will of course want the bulb turned on for the photo. So choosing the lamp will be important, too. Or not, as the case may be.
Over the course of a few weeks I let the shot turn over in the back of my mind. One by one, I came up with solutions for the problems. Some solutions worked right away. And some ideas needed to be revised when I actually tried them. But by stretching out the problem-solving process, one complex problem morphed into a series of very solvable smaller problems. It is a very organic and satisfying experience, and a process I highly recommend trying.
It is important to note that I had the time to think because the proposal was mine. I did not even present it to an editor until I had my shot worked out. That's a good way to control your timetable if you are typically rushed with the illustrative ideas at your own publication. When I presented the idea in its final form, it was an easy sell.
So, if you are up for some mental gymnastics, take three or four days to mull the hurdles over in your mind and figure out how you might shoot it. As a reality check, I ended up using about $5 worth of items bought (all at a hardware store) specifically for the shoot. I also used three small Nikon speedlights (2 SB-26's and an SB-800) to light it. Nothing fancy, and all done in my living room.
In the end I was particularly pleased with the result, which I will post in a few days. At that point, I'll go through how the problems were solved and go into detail on the light.
Feel free to think out loud in the comments section in the interim.
__________
Next: Pt. 2: Final Shot and Setup Photos
__________
New to Strobist? Start here | Or jump right to Lighting 101
Now available in audiobook: The Traveling Photograher's Manifesto
Permalink
<< Home