
Developing an Idea, Part 2: Compact Fluorescent Bulb
 In Developing an Idea: Part One, we talked about the process of coming up with an idea for a photo and then letting it sit in the back of your mind while you solved the series of problems you would encounter while producing it.
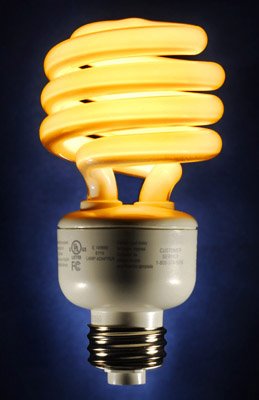
In this case the idea was to produce a photo to grab people's attention long enough to learn more about compact fluorescent light bulbs, or CFL's.
In preparing for the shot, four major "curve balls" were identified. Again, I like to think of problems as curve balls. They can be very daunting, but many people obviously learn to hit the daylights out of them. It's a good mindset.
First was the illuminated CFL light source itself, which was to drive the exposure for the photo. It would leave the remaining part of the bulb very dark. This would be solved by combining flash and available light (the CFL's light output) to compress the tonal range. No different, in theory, than using "fill flash" in the noon-day sun.
Second, the business end of the bulb is white even before it is turned on. So that part of the bulb would have to receive almost zero strobe light, which would be tricky given it is right near the base of the light, which would have to be fully lit by flash.
Third, the light would need to glow, even with the base fully visible and apparently unattached to AC.
Fourth, an offshoot of curve ball number three, is how to make the bulb appear to float.
Starting with the glowing light issue, we simply needed to design an invisible lamp. This was easy enough, but not something I would encourage unless you are comfy working with household AC current.
(No kidding, this stuff can kill you. It basically can defib your heart if you grab it wrong. Don't play with it unless you know what you are doing. Strobist is less than three months old and I do not need to be killing off readers.)
What I did was to solder a lamp cord directly to the screw threads and bottom of the CFL. By doing both wires on the same side, I could shoot the CFL and have it appear to be unconnected to power.

Second, I wanted it to float in order to reveal the entire screw thread assembly. By running (and taping) my lamp cord down the length of a dowel clamped to a light stand, I could invisibly support the light and apply electricity to it at the same time. The dowel passed through a small hole in a piece of ordinary black poster board, which hid the light stand support and gave me a sort of "studio" background look. I say "studio," because it was shot in a smallish townhouse living room.
Studios are just big, boring rooms. "Studio lighting" is very limiting. Try to learn to separate the terms, "Studio" and "lighting" in your mind. It's a strong and needless association for many people. I actually got yelled at on a very popular digicam message forum recently for just suggesting such heresy. Oh, well.
Total cost for the extras at Home Depot: Couple of bucks for the dowel and $1.24 for the extension cord. (I just cut the female end off.) Forty nine cents for the poster board and some gaffer's tape later, I was in business.

Here's the shot with a couple of Nikon Speedlights lighting the base of the lamp. There's WAY too much light spilling onto the bulb part, but the shooting angle is hiding the support just fine. So we are getting closer.
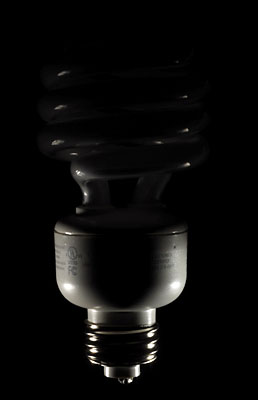 A few minutes later, having experimented with some cardboard snoots, I had most of the strobe light killed from the bulb part, as seen above.
 Here is a shot without flash, with the bulb plugged in, showing what will be the ambient portion of the exposure. (I held my breath the first time I plugged in the lamp.) Remembering that we have controlled the flash spill from the base, combining the two light sources is now very simple.
 Here is the combination shot. If I wanted to change the light level on the base, I did so by changing the camera's aperture. If I wanted to change the exposure on the bulb, changing the shutter speed made it a piece of cake.
Only thing left is adding some tone and color interest to the background. This was done with a third Nikon SB-800 speedlight with a blue gel on it propped up on some books.
All of the flashes are on manual for full control. The back flash was powered way up because the black poster board ate light like crazy. The front flashes were almost too bright at 1/64th power.
 And there is the pull-back, which shows the whole setup for the final shot. What amazes me is how spartan the set is, and how produced the final photo looks. It looks better than the original version, which was shot in my brain about a month ago. This is almost never the case for me. But I will gladly take it when it happens.
Photoshop-wise, this is almost a straight, in-camera photo. There was a dollop of solder on the bottom that I cloned out. You can see it in the interim photos. It was a tradeoff between safety (I wanted a very good solder joint) and invisibility. Safety won.
Much of the credit for how good this final image looks goes to Nikon. The D200 (loaner) digital camera I was using when I made this shot makes some amazing files. I want one. Or two.
All of my cameras are purchased by The Sun - and I am not complaining, mind you. But that also means that I am not in control of when I can upgrade, and what I will upgrade to. If it were up to me, I would gladly trade in my two (Sun) Nikon D2h's for one Nikon D200. The camera is far ahead of the D2h.
If I got this assignment with one day's lead time, it would not have happened. But being on your own time frame - and having a chunk of time to learn to hit your curve balls - can let you find the path to the photo your mind can easily snap the instant you get the idea.
Oh, and switch to compact fluorescent bulbs. You'll save money every month on your electric bills.
And if you don't need to save money because you already have too much, do it anyway. You can use the money to buy me one of those D200's for my birthday.
Next: 5-Minute Test Shot
__________
New to Strobist? Start here | Or jump right to Lighting 101
Now available in audiobook: The Traveling Photograher's Manifesto
Permalink
<< Home