
Lighting 102: 4.1 - Restricting Light
 Soft light is... nice.
Soft light is safe. It is flattering. It is, well, expected, for lack of a better word.
And don't get me wrong -- nice, safe, flattering and expected are good things. They put bread on the table every single day for pro shooters around the world. But the people who are doing edgy, risk-taking stuff -- fun stuff -- tend to not be the typical, umbrella-toting photographers.
Hard light -- especially hard light that has been restricted in some way or another -- can really get you out of a rut if you are looking for a way to amp your photos. Remember, using light balancing techniques, you can still control the ratio of the lit-to-unlit sections of a photo. This is true whether you are transitioning from a strobe-lit area to an ambient-lit one, or from an area lit by one strobe to an area lit by another strobe.
So, while apparent light size controls the abruptness of the transition to shadow, your various light balance levels will control how far you fall into the shadow. These two variables, used in tandem, give a wide range of control.
But the beam of the light source itself -- usually a hard light source in this context -- can be controlled via various light restricting devices. More after the jump.
_______________________
Gobos
 A gobo is basically any type of a light shield. "Gobo" is a slang abbreviation for "go between." It can be either attached to the side of the light, or placed between the light and any place you do not want the light to reach.
 This can be to solve a flare problem with a light that is aimed back toward the camera, or to shield light from falling onto the background, or any number of things. Gobos are extremely useful items that do not take up much room in a lighting kit. You should always have a few around.
 For example, here is a group shot at one of the London seminars, in which we had just placed a warmed-up separation light in the background, aimed directly the group. As you can see, the light is also spilling onto the ceiling pretty badly.
We can solve that problem by placing a gobo on top of the flash, blocking the light from heading straight up.
 The light now does what we want it to do, but not what we don't want it to do.
There is no reason you could not put a gobo on the bottom, too, for instance. In fact, you can have just about any beam pattern you want through the use of gobos, snoots, and/or grid spots. (You can see a full On Assignment write-up on this photo here.)
Any good mechanic will tell you that it is important that your car be able to go, but it is more important that your car be able to stop. This is also how I feel about light. Put the light where you want it, and keep it from going where you don't.
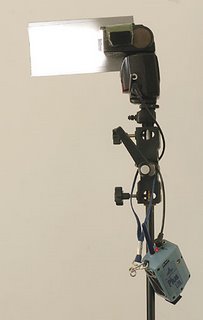
For instance, I could have a hard light that travels as a vertical strip by placing a gobo on each side of the flash.
Snoots
A snoot is essentially a four-sided gobo -- just a tunnel for your flash to restrict the light to a tight beam. The longer the snoot, the tighter the beam. Simple as that. But there are more controls to be had with a snoot.
You'll get fast fall-off on the edge of your beam if the inside of your snoot is black. This is because there is very little light bouncing around the inside of the snoot, contaminating the edges of the beam. You'll get softer edges to the beam if the insides are light grey, or white. And softer yet edges if the inside is silver.
You can see more on snoots and gobos in the original L101 post. I am a cardboard snoot and gobo kinda guy, but you can get ready-made (i.e., non cheapskate-looking) versions if you do not want your clients to catch a cereal box vibe from your gear.
A good example of problem-solving (including the why and the how-to) with a snoot is in this biz portrait On Assignment post.
You can also make snoots out of black foil to have teeny-tiny openings, as in this example. This gives exception light beam control, which is especially helpful with light painting.
Even with close-up photography, the ability to direct strobe light right where you want it can give you the control to light on complete different planes, even if the two planes are literally inches away from each other.
Grid Spots
 Grid spots are essentially a patterned group of snoot built into one device. They offer much more beam control over the light. I have grids that will throw about an eight- by six-inch pattern at six feet. That's tight.
The longer the grid is (and the smaller the individual channels) the tighter the beam. The best two ways to make grid spots are out of black straws or coroplast, (a plastic version of corrugated cardboard.)
As an example of the level of light control with a grip spot, I bounced a light around the inside of a missing slice of cake in this photo. The light does not hit the white icing right next door. That's control. That's a grid spot.
Cookies
In addition to simple objects that are designed to block the light, you can shoot through complex objects to partially block the light, or to create a neat pattern of interest in your photos. Typically, these are colled "cookies," if they are 2-D and man-made, which is short for "cookaloris." It's an old movie lighting term.
 They are usually a sheet of black cardboard, with a seemingly random pattern of holes. But my preference is to use found objects, such as potted plants, to create patterns as in the photo at left, which is explained in detail here. I cannot tell you how many times this technique has helped to elevate an otherwise boring photo.
Time to Play
So, those are my Four Horsemen of light restricting. But you'll never get feel for using them if you just read about them. So, for this session's exercise, we'll be making some light restrictors and test-driving them.
This is easy, sit-around-and-digest-the-Thanksgiving-turkey stuff. Your exercise is to make some various light restrictors and shoot some consistent photos, swapping out and/or moving the light mods.
For example, you might do something as simple as make a couple of gobo's and a few snoots of dfferent lengths and set a flash on a stand and shoot pic of the wall. By placing the different light mods on your flash, you should gain a good understanding of what it is that they do.
You'll want to be putting together a grid spot, too. It's a tad more complicated to build than the gobo and snoot, but it turns your flash's output into an amazing little beam of light. We are gonna play with that more later.
Tag your exercises as:
Strobist
Lighting102
exercise
restrict
You can view the completed exercises of others, here. There is a discussion thread set up for this post here.
NEXT: Restricting Light / Film Noir Assignment
__________
New to Strobist? Start here | Or jump right to Lighting 101
Now available in audiobook: The Traveling Photograher's Manifesto
Permalink
<< Home