On Assignment: Earth Treks, Pt. 3
I'd much rather shoot real people, for lack of a better term. They are way more interesting, and certainly more fun to work with. You just have to remember that they are not used to being in front of a camera and lighting gear all of the time.
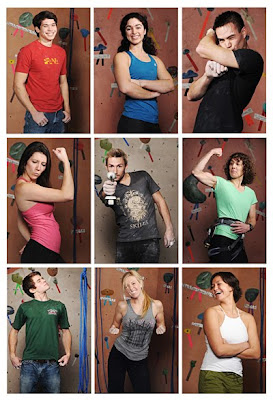
After the pretty lengthy shot list during our shoots at Earth Treks climbing gyms, I suggested we get all of our volunteer climbers together and do some of what I like to think of as "speed portraits."
__________
Expanding the Shot List
The climber portraits were not even in the original brief, but I decided to add them in for several reasons.
First, they had all graciously volunteered their time as climbers for use in the larger scale photos we were there to shoot. And one of my worries was that for some of them, there would not be a photo that featured them enough to merit the time that had been involved.
Second, I felt the the photos would be genuinely useful for Earth Treks, even if they were not in the original game plan.
Sure, the huge facilities and soaring climbing walls (see Pts. 1 and 2 in this series) are impressive. But for many potential new members, none of that would be nearly as much of a motivator as the "Damn, I'd love to be ripped like that" bodies of the members who showed up to be our subjects.
And ripped, they were. I have never seen such a sickeningly healthy group of people in my life. Erik, Dave and I were talking about how fit they were afterwards, as we downed humongous burritos at Chipotle.
Third, the scale of the photos -- individual people -- would give a nice change-up in the slideshows of our photos that were to run on the HD TVs in the lobbies of the three gyms.
Speed Lighting
Okay, maybe a confusing choice of terms for the subhead above, as we used two AlienBees for these. But the setup is very similar to a technique I use a lot with SB's, and the principles are the same.
First, I wanted to show off how cut they were, with their lack of body fat. Fortunately, I was there to normalize the percentages, if you averaged us out.
But with hard light, you are also gonna get hard shadows -- and those needed to be controlled first. If those hard shadows do not fall too far into the left side of your histogram, you can get all of the advantages of hard light and still have a more subtle look.
 So the first step was to build a base of on-axis fill. I wanted a safety net for the shadows that would allow me to use a hard key light without making them look bad.
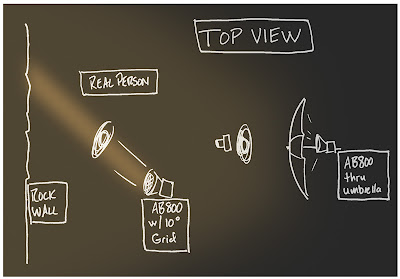
Without a ring flash, we put one AB800 into a shoot-through umbrella. We then placed this directly behind and slightly above the camera to create a fill light that did not leave its own signature. By underexposing this (just change the power level or your aperture) until we had nice subdued detail levels, we created the safety net. Whatever was not lit by the hard key light would fall into shadow, but it would not be black.
This is the same kind of thing you might do when balancing flash and ambient. But our ambient was a really crappy sodium-God-knows-what, so we worked several stops above it and built the photo entirely on light from the flashes.
In effect, the on-axis umbrella became like our ambient fill. Except we could design it to be a neutral color with no inherent direction. With our fill light nicely subdued, it was a simple matter to add the hard, gridded key light to complete the setup.
Grid spots are very unforgiving with respect to aiming them. Here are a couple tips on setting and quick-changing a gridded key light that help me work faster.
First, tape a spot on the ground and guide people to that same, repeatable location for consistency. Then pre-set the grid to hit the face of someone about six feet tall. It's pretty easy to estimate how much over or under 6 feet tall a person is when they walk up.
So with a quick, correlating change in the height of the stand as the next person approaches, you are aimed and ready to go as soon as they get into position.
Second, this is an instance where modeling lights will help you work much faster -- if for no other reason than aiming that grid beam. If you are using battery power on your monoblocs (which we were) you have to remember that powerful modeling lights will drain your batts far faster than will the flash pops themselves.
So if I am gonna be using modeling lights and batteries (as we were on the grid light only, to help us aim it quickly) I like to substitute compact fluorescent lights for my modeling bulbs for far longer battery life. You'll save 77% on your modeling light battery drain that way.
[UPDATE: Note that if you do use CFLs as battery-friendly modeling lights, set your model lights to full power. (Most) CFLs do not take kindly to dimmer circuits.]
Here is a rough (big surprise) sketch of our lighting scheme. On alternate days, we swapped sides on the gridded key light for a little variability in an otherwise consistent set.
Pretty simple:
 This allowed us to move through a large number of people in very quick succession, while accentuating their muscles and lighting them in a legible way at the same time.
We averaged about two minutes per person. Which is a good thing, because I find that a quick-hit approach gives a far better batting average when shooting a group of people who are not used to be in front of a camera and lights. You'll lose them if you take too long.
So, Who's the Ham?
My favorite trick for shooting a bunch of real people without having them go all shy on you is to knock off the easiest one first, then let peer pressure work for you for a change.
That's exactly my approach in a group situation like this. You want to find a ham for a first victim, and get them all talking and reacting while you shoot them quickly.
And only part of your attention should be on your lead-off ham, as you also want to be encouraging whatever discussion is starting to happen between your subject and the obligatory peanut gallery of future subjects behind you. Because if you do it right, the group dynamic will improve your photos of everyone right down the line.
And that good vibe all the tailwind you'll need if your light is preset and ready to go.
By example, (and remembering that this was a corporate shoot) one guy on the last day slid into position, immediately crossed his arms gangsta style, and flipped me off with both hands.
Are they gonna use that photo? Probably not.
Is the group dynamic pretty much in autopilot for me now? Absolutely.
And without their buying into the idea that getting photographed will be fun, no amount of lighting is going to make good photos anyway.
__________
Next: Gas Station Tacos
__________
New to Strobist? Start here | Or jump right to Lighting 101
My new book: The Traveling Photograher's Manifesto
Permalink
<< Home