UPDATE: Strobist was archived in 2021.
Here is what I am up to now.


________________________________________

SPOY 5th Place: You Be The Judge

The very cool 3rd-place "Ants at the Trough" photo, by Peter Steeper, showed a 2007 date in the Flickr system, but was in fact taken in 2003. This being the 2007 Strobist Photos of the Year, Peter and I mutually agreed to remove it from consideration after the fact.

Given that the contest was for photos taken in 2007, we both felt it the fairest course of action. Mind you, it's still a kick-butt photo, and Peter should be very proud of it. Other arrangements are being made in thanks for Peter's gracious handling of the date confusion.

With a hole left in the top five photos, and five honorable mentions waiting at the ready, and Chase Jarvis inconveniently en route to Paris as I type this post, we are left with a decision as to what to do.

That's where you come in. Hit the jump for details.
_________________________


First of all, 5th place moves to 4th, and 4th moves to 3rd. Which now leaves the hole at 5th.

Problem: Where to find a judge on such short notice to determine which of the honorable mentions gets bumped up to 5th?

Solution: The 5th place slot now becomes a Peoples' Choice, from the remaining honorable mentions. They are listed below, in no particular order. (Please note the number by each photo. )

The members of the Strobist Flickr Group have all been deputized as 5th-Place, Peoples' Choice Judges. You will be choosing one, and only one. We, uh, you will vote simply by leaving a post in the thread linked below and stating the number 1, 2, 3, 4 or 5.

Please vote only once. Any instance of duplicate votes will result in none of your votes being counted. You may change your vote at any time via the edit function. If you wish to lobby, please do so in the SPOY Discussion Thread instead of within the voting thread. And please keep your lobbying to being in favor of a particular image, rather than trashing another one.

IMPORTANT: Your post in the voting thread should contain one digit: 1-5. Simply cast your vote by typing a number.

The voting closes as of the end of 2007, which is about 22 hours from now, Eastern Time US. You'll know voting is closed because we have arranged for a shiny ball to drop down in Time Square in New York City to mark the closing of the polls. Any votes cast after that time will not be counted. We are arranging to have the NYC vote-closing ceremony televised, too. Check local listings in the US.

Without further ado, here are your five honorable mentions from which to choose. You may click through from any of the photos to see the photo's Flickr page for more information.

__________________________


Number 1


Number 2


Number 3


Number 4


Number 5


_________________________________

I am very curious to see how smoothly this goes. If it works, it could pave the way for an all-peoples' choice 2008 SPOY. Assuming there is a 2008 SPOY.


Please vote here.


Thanks for your help!


__________

New to Strobist? Start here | Or jump right to Lighting 101
Got a question? Hit me on Twitter: @Strobist
My current project: The Traveling Photograher's Manifesto


Permalink

Strobist Photos of the Year, 2007 -- 2nd Place Winner

Three down, two to go.

For each of the previous winners, we have given comments as to why they were chosen. We'll do that after the jump, but for the final two I also want to post some of the comments of the other Flickr users left when they first came across the 2nd-place photo on its Flickr page:


"Wow. Amazing. Is this real?"

"Superb!!! How did you get the light on her legs?"

"Absolutely stunning lighting and POV."

"This is amazing! Truly original concept. I like that it looks like a fantasy painting."

"I thought about wow! but then I see so many others expressing the same sentiment. What the hell... WOW! Just WOW!"


(See the 2nd-place winner and judges' comments after the jump.)
_________________________


2nd-Place Photo: Woman Playing Volleyball at the Beach


Second place goes to California-based photographer Robert Benson, for his cross-lit shot of a woman playing volleyball on a beach.


From Robert's comments, some thoughts on the setup:

"To turn outdoor bright sunlight to a controllable dark, you first have to put camera on slowest ISO setting (50 or 100), go to your camera's fastest shutter synch speed (usually around 1/250th), and dial aperature down to around f16 or f22," he says.

"Then set up your off-camera lights. Outdoors they will have to put out enough power to light subject at that small F16 or F22, and with moving subjects, the duration of the flash should be short, to prevent motion blur."
______________________


(As most of you know, you can duplicate this technique by using a camera which allows hi-speed synching, which gives you the ability to do this with a pair of speedlights. This method also keeps the flash duration way down, which eliminates motion blur.)


Chase Said:
Nicely executed shot here.

The certain je ne sais pas (I know not what) of this image is actually that there is no je ne sais pas at all. We know it all. It's a very classic formula for making a great image and it deserves to be recognized as such. 

The formula is:

A) The timing: Peak action with some tension in the moment; 

B) The light: I'm guessing it's what I call the "sandwich" technique (strobe left, strobe right, and backlit with the sun. Also, the use of the sun to draw the viewer to the focal point and the overall underexposing of the image to amplify texture in the clouds and the sand is a wise move. And finally,
 
C) The composition: The subject position in the frame generally is pleasing; the separation from subject, ground, net, sun, and ball creates beautiful tension (and simultaneous fluidity); the camera angle adds drama and accentuates the athleticism of the subject.


I Say:

This photo is so much more than just lighting technique, which of course was well-executed. As Chase said, many factors come together to make this a very dynamic moment: The tonal gradient created by the obscured sun drawing the eye into the compositional center frame, the tension, the way the light defines the muscles, the simple (yet dynamic) composition, the timing.

On that last point, a tip for aspiring action shooters: The moment just before something happens has much better tension and timing than when the thing is actually happening. And if has just happened, you missed it. And for you portrait shooters and wedding shooters, how much more interesting the fractional second before a kiss actually happens than the kiss itself.

Finally, the icing on the cake for me on this one is the sand: Frozen, defined by the crosslight, and looking for all the world like a nebula shot from the Hubble Space Telescope.

_____________________

Congratulations, Robert, on the photo. If you would be so kind as to choose your top two prize choices, in order, from the list below and stick it into a comment on your photo's Flickr page, it will greatly help to speed the process of distributing prizes to the five winners after they have been announced.


Thanks again to the following sponsors for contributing such great prizes:


• An AlienBees ABR800 Ringflash, courtesy AlienBees.

• A pair of Pocket Wizard Plus II's courtesy the MAC Group, facilitated by Midwest Photo Exchange.

Elinchrom D-Lite 2 Kit, courtesy Elinchrom and facilitated by The Flash Centre.

• Two Nikon SB-800 Speedlights, courtesy Nikon USA.

• A Canon Powershot G9 Digital Camera, courtesy Canon USA, facilitated by Midwest Photo Exchange.

_____________________


Discussion, including details on the judging process and the honorable mention (6-10) photos, here.


__________

New to Strobist? Start here | Or jump right to Lighting 101
Got a question? Hit me on Twitter: @Strobist
My current project: The Traveling Photograher's Manifesto


Permalink

Reader Question: Why Do Rim Lights Blow Out?

Reader Till Hamburg asks the above question in the Strobist Flickr Pool, and posts a series of photos just to prove his point. First of all, a little explanation of what Till means by these numbers. Then, an explanation and how to make that angle-dependent strength thing work for you.

The series of photos at left have two lights which concern us. (Looks like there is a backgrond light going on there, too. But let's ignore that for the purposes of this discussion.)

In the top photo, the rim light is set one stop hotter than the light at camera right (which is illuminating the subject's face.) In the middle, they are equal. And in the bottom, the rim light is one stop lower than the main light.

__________

PLEASE NOTE: I think he has his f/stops reversed in the label on the bottom photo. As you can see, the main light is remaining constant, while the rim light drops a stop each frame, heading toward the bottom.
__________

This lighting quirk used to screw me up all of the time when I would shoot a rim-lit situation, until I figured out what was going on.

Why it happens, and a way to make this work for you, after the jump.
____________________________


Rimshot, Please...

The first component of the higher efficiency of rim light is the physical property of the way anything reflects when it hits something at a shallow angle. I always use the analogy of light behaving like a pool ball when it comes to reflections, as in this post on how to light people wearing glasses.

So let's stretch the light-as-pool-ball analogy a little more and think in terms of retained energy. A glancing reflection off of something will use up less energy than a direct hit. So to will light glancing off of a 3-d object. It is simply a more efficient way to reflect.

Second, rim lights are more likely (than main lights) to be hard light sources. As we have learned, hard light sources create stronger specular reflections than do larger light sources. I know the specular reflection strength is a component to rim lighting being more efficient because I see the effect lessened when my rim light is soft.

So, how can you use this info?

Well, you certainly want to use your weakest light as a rim light to take advantage of the efficient rim light thing. In fact , when I am rim lighting in close, I usually start my SB-800s at 1/128 power and adjust my working aperture to where that looks good as a starting point.

As you can see above, even one stop down is a little hot for a rim light. I tend to start out at two stops down. (If you work without a flash meter, as I do, use your guide number chart to get you close on the first pop.

Also, if a room is ambient-lit in a poor, muddy-ish, ASA-800 kinda way and you only have one light, consider using that light as a separation/rim light (instead of in front) to add depth to your scene. Because of the efficiency of the lighting angle, you can back that speedlight way back (adding depth and internal separation and slow fall-off to the whole scene) even though your speedlight is not very powerful.

___________________


Related posts:

:: L101: Lighting People With Glasses ::
:: L102: Specular Highlights ::
:: Guide Numbers: Your Free Flash Meter ::


__________

New to Strobist? Start here | Or jump right to Lighting 101
Got a question? Hit me on Twitter: @Strobist
My current project: The Traveling Photograher's Manifesto


Permalink

Peter Steeper: Eating at the Trough

UPDATE: There was a mixup in the date on our third-place winner, with Flickr having the photo as a 2007 shot, when it fact it was shot four years ago and dropped into Flickr in 2007. While still an amazing photo, the "Ants" photo was removed from the competition by mutual agreement between the photographer and myself. Thus, 5th goes to 4th, 4th goes to 3rd, and a vote-off is held for 5th place. More here. For informational purposes, we are leaving the photo and description up as inspration to ant-infested photographers everywhere, including myself.

"Eating at the Trough," by Canadian amateur photographer Peter Steeper, was made with a Canon G3 point-and-shoot digital camera, a 420 EX flash and an off-camera cord.

Says Peter:

"After an incident in the kitchen with ants I decided to take advantage of what I thought was a great photo opportunity. Then my wife discovered what I was doing. The experiment ended suddenly."

As for the outpouring of familial support for his domestic photographic endeavors, he notes:

"The background is one of my wife's fine white china dishes. I am banned from ever using her china again as a prop."


Chase Said:
Conceptually brilliant.

The vision it took to create this shot is impressive. Note from the shooter's description that an incident in the kitchen turned into a creative opportunity.

Whether it's an obsession with photography or simply a creative thread in the photog's brain - being attuned to this moment as a great moment to create a cool shot is something of a wonderful gift/talent.

Combine that vision with a solid execution (love the highlight on the right and the shadow on the left defining the "depth" --and thus thick consistency-- of the syrup). The highlights on the ants' little bodies are really cool for bringing them to life, and I'm guessing that the bubbles in the syrup were a happy accident, but they add something to the value of this shot too.

This image has some of the same characteristics of the winning shot you'll see soon -- people will stop in their tracks to look at this shot. It's got visual mojo.


I Say:

As I mentioned in the lead-in, this photo epitomizes the idea of the photographer making the photo rather than the gear doing it. A point-and-shoot and a small flash, with dash of spontaneity, led to a spur-of-the-moment photo.

Some might call the light simplistic. IMO, much more would have been overkill.

And the light was necessary for more than just aesthetic reasons. That close of a macro shot needs some aperture to control depth of field. At such clse range, even a small flash makes small apertures possible.

The smaller chip size of the P-n-S camera helped, too. A smaller chip means more depth of field for a given aperture setting. (This would have been a much more difficult shot to pull off with a dSLR for several reasons.)

But beyond the technical stuff (there were far better technicals displayed elsewhere in the pool) this is a photo that could be used to convey many different ideas that have nothing to do with ants.

They are us, whether we are blue-collar workers, guys at a bar, sugar addicts, mooches, or any number of other things.


_____________________

Great shot, Peter. And thanks for your gracious understanding about the date.


__________

New to Strobist? Start here | Or jump right to Lighting 101
Got a question? Hit me on Twitter: @Strobist
My current project: The Traveling Photograher's Manifesto


Permalink

Dave X. Tejada: Head Shots, and Pimping Your Chimping


How do you get to never be without access to your prized Golden Girls DVD collection while on the road, and write it off on your taxes at the same time? If you are David X. Tejada, you make up some lame story about how clients would rather chimp themselves on a seven-inch screen instead of the 2.5" back-of-the-camera version.

Being Dave, he sneaks in a little lighting info, too. That big feathered soft box / reflector combo is makin' some bacon for him. And I love how well the small seamless rolls fit into cubicle land. You can shoot Dilbert and get him right back to work before Wally comes back from the coffee machine.

And anyone catch the second, stealth fill card in there? That table is white and folds up to nothing. Makes me wonder if he scrounged it from on site, or if he gets to write off his picnic gear, too. Great idea.

I'll tell you right here that the next Wally-Mart special fold-up table I buy will be white.

And don't worry, Dave. I'm right there with you on Nikon not increasing the size of the back-of-camera monitors as fast as our eyes are going south.
__________________

More Dave:

:: Dave's Lighting Bag ::
:: Dave's Photo Cave ::
:: On Assignment With Dave ::
:: Dave's Blog ::
:: Dave's Interview on LightSource :: (Podcast)

-30-


__________

New to Strobist? Start here | Or jump right to Lighting 101
Got a question? Hit me on Twitter: @Strobist
My current project: The Traveling Photograher's Manifesto


Permalink

Strobist Photos of the Year, 2007 -- 3rd Place Winner

One down, four to go. And like yesterday's photo, the SPOY 2007 fourth-place winner also understood the power of not letting the light upstage the rest of the image.

See the 3rd-place winner and judges' comments after the jump.
_________________________


3rd Place: Dionaea - Hosford, FL

"Dionaea - Hosford, FL" was photographed by reader Forbes Conrad) with a Canon EOS 20D and a pair of Nikon SB-26 speedlights.

An SB-26 was at camera right, through an umbrella and another was slightly behind at camera left and gobo'd to control lens flare.


Chase Said:
Photographers take note: What stands out in this shot is that the light doesn't stand out - it's in perfect harmony with the image.

Many Strobist shooters -- or those in the early stages of fiddling with strobes or off camera lighting in general -- get caught in a paradox where the "less gear, more brain, better light" mantra gets misunderstood to mean "less gear, more brain, MORE light".  

Not so.  

Lighting an image is not only about big dramatic brush strokes with your gear. Sometimes the best light is really noodly and wimpy. It's light that you don't even recognize. This shot exemplifies this principle. It is beautifully -- and very simply -- lit.

And the lighting does not distract the viewer. It's a shot of the fly and the flytraps, not of the light that's lighting the fly and the flytraps.  

Catch my drift?


I Say:

First of all, I'll second what Chase said. The idea of making a photo about the light is a habit that I always have to work hard to overcome. There are times when you need to make something out of nothing. But there are also times when you should not let the light take center stage in a photo.

To me, the quiet light in this photo is very important in that the star of the photo is not the plant. It's not even the fly. The star of this photo is the tension arising from the knowledge of imminent death.

Even if the fly is not truly in danger (i.e., could be a dead fly, a plant that is not closing for some reason, etc.) the visual tension still holds. FWIW, the fly looks real to me, and the only standard which would come into play if it is not is a photojournalistic one.

Long story short, every person viewing this photo instantly knows what the fly does not -- that it likely is living on borrowed time. That's a powerful and riveting property in a photo, even if that subject of that photo is an bug.

_____________________

Congratulations, Forbes Conrad, on the photo. If you would be so kind as to choose your top four prize choices, in order, from the list below and stick it into a comment on this photo's Flickr page, it will greatly help to speed the process of distributing prizes to the five winners after they have been announced.


Thanks again to the following sponsors for contributing such great prizes:


• An AlienBees ABR800 Ringflash, courtesy AlienBees.

• A pair of Pocket Wizard Plus II's courtesy the MAC Group, facilitated by Midwest Photo Exchange.

Elinchrom D-Lite 2 Kit, courtesy Elinchrom and facilitated by The Flash Centre.

• Two Nikon SB-800 Speedlights, courtesy Nikon USA.

• A Canon Powershot G9 Digital Camera, courtesy Canon USA, facilitated by Midwest Photo Exchange.

_____________________


Discussion: SPOY Results Thread on Flickr


__________

New to Strobist? Start here | Or jump right to Lighting 101
Got a question? Hit me on Twitter: @Strobist
My current project: The Traveling Photograher's Manifesto


Permalink

Strobist Photos of the Year, 2007 -- 4th Place Winner

The year is almost gone. In fact, there are exactly five days left in 2007. Which means it is time to announce the SPOY winners. But before we get to the 5th-place winner, a little housekeeping is in order.

First of all, a few thoughts on the process of choosing ten winners. Amazingly not a single one of you attempted to find out how cheaply I could be bribed. (Answer: very.) But it is too late for that now... :)

It should be noted that any one of you may well have chosen many different finalists and different winners. Very likely, ten completely different finalists, truth be told. We all have our own internal biases, and certainly show up in something like this.

I initially narrowed down the pool to about one hundred wonderful images. Then I would go through them night after night, slowly weeding them down. There were photos which were very similar to other photos in the finals, so sometimes this was very difficult. But I wanted to avoid significant duplication within the final ten, so that became yet another criteria for thinning the pack.

Another criteria was inclusion of lighting information in the caption, or at least in the comments. Literally dozens of photos were culled using this criteria. Some of them would certainly have made the finals. But that is the primary rule of the pool, and also was one of the criteria for judging. This made a difficult choice between two otherwise great photos into an easier one.

On the process of choosing, I would again note that I winnowed the pool down to ten finalists, and Chase Jarvis chose the five winners, in order, from the final ten. Chase would have certainly chosen a different lot of finalists -- any of us would have.

Chase's selects probably would have been more conceptual and avant guarde, whereas I tend to go for classic, and well-executed. But that's what makes the world go 'round.

I would also note that I ran my list of semi-finalists and finalists by a number of other people, looking for feedback. So, while I am sure there will be Monday-morning quarterbacking on this one (uh, it started a while back, actually) please bear in mind the process through which the finalists were chosen.

Bell-curve-wise, we had in the finals photos taken by pros and by amateurs -- the greater numbers being with the latter. We had big lights and small lights represented -- again, the greater numbers being with the latter. And we had photos which have been very heavily viewed and commented upon right next to photos with minimal views and comments.

To those who think that many page views, favorites comments and notes is the mark of fine quality, I offer this counterexample.

Finally, I was heartened by the fact that Chase chose from the final ten exactly the first-place winner the photo I would have chosen. There was no ranking, hinting or prodding by me. Personal biases aside, I think some photos stand out no matter who is viewing them.

So, for the next five days, I will be posting a photo a day, with commentary from Chase and myself. Please join me in both congratulating the winners and thanking the sponsors (listed below) for upping the ante to make this so interesting.

The 4th place winner is after the jump.

_____________________


4th Place: Radiant Bones - All Hallows Eve

"Radiant Bones" was shot by Christopher Perez (AKA Smiling Monk) with a Canon 40D and a single AlienBees 800 flash.

Christopher is a self-described "engineering manager by trade and a photographer by passion." His photographic website is here.

As for lighting, the flash was placed inside a 3x5-foot soft box. Then, the already-soft light was spread around the subject through the use of three large white ragboard reflectors to preserve the delicate tones of the subject and backdrop. Simple, elegant and something that could be done with a single speedlight.


Chase Said:
This gets the nod as a testament to simplicity of lighting and setup and good, simple post production. Most photographers could not resist punching the hell out of the contrast on this shot in post - thus turning this shot into something that looks like so many of it's predecessor black and white skull shots.

This avoids that standard pitfall and seeks to pave its own ground. It's is a success in its subtlety and it's beautifully toned.


I Say:
The lighting, composition and post production on this photo all elevate it from a simple still life and give it an evocative and ethereal quality. I strongly agree with Chase on the tonal restraint (in both lighting and in post) adding to the final product.

From a lighting perspective, the use of soft, multi-directional fill allowed total control over the tonal range of a subject that was essentially composed of one tone. Just because there is a full range of pure black to pure white does not mean we are required to use it.

_____________________

Congratulations, Christopher, on the photo. If you would be so kind as to place into order your prize choices from the list below and stick it into a comment on your winning photo's Flickr page, it will greatly help to speed the process of distributing prizes to the five winners after they have been announced.


Thanks again to the following sponsors for contributing such great prizes:


• An AlienBees ABR800 Ringflash, courtesy AlienBees.

• A pair of Pocket Wizard Plus II's courtesy the MAC Group, facilitated by Midwest Photo Exchange.

Elinchrom D-Lite 2 Kit, courtesy Elinchrom and facilitated by The Flash Centre.

• Two Nikon SB-800 Speedlights, courtesy Nikon USA.

• A Canon Powershot G9 Digital Camera, courtesy Canon USA, facilitated by Midwest Photo Exchange.


_____________________


:: SPOY Results Discussion Thread on Flickr ::


__________

New to Strobist? Start here | Or jump right to Lighting 101
Got a question? Hit me on Twitter: @Strobist
My current project: The Traveling Photograher's Manifesto


Permalink
Christmas Game Plan: Results

Just for kicks, I took a few moments to set up a couple of SB-800's according to the Christmas game plan I outlined on Sunday. This is a technique I use a lot for family events (birthdays, Christmas, etc.) when I know where things are going to happen and I just want to light a room.

This is a good, low-pressure, no-risk way to experiment and practice. So the next time you have to light a room for fluid situations and every photo counts, you'll be ready. Or at least slightly less petrified.

Hit the jump for the easy-peasy lighting setup and some results from different areas of the room.
___________________


Okay, so here is the living room layout and lighting setup. I have annotated it with a grid for easy reference. For instance, the two PW'd SB-800 speedlights (on light stands) are at E-2 and A-10, respectively. They are set to 1/8 power + 1/3 stop, and pointed toward the ceiling with a 24mm beam spread.

(Click here to pull up a 1000-pixel jpeg of the lighting diagram for easy reference during the rest of the post.)

This diagonal, soft cross-light is an easy, go-to technique for evenly lighting a room with a couple of small strobes. This is a great way to shoot meeting shots, group shots, candids -- whatever.

Using the grid on the diagram as a reference point for both camera and subject, let's walk through a few shots in different parts of the room and see how it looks.

Pictured at the top of this post is my daughter Emily, opening a present near the middle of the room. The camera position is at A-4 and Em is at D-6. As you can see, the strobe at right is the main light, and the left/back strobe becomes a rim/fill light. They both combine to light the rest of the room.

The cool thing about this setup is that I can shoot from just about anywhere in the room. The only thing I have to do is to keep my strobes out of the frame.


In the photo at left, Ben and Em are entering the room after being help upstairs until the ridiculously late present-opening start time of 7:30 a.m. They are at about A-3 and B-4, respectively, and the camera is at A-8.

The flash at E-2 is now the main light, with the flash at A-10 becoming fill. We are also getting fill from the continuous light, a CFL, located high at about A-4. Shooting at a 1/50th of a sec at f/3.5 at ASA 400 picks up this warmish fill a little.

Again, as in the earlier photo, the light is not calling attention to itself, but rather is just making everything crisp and well defined. It's not dramatic, it is simply designed to work nearly everywhere in the room.


Next is Ben, 7, a certified Lego-a-holic, with his new Lego motorized, R/C bulldozer. The thing has over a thousand parts, and he is almost done with assembling it for the first of many times.

Ben took the high-risk route of penning a one-item Santa wish list this year. I do not know if I would have had the guts to do that, but Ben was resolute. That's the 7-year-old equivalent of putting a thousand bucks on 36-red at the Roulette table. It paid off. And, I have to say, that thing is awesome.

Ben is at D-8, and the camera is at B-5. But he is turned away from the closer A-10 flash, so it becomes a bright rim light while the E-2 flash becomes the flash that lights his face. It is hard to hide from this lighting scheme.


Last but not least is Ginger, our affectionate-but-dimwitted cat, stoned out of her gourd on catnip (in red package at left) late on Christmas Eve. She looked the way Susan and I felt. Mind you, our condition was fatigue-induced and not at all drug-aided. Unless you count Christmas cookies.

Cheech Ginger is on the ground (or well above it, depending on what we are talking about) at about E-8, and I am about a foot away at D-8 wishing like heck that catnip worked for me, too. (Hey, that stuff is cheap and grows like a weed really fast.)

Again, the lights just work. Nothing flashy or attention getting. Just even, crisp lighting that does the job.

One more important thing to note was that I invited the other adults to feel free to pick up and camera the camera and shoot whenever they wanted. Once the light was set up, it was pretty hard for them to miss. So, why not?

So, there you are. Make better Christmas/birthday pix while you bone up on light to juice up your next meeting/interview photos. It's a win/win and you makes some brownie points with the Significant Other at the same time.
____________________


Related posts:

:: 'Twas The Light Before Christmas ::
:: David Tejada: Lighting a Conference Room ::
:: On Assignment: London Group Shot ::
:: Strobist Flickr Threads: What did you get for Christmas? ::


__________

New to Strobist? Start here | Or jump right to Lighting 101
Got a question? Hit me on Twitter: @Strobist
My current project: The Traveling Photograher's Manifesto


Permalink

'Twas The Light Before Christmas


UPDATE: Also after the jump: A Christmas Day game plan.
___________________

It's Christmas Eve, and whether you celebrate Christmas or some other holiday in your household, the last week of the year is a very special time.

The entire staff here at Strobist International Headquarters will be spending Christmas Eve and Christmas with our families. So there won't be any posts on the 24th or 25th. (We even let the interns have Christmas off.)

But we still have a few tricks up our sleeve before the calendar rolls over. More after the jump.
____________________


If you do happen to cruise by here during that time, I would appreciate it if you could take a moment to declare your status in the latest question in our ongoing reader poll. This week we are wanting to know if you in it for love or money. I am already surprised at what percentage of you are full-blown amateurs. Must have been the pictures that fooled me.

(The poll is at the bottom of the sidebar on right.)

The last poll did not surprise me in direction, but floored me in magnitude. Here's the sad fact: We are over 90 percent male.

I will soon be hitting up the (apparently) 12 women who actually read this site for ideas on what we can do to make lighting education more accessible to your gender-mates. So, please be thinking about that. I mean seriously, there has got to be a way to balance that statistic out a little.

(Besides, just think how pathetically boring our parties would be...)

In addition to the pro/am thing, I am going to be polling on camera platform and a couple of other things. The general idea is to replace my hare-brained assumptions about you guys with some decent info. This will help me to better position the content on the site.

We have a few more cool lighting posts coming between now and January 1st. And there are a few New Year's resolutions to be made (and subsequently broken.)

Also, there is the small matter of a few SPOY prizes to consider. Five of you folks are gonna have an extra-special, late Christmas.


But until then, may Santa bring you a set of Pocket Wizards (or at the very least, a cardboard snoot.) And please accept my best wishes for a Merry Christmas and/or Happy New year from my family to yours.

And yes, sadly, this was shot with on-camera flash. But it was hurriedly set up for another family to shoot. They were also there to kill a perfectly good evergreen. And besides, we used the sun as a rim light. (Here's the tree, dressed up.)

________________

CHRISTMAS PHOTOS UPDATE:

Okay, now for the Christmas game plan. If you are going to be shooting little munchkins unwrapping gifts in the morning, go ahead and stick two speedlights up on stands, bare and pointed to the ceiling, in the corners of the room.

If your tree is in a corner, stick your flashes in adjacent corners for 45-degree bounce cross light. If your tree is in the middle of a wall, stick your flashes in the corners of the opposite wall. This placement is just a quick suggestion, and defintely experiment.

Set your camera on your highest sync speed. Now, using a starting point of 1/4 power on each, test at various apertures until you get a good working aperture. The light should be pretty even all around the room, svae right next to the lights. After you have a good aperture selected for the flash portion of the exposure, vary your shutter speed (opening up) and test until you get a good balance with the ambient lighting in the room.

This might mean windows, Christmas tree lights -- whatever. Remember not to go too low if you do not want to risk ghosting. I'd keep it above 1/30th. But the flashes will freeze a lot of movement anywhay.

Now you'll have soft, even, multi-directional light for Christmas morning. Darn hard to miss with that. You can even test it tonight (Christmas Eve) and you'll be ready with great light when things get a little crazy tomorrow morning.

________________

(Way cool DIY holiday ringlight idea by Peter Boden. See the results here.)


__________

New to Strobist? Start here | Or jump right to Lighting 101
Got a question? Hit me on Twitter: @Strobist
My current project: The Traveling Photograher's Manifesto


Permalink
Registration Opens for Jan. 19th San Francisco-Area Lighting Seminar

UPDATE: The San Francisco-area lighting seminar for Jan. 19, 2008 is sold out. Info and class details follow after the jump. Discussion thread link is here.

__________________________

Two things to note right off the bat:

1. I realize this is a little ways south of San Francisco proper. But this trip coincides with a visit to the nearby headquarters of a very large, unnamed internet-based company. I am scheduled tightly both before and after this seminar, which will preclude the normal Saturday-Sunday combo. So, Saturday it is.

2. Annoyingly, PayPal offers me no way to limit the number of seats in the transactional process. So I will be monitoring incoming the sales realtime and will pull the PayPal link from this page as soon as we get close to the limit. There is a chance that some of you may still apparently be able to register after it fills if you were already into the process when it filled. I will have to issue refunds for those people. It will be first-come, first-served as delineated by the time stamp on the emailed PayPal receipt. Refunds will be issued ASAP, and you will know via an additional email from me. I apologize in advance for this if it affects you. PayPal is very imperfect.
___________________________


Seminar Info and Registration Details

The class is to be held at the Santa Clara Marriott, at 2700 Mission College Blvd. in Santa Clara, CA.

Here's a map:


View Larger Map


With these seminars, my goal is threefold: To refine your approach to creating light, to fill you with as many ideas as possible in a day's time and to have fun doing it.

We'll start with a roadmap for the day, which I will do my best to keep us on. But each session will take on somewhat of a life of its own. Which is a good thing.


Our Anticipated Schedule


Morning check-in/setup: 9:00 a.m. - 9:30 a.m. Please plan to arrive between these times, as we will still be setting up before then.


Morning session: 9:30 a.m. - ~12:30 p.m.

We'll talk about gear (I'll have a good gear selection there for a petting zoo) and take an extended, integrated look at what is essentially the Lighting 102 material in it's entirety. The focus will be on taking all of the things we talk about on the site in a day-to-day sense and integrating them to gain more of a holistic approach to lighting. Everything really is interrelated.


LUNCH BREAK

On your own, approx. one hour, and we'll be looking for your nearby suggestions in the Flickr discussion thread related to this seminar. Link to a discussion thread will be posted shortly.


Afternoon Session:

~1:30 p.m. - 5:00 p.m.

Assuming we have finished the theory stuff, we'll move into the practical/demo session. (Sometimes we go into a little overtime on the theory.) We'll get into some real-world lighting exercises photographing some of the absolute, best-looking lighting-website-reading models in the world.

(You look mahvelous...)

This is basically a lighting version of "Whose Line is it, Anyway?" with a focus on improvisational lighting based on available gear, the room, found objects, lighting mods, etc. I never know what ideas we will come up with, which is what keeps me equal parts interested in and petrified of the afternoon session. It's a good thing.

Shortly after each shoot, we will view each setup and discuss the results onscreen. This instant feedback in a group environment is an amazingly efficient way to drive home the thought and technique process. We can read and write all we want, but for photographers there is nothing better than "monkey see, money do."

(No offense.)

The goal will be to incorporate lighting theory, room environment, assignment constraints and our available gear to create a photo that seeks to produce an photograph that is an appropriate response to our situation.

Working within that framework will allow us to concentrate on better freeing ourselves in the other areas: Creativity and subject/photographer interaction.

The entire day will be a non-stop flow of ideas and techniques, punctuated by spur-of-the-moment Q-and-A. I want you to bring lots of questions, and to feel free to voice the ones that pop into your head throughout the day. In fact, if you do not ask me enough questions, I will start throwing some questions at you.

(Anyone? Anyone? ... Bueller?)

You might want to bring a notebook and pen. (I will have a URL to download the presentation, so you can relax and listen.) And bring a camera if you want to shoot the setups as a visual reference. And dress is casual, so you won't feel out of place if I show up in shorts.

As with my philosophy for the website there will be no secrets and no posturing. This stuff is not rocket science. It's light. And the first step in learning to light is to realize that anyone can get very good at it.

We will plan to wrap up at about 5:00. But if we are still going (and they don't kick us out) who knows. Normally, a fair number of people come back to the hotel bar after dinner, where we discuss lights, darks, ambers -- whatever. Always fun.

If, for some reason, you require a cancellation after booking, refunds will be granted up until January the 10th. After that time, you would be responsible for transferring your seat to another attendee.

Very Important: If, through events beyond my control, I am unable to present this seminar, refunds will be limited to the ticket price. As I already have airfare, hotel room and our venue rental paid in advance, I do not anticipate this happening. But I just wanted to cover all of the bases, in case I get run over by a bus tomorrow, or one of those Big Macs catches up to me.

Bases covered, I have to say that I am very much looking forward to this trip and especially to meeting many of you. As I do more of these seminars, I find that each session develops a vibe of its own. You put a few dozen photographers who are all eager to learn in a room, and what starts out as a simple stack of talking points turns into a rich, organic discussion that ends with everyone - including me - having a head swimming with new ideas.


Registration Details


The cost for the seminar is $159.00. (This seminar is sold out.)

To register for either seminar (with any major credit card) please click on the link at the bottom of the post, which will take you to PayPal. A PayPal account is not required to register. You will be returned to this site after successfully registering. Again, if you are in the process of registering and the seminar sells out, your fee will be refunded by the end of the day. Make sure your PayPal email address is one at which you can actually be reached.

Please leave your name and phone number (and a working email if different from the PayPal address) in the info box on the PayPal page, in case I should need to contact you. There is a discussion thread set up in the Flickr group, here.

I look forward to seeing you there.
___________________________


(This seminar is sold out.)


__________

New to Strobist? Start here | Or jump right to Lighting 101
Got a question? Hit me on Twitter: @Strobist
My current project: The Traveling Photograher's Manifesto


Permalink

Guide Number: Your Free Flash Meter

Pop quiz:

What f/stop will your flash give you through an umbrella at ISO 100 on 1/4 power at ten feet?

Not sure? Read on...

Guide numbers are basic, core, old-school flash photography knowledge. And I can all but hear the old-timers rolling their eyes and saying, "Gee, Dave, whaddya gonna tell us about next, bounce flash?"

But we have gotten so far from this kind of thinking, what with TTL everything, eTTL and CLS, that many people have never had occasion to think about guide numbers. Which is a shame, really, because a working knowledge of guide numbers (GN) can do something very cool: Get your exposures in the ballpark on the very first test shot.

Find out how helpful -- and easy -- using GN is after the jump.
____________________________


And Now, a Word From the Math Department

Okay, let's start with the definition. The guide number of a flash is the product of the f/stop of the exposure at a given distance at ISO 100. Wikipedia has a whole page on it here. But that's all pretty math-centered and kinda inverse-squarish. And you really do not need to know that stuff to use GN to zero in on a first exposure.

Here's how to use it. On just about any hot-shoe strobe capable of manual, there's a guide number calculator built in. The photo up top is from a Vivitar 285HV, which is a 70's-design manual-capable flash. Let's use this as an example.

The four variables are: F/stop, distance, power and ISO. You plug in any three, and the calculator spits out the fourth. For instance, click here to open the 285 GN dial in hi-res in a new window.

This GN calculator is set for full power manual at ISO 200. It is telling you that, at 30-40 feet, you would get about f/4 out of this flash. And if you set the flash to 1/2 power, you'd get f/2.8 out of it at that distance. Here's the cool thing: If you zoom the head -- even on this old-design flash -- it will move the dial and adjust the result.

Here is an example of more modern guide number calculators. Click here to see it big in a separate window. This display (from an SB-800) is typical of modern GN calculators. Every flash is a little different, but they all work pretty much the same way. One thing to remember: The GN calculator display will only pop up if the flash is at it's direct flash setting, i.e., no bounce. This, for instance, is telling me that I will get f/5.6 at ISO 400 on 1/4 power at 26 feet at the 50mm zoom setting.

Play around with your buttons a bit and you will see how yours works. What I like to do is to already know my ISO, my desired shooting aperture and an estimated flash-to-subject distance. Now, by setting up my GN calculator, I just dial in the different manual power settings until my desired f/stop lines up with my flash-to-subject distance.

So, this is pretty cumbersome and slow and why should you even bother, right?

Well, I'll tell you. The first five or six times you have to dial in your GN calculator and learn where you need to set your flash to get f/4 at, say 10 feet, you'll need the calculator to tell you. Then all of a sudden one day, you'll just know.

And if you learn a good anchor point, like say 1/8 power at 50mm zoom, 13-foot distance at ISO 400 = f/8 (exactly what an SB-800 will do at those settings) you'll quickly start interpolating around that to suit your given situation. And then, you really do not even need your GN calculator to get close on the first test.

"But wait," you say. "I'm a hot shot. I use snoots, grids, umbrellas and gels. Won't that screw it up?"

Yeah, maybe. But consistently so. A snoot will be dead-on with the expected aperture in the center of the beam. Your grid spot might knock it down half a stop. Your shoot-through umbrella might knock it down two stops -- but the difference will be the same, every time. Once you learn how much your umbrella knocks your bare flash down, just adjust for that. Ditto for the gels. A typical full color conversion gel knocks about 2/3 of a stop off of your flash.

If you are having trouble getting a handle on your early test pops -- you know, like getting first shots that are about 5 stops off -- this will zero you in real close, real fast. In fact, there is no faster way to save time on your first test pops than to learn to use your GN calculator.

Until you don't need it any more. Then, you'll be faster yet.


__________

New to Strobist? Start here | Or jump right to Lighting 101
Got a question? Hit me on Twitter: @Strobist
My current project: The Traveling Photograher's Manifesto


Permalink

Jan. 19th, 2008 San Francisco Seminar Registration Opens Saturday

Registration for the Jan. 19th, 2008 San Francisco area small-flash lighting workshop will open Saturday morning, Dec. 22nd, at 8:00 a.m. Pacific time. Sorry to bump it up into the holidays, but there were details that had to be nailed down before I could open it up.

Broad strokes, it is basically the same as the other seminars. You can get a good idea of what to expect form the London Seminar sign-up page from earlier this year.

The price is $159.00, payable via credit card through PayPal.

We'll actually be a little south of SF, at the Santa Clara Marriott, with full details to follow on Saturday morning.

(Cool, light-painted bridge shot is by Strobist reader Fgfathome. Click the pic for more info.)

-30-


__________

New to Strobist? Start here | Or jump right to Lighting 101
Got a question? Hit me on Twitter: @Strobist
My current project: The Traveling Photograher's Manifesto


Permalink

Got a Few Dozen Flashes Sitting Around? No?

I love bootstrap lighting ideas.

Darien Chin, of of those crowd-sourcy, peer-to-peer Seattle photogs, made a very creative shot of his car with just a few speedlights. It could have been even cooler, but Darien only had three good sets of AA batts. Click the pic to see how he did it.

(Bonus points for use of duct tape as a clamp...)

-30-


__________

New to Strobist? Start here | Or jump right to Lighting 101
Got a question? Hit me on Twitter: @Strobist
My current project: The Traveling Photograher's Manifesto


Permalink

Annie and Elizabeth, Minute-by-Minute


I have seen a couple versions of video from Annie Leibovitz's Queen Elizabeth shoot. But this is the full segment, and has lots of interesting tidbits. I watched it several times and learned a lot.

Hit the jump for the full, annotated version and links.
______________


1:19 -- Annie scouts rooms, making notes with a camera. This is common practice with pros, not so common with amateurs. I always try to have at least a point and shoot with me for this reason. (FWIW, I also talk ideas into the video recorder built into the camera.)

2:04 -- Please note here that Annie rips off photos far more elegantly than you do. Remember the Tom/Suri Cruise "in the jacket" pic? That's an (cough) "homage" pic, too...

2:10 -- ... on a horse in the state apartments? Can't blame her for trying. Always try.

2:26 -- All that display of wealth, and my eye still tries to figure out what the lights are. Sheesh.

2:32 -- Even Annie's too-cool-for-you assistants wear suits for The Queen. Annie wears sensible pants, and... wait, were those sneakers?

2:37 -- All those Queen pix: One-half hour. Shooting for four setups, too. That's either a tremendous amount of time or nothing, depending on whose perspective you are taking -- Queen Elizabeth's or Annie's.

That's one advantage I tell people about WRT to one Profoto vs. six speedlights: You can split the speedlights up to have several situations pre-set and ready to go. Not so one Profoto 7B. Of course, Annie has all the lights she wants...

2:49 -- What is it, "Take Your Daughter to Work Day?" That's chutzpah.

2:53 -- Eleven. Effing. Assistants.

3:13 -- The Queen is wearing the Full Regalia of the Ancient Order of the Garter, complete with Tiara. But the important thing is that the photog is wearing comfy shoes.

4:00 -- "Sit here like this. We'll do the rest." (I have to remember that line.)

4:05 -- Note the light: Motivated light from the window. Octa through a scrim to further diffuse it. Them there's some watt-seconds, but they'll look good.

(FYI, "motivated light" is a classic Matters of Light and Depth technique. It means to recreate the effect of a seen (or assumed) natural light source -- with more control and/or strength. This is pretty much the Golden Rule for lighting cinematography.)

4:22 -- "Lose the crown, will ya?" (In the 80's, the joke was, people just start talking off clothes as soon as Annie pulled out a camera.) Note how well she recovers after that look? Keeps pouring on the compliments... "You will look better. Less dressy."

Less dressy? (Yeah, and maybe some Chucky D's, like Annie...)

Here. We'll do a couple with the crown on. For the grandkids. Then we'll do it my way. Trust me on this one.

5:10 -- (Cut to scene of Chuck Westfall doing a touchdown dance at Canon's headquarters...)

5:32 -- I found this interesting: Even with someone like The Queen Annie is keeping her face stuck behind the camera while giving full-time direction. This is extreme professionalism head-butting right up against deference. Leibovitz is not going to miss a fleeting expression if she gets a telling glimpse or an instant of unguarded body language.

5:50 -- Still trying for the horse shot. Gotta love that. Softening her up for the next shoot...

7:30 -- So, this is how Royalty does "proofs". Note to self: If trying to impress an important subject, why not output edited proofs as 11x14's? What are they, like $5.00 each now? Nice big, white borders. For $100, you could make a heckuva good impression for next time.

7:36 -- Photoshop. Dang, I wanted that sky to be real. ("... and then we stuck the Queen's head on Scarlett Johansson's body... ")

7:46 -- "Did she like them?" (Well, she approved them, didn't she?)

___________________


Related reading:

:: Images From the Shoot ::
:: Photographs: Annie Leibovitz 1970-1990 ::
:: Ross Lowell: Matters of Light and Depth ::
:: Discussion Thread on Flickr ::


__________

New to Strobist? Start here | Or jump right to Lighting 101
Got a question? Hit me on Twitter: @Strobist
My current project: The Traveling Photograher's Manifesto


Permalink

Easy Nikon SB-600 Sync Jack Mod

For most people, the biggest difference between the Nikon SB-800 and SB-600 speedlights is the presence (or lack) of a Pocket Wizard-friendly sync jack. Remember the genius/insanity guy from a couple weeks ago?

Well, here's another idea from him that is all genius without that pesky "insanity" part. It's also cheap and easy.

Aki K. has taken the little AS-19 stand thingie that comes with the SB-600 (and the -800) and created a slick little sync jack mod using a female 1/8" mono jack. That's about three bucks at Radio Shack or any one of a gazillion other places.

The genius is in the simplicity: He drilled a couple of holes in the AS-19 and connected the leads of the jack (using bare wire) to the center point (positive) and along the rail (negative) areas of the insides of the plastic cold shoe part. The jack fits right one of the other shoe feet. A jack, a little wire, a drill and some glue. Sweet.

Here's the genius-er part: Your required cord to sync your SB-600 to a Pocket Wizard is now a 1/8" mono-to-mono audio patch cord -- also $3.99 at Radio Shack and many other places.

Nice thinkin' there Aki. Click the pic (or here) to see more details on how to do it, ask him questions, give him props -- whatever. You can also see his whole camera kit, chock full of second-hand bargains and DIY'd goodies, here.


__________

New to Strobist? Start here | Or jump right to Lighting 101
Got a question? Hit me on Twitter: @Strobist
My current project: The Traveling Photograher's Manifesto


Permalink

How To Balance Flash with Moving Continuous Light Sources

strobist fire batonEver see those photos that pop up in the Flickr pool that combine strobe and moving lights? Putting light sources in motion -- or capturing lights that move on their own - is fun. But balancing them with strobe means solving for two variables.

For some shooters that can get a little complicated, but it doesn't need to be. More after the jump.
___________________


The Movement Is Your Shutter

The first step in balancing lights-in-motion with flash is to realize that moving light sources are very much like flash, in that their exposure is aperture-dependent. Take the fire juggling photo above for instance, which is by reader Hugh Beauchamp.

The fire in this photo is continuous, so its exposure is determined by both shutter and aperture. But since the continuous light source itself is moving, the speed at which it is moving already determines the effective shutter speed for a given place in the photo.

The faster it is moving, the less time the fire spends on any one spot on the frame to burn itself in, so to speak. So the speed of the motion of the flame is, in effect, it's shutter speed. Assuming a reasonably constant speed, the total exposure is now going to depend on the aperture. (It'll also depend on the ISO, of course, but let's zero that out for the sake of simplicity.)

Let's assume a dark environment. To duplicate the technique of Hugh's spinning fire shot, the process would simply be this:

1. Set your camera to a reasonable ISO. Say, ISO 200, for example. Lock down in a tripod.
2. Get your subject to run through the motion at normal speed as you shoot a few test exposures.
3. Varying the aperture and chimp the back of the camera until you like the look of the burned-in flames.

Now, you have your working aperture, and your shutter is going to be determined by how long and complicated you want the fire "tracks" to be. In this case, Hugh shot at f/10, for 1 second. (He was shooting at ISO 100.)

Now that you have a working aperture, it is a simple thing to adjust your flashes until you get the level of light that you want on your subject. Given that Hugh was shooting against a dark background, he wisely chose to use back/rim lighting to define his subject. This gave him dramatic light (which worked well with the fire) and good internal separation of his tones.

Hugh also chose to include his flash in this photo, which I like. He could have killed the light stand very easily by running a strip of matte-black gaffer tape down the front pole and legs, but now I am just being picky.


You can see Hugh's full lighting setup here, which is basically back/rim lighting plus a CTO'd flash for the face.

You might be thinking it would have been cool to do this at twilight instead of at night, But that's gonna make the whole thing more complicated, as now you have to worry about the sky "burning in" through parts of the juggler as he moves. Not to say that it can't be done. Just gets a little more complex as now you have to worry about your background tracking in various parts of the frame.

Cool shot, Hugh. And for those of you thinking of trying it: Please make sure you have a couple of buckets of water on hand. And resist the urge to keep shooting -- no matter how cool it looks -- if the whole field goes up in flames.

(You can see Hugh's whole combustible set of photos here.)


__________

New to Strobist? Start here | Or jump right to Lighting 101
Got a question? Hit me on Twitter: @Strobist
My current project: The Traveling Photograher's Manifesto


Permalink

SPOY Prize #5: An AlienBees ABR800 Ring Flash

I am happy to announce that the final prize in the Strobist Pictures of the Year is an AlienBees ABR800 Ring Flash. And at 320 watt-seconds of power (with continuous power variability over a 5-f/stop range) it'll do just about anything you need a ring flash to do. Priced at $399.95, it is no suprise that it is going through the photo community like a hot knife through butter.

But AlienBees Head Honcho and flash engineering legend Paul Buff did not stop with just a standard ring flash, bucko. He also created a full line of inexpensive light modifiers that can turn the ABR800 into a wide range of light sources.

You can shoot through the flash unit it as is, or mount one of several soft-box-like accessories to it. The octagonal soft boxes (30 and 56 inches, respectively) can be configured as either shoot-through or standard soft light sources, depending on the diffusion fabric you choose. Honestly, it is hard to imagine a more configurable high-power main light for any price.

Paul Buff himself is one of the most wonderfully eccentric orange-haired rocket scientists you'd ever want to meet. All of his life, he has marched to the beat of a different drummer. And his penchant for thinking outside of the box has resulted in a string of high-value lighting gear coups over his entire career.

I had been planning to visit the Nashville headquarters and do a post about it, but someone has already beaten me to the punch. The Sound Advice blog did it here. That blog, written by Don Lindich, has recently jumped to the top of my daily read list, BTW. Great stuff.

I am obviously very happy to be able to offer an ABR800 as one of the prizes in the Strobist Photos of the Year. Please join me in thanking the folks at AlienBees for donating such cool piece of gear.

NOTE: The ABR800 operates only on 110v / 60 hz AC power. If you live in a country that has a different voltage arrangement, you will either have to supply your own appropriately spec'd power converter, purchase a portable battery power pack or select a different prize.

___________________________

Read More:

:: ABR800 Product Page ::
:: AlienBees Home Page ::
:: Sound Advice Tour of AlienBees Intergalactic HQ ::
:: SPOY Rules and Regs ::

-30-


__________

New to Strobist? Start here | Or jump right to Lighting 101
Got a question? Hit me on Twitter: @Strobist
My current project: The Traveling Photograher's Manifesto


Permalink

That Does It. I'm Moving to Seattle.


Seattle is now officially the Center of the Universe for crowd-sourced, peer-to-peer lighting education.

They are having classes. They have adopted an A-list pro shooter. And now they have invaded a parking garage (great idea) for their latest in a seres of regular meetups. It's like grunge music in the early 90's, except with speedlights.

No kidding, if I were 25 years old and wanted to learn to shoot better, I'd move there in a heartbeat. In fact, I am ready to go there now. And while I am thinking about it, how did you snag a garage? Just show up or what?

All you guys have to do is convince the Missus, and I am there.

UPDATE: This is apparently the fourth time they have descended on this garage. Take a look at some of the results.

-30-


__________

New to Strobist? Start here | Or jump right to Lighting 101
Got a question? Hit me on Twitter: @Strobist
My current project: The Traveling Photograher's Manifesto


Permalink

SPOY Prize #4: A Pair of Pocket Wizard Plus II's

You could hardly ask for a more appropriate prize for our bunch than (2) Pocket Wizard Plus II's. Today's booty is courtesy the MAC Group, also known as the Mamiya America Corporation.

Never heard of MAC Group?

You have probably heard of some of their companies: Pocket Wizard, Sekonic, Tenba, Profoto and Toyo-View (just to name a few) are among the many photo names under their umbrella.

Pocket Wizards are the Gold Standard against which other remotes are judged, and I have blathered on about them ad nauseum for the last 18 months. So you do not need me to repeat all of that here.

Suffice to say that not only do you want these, you want as many of them as you can get your grubby little hands on. And maybe, just maybe, you can shoot yourself to a free pair.

Thanks much to both MPEX and MAC Group for this very appropriate prize in support of the Strobist Pictures of the Year.
________________________

Read more at:

:: MAC Group ::
:: Pocket Wizard Plus II Drool-worthy Specs ::

(Pocket Wizard Photo by Krazewerks)


__________

New to Strobist? Start here | Or jump right to Lighting 101
Got a question? Hit me on Twitter: @Strobist
My current project: The Traveling Photograher's Manifesto


Permalink

Bert Stephani's Light Stand Box Strip Light

My 7-year-old's favorite playthings are the boxes that used to contain expensive toys. Belgian photographer Bert Stephani apparently thinks the same way.

For the record, I have nothing against store-bought strip lights. It's just that if I have a limited supply of money, I'd rather use it to buy the things I cannot make. And I can make a strip light modifier easier than I can make a D3.


If you in the market for a light stand, don't toss the box that it comes in. And if you are in the market for two light stands, you may be able to get all Martin Schoeller on someone on the cheap.

Check out Bert's blog for the details.

-30-


__________

New to Strobist? Start here | Or jump right to Lighting 101
Got a question? Hit me on Twitter: @Strobist
My current project: The Traveling Photograher's Manifesto


Permalink

The SPOY Prize Strip Tease Continues

When I first heard that the folks at Elinchrom were interested in sponsoring our contest, visions of Maryam Abdullina, the stunning Kazakh model in the Joe McNally / Elinchrom lighting brochure, danced into my head. But alas, modeling sessions with Ms. Abdullina are not Elinchrom's to contribute.

To find out what Elinchrom did contribute to the Strobist Photos of the Year and the the folks who made it happen, take a peek behind the jump veil...
________________________


Elinchrom has generously ponied up a D-Lite 2 Kit, which is an AC-powered (2) 200ws-monobloc kit. Each of the strobes is more than three times as powerful as your average speedlight, but the goodness doesn't stop there.

The D-Lite 2 Kit prize was arranged by Alex at The Flash Centre, a UK-based group of stores that specializes in lighting gear. I visited the London store in May. (They also have stores in Leeds and Birmingham). Giant photos shot by customers up on the walls, lotsa lighting conversation -- the whole nine yards. Ran into Neil Turner (of the lighting site dg28.com) last time I was there, too.

If you are in the UK and have not yet visited a Flash Centre, you are missing out. Just a good place to hang for an afternoon and get your wallet lightened.


Back to the Elinchrom gear, here are some specs on the D-Lite 2:


• 200 WS monobloc flashes, AC-powered.
• 100-watt modeling light
• 5-f/stop manual range
• 0.7-second recycle (0.8 sec on 110v power)
• Flash duration 1/1200 sec.
• 5v trigger voltage -- safe for your dSLR


There are more goodies, too. The kit comes with:

(2) flash units
(2) light stands
Sync cables
Protective caps
(2) softboxes
Bag for monoblocs
Bag for stands
"Better Pictures" DVD
(2) modeling lamps.


Note: These are shipping from the UK, and may very well come with UK-tipped power cords. But they are multivoltage compatible, and appear to have standard power cord connectors on the flash head end for easy, cheap swapping out.

If you own a D-Lite 2 Kit and can confirm this, please let us know in the comments.


Here's a little clip from the lighting DVD that ships with the kit:


So, getting interested yet? We now have the Canon G9, the SB-800's and the Elinchrom kit. And there are two more to come. Get those pix into the prize pool before the 18th!
___________________________


Please join me in thanking both Elinchrom and the gang at The Flash Centre (especially Alex) for making this happen. We have a good number of readers in the UK, and it is great to see the UK flying the flag in the prize pack.

Please see more at:

:: The Flash Centre ::
:: Elinchrom Main Site ::
:: Elinchrom Product Line PDF ::
:: Elinchrom Lighting Brochure, by Joe McNally ::


__________

New to Strobist? Start here | Or jump right to Lighting 101
Got a question? Hit me on Twitter: @Strobist
My current project: The Traveling Photograher's Manifesto


Permalink

Who Are You and What Do You Want From Me?

Over the next few days, I will be doing a little research to help me better guage the makeup of the site's readership and learn what I can do to make this blog better. I will be doing this through a series of simple, one-question polls. They will be located at the bottom of the sidebar on the right.

Who you are -- and what you think -- matters very much to me, and I very much appreciate your participation. So please feel free to leave relevant comments under this post, too.

I will be sharing info gleaned both from your responses and from site metrics after the fact.

Thanks much,
David


__________

New to Strobist? Start here | Or jump right to Lighting 101
Got a question? Hit me on Twitter: @Strobist
My current project: The Traveling Photograher's Manifesto


Permalink

Take Chances With Your Lighting

strobistgator
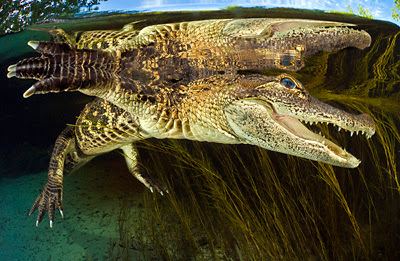
Florida nature photographer John Moran, whom we previously have featured several times, gets up close and personal with a wild alligator in the latest in his ongoing Florida nature series.

John has long been a mentor and compass point of mine. I have always admired the lengths to which he was willing to go to make a striking photo. As for protective gear in this instance, John was wearing a false sense of security and little else.

For more on his lighting technique, "alligator luv" and links to more work, hit the jump.
_______________________


Alligators All Around

Says John:
" I shot it with a Nikon D200 with a 10.5mm fisheye lens in a Subal housing with a dome port. I used twin Inon underwater flashes plus a slaved nikon SB28DX flash held above the gator.

I worked with a biologist and a lighting assistant in a clear-water spring run in the ocala national forest. I've long been fascinated with alligators. My initial concept was to do a split half-in, half-out photo of the gator, but once I was in the water I saw the surreal surface reflection and knew that was my picture.
       
I made the photo in September and displayed a large, framed print soon after at my gallery for the monthly gallery walk in downtown gainesville, an event that allows art lovers to enjoy free wine and hors d'oeuvres to go along with the paintings and photographs on display.

A woman who'd been enjoying more than her share of the free wine stepped into my gallery, gasped when she saw the photo and blurted out, 'are those alligators making love?'

My work is driven by my desire to show people Florida in a way they've never seen it. my background as a newspaper photographer taught me to welcome the challenge of making pictures that surprise the viewer."
_______________________

Typically, photographers start out taking unnecessary chances to get cool photos and graduate towards smarter, safer environments. Given this earlier, long-distance flash shot of a herd o 'gators taken safely from a dock, I would say that Moran is on somewhat of a reverse track:

You may remember John from the other times he has been featured on this site, including his Hale-Bopp Comet photo, and his shot of fireflies at dusk.

To see more of John's work, visit his site at www.johnmoranphoto.com/.


__________

New to Strobist? Start here | Or jump right to Lighting 101
Got a question? Hit me on Twitter: @Strobist
My current project: The Traveling Photograher's Manifesto


Permalink

Everybody Into the Pool

Lotsa cool pix falling into the Strobist Flickr Pool in advance of the SPOY judging.

Yet another prize will be announced later today -- and we still have two more to go after that. Remember, you can't win if you don't play.

-30-


__________

New to Strobist? Start here | Or jump right to Lighting 101
Got a question? Hit me on Twitter: @Strobist
My current project: The Traveling Photograher's Manifesto


Permalink

SPOY 2007 Prize #2: (2) Nikon SB-800 Speedlights

I have said it before, and I will say it again: The Nikon SB-800 Speedlight is, IMO, the best small flash available today. Or ever, for that matter.

Consider the capabilities:

1. Full Nikon CLS compatibility, either as a commander unit or a remote. If you shoot with any recent Nikon dSLR for which the pop-up flash acts as a CLS commander, a pair of these puppies will rock your world.


("But wait, Dave," you say. "I shoot Canon/Pentax/Sony/Pinhole/Etc...")

Hold your horses, Spanky. Look at what this thing will do with your camera:


2. Full manual control -- down to 1/128th power -- in 1/3-stop increments.

3. PC jack, for easy external sync with Pocket Wizards. (Heckuva combo, BTW.)

4. Built-in, super-sensitive slave (see how to enable it here) for easy triggering from your other flash.

5. Built-in modeling light -- very useful for small-scale light painting.


So, what could be better than an SB-800?

Two SB-800's of course. Essentially, even if you are not a Nikon shooter, (not that there's anything wrong with that) two SB-800's turn your one off-camera flash into three synched off-camera flashes.

And if you are a Nikon CLS shooter already, well, you just moved into Mr. McNally's neighborhood. Gear-wise, anyway.
_____________________


Big CLS, full-manual, super-slave thanks to Geoff at Nikon for making it happen. To learn more about the Cadillac of Flashes, (as they say in Get Shorty) hit the folowing links:


:: Nikon SB-800 Specs Page ::
:: Nikon CLS Multi-Flash Virtual Demo ::

-30-


__________

New to Strobist? Start here | Or jump right to Lighting 101
Got a question? Hit me on Twitter: @Strobist
My current project: The Traveling Photograher's Manifesto


Permalink

You Screwed Up. Congratulations!

National Geographic photographer Bill Allard famously said that in photography, interesting failures are more valuable than boring successes. That's a thought that has been sticking in my mind recently as I try to find ways to give more of an edge to my lighting.

It is easy to hang out in a comfort zone, because you have the security blanket of knowing that your go-to tricks will always work. But they also lead to a sameness and safeness that is antithetical to growing as a photographer.

For a good example, I offer a pair of photos by Strobist reader Tom Miles, after the jump.
____________________

I was cruising through the Strobist Flickr pool recently, and saw two photos by London-based reader Tom Miles, of ice skater John Hamer. John was shooting Hamer for Men's Fitness Magazine, which focuses on alternative sports.

Miles posted two photos of Hamer performing a move called a "death drop." In the first, above, Miles' lights fired as he intended them to.

The next photo was a mistake, in which Miles' front light did not fire.

Said Miles of the photo:

"... Obviously, it'd look loads better if the front light had fired. Bugger. ..."

Call me crazy, but I find the mistake photo more interesting than the success.

Is is ideal? No. But it would get me thinking along a more interesting path that might involve creating the scene for a photo through backlighting, then adding just a little hard, directional light, maybe from hard camera left, to crosslight just a little detail.

Does that mean you go out and shoot just the edgy photo and come back with only that? No, not if you want to get called back to shoot another assingment. But if you can adjust your workflow so as to not waste much time and energy getting the safer stuff, you can move on to photos that take more of a chance -- and offer a bigger payoff if they connect.

And between these two photos, IMO, the sweet spot if somewhere in the middle. Build the lighting around edgy backlight, then light just enough from the front to reveal sufficient to satisfy the literal content needs of the magazine. Maybe a 1/2 CTB on the background and a 1/2 CTO on the hard-left skater light, too. Not much color, just a little cool/warm contrast.

In my experience, happy accidents such as Tom's have been the most frequent way in which I have gotten those little visual kicks-in-the-butt that make me think very differently about lighting. My default is to get something safe, early, and then see what I can do to stretch myself a little. Or a lot.

It's unintended consequences like the almost-silhouette above that get me thinking about planning a shot like this from the get-go next time. Not that I am not still gonna play it safe -- I want to come back with a useable image. But if I can get that quickly, I would always be looking to be going for something more interesting and risky.

And the more often you pull off an interesting, risky success, the more you start to realize that when it comes to designing lighting, safe is the enemy of interesting.

(Click the pix for 500-pixel versions. Especially the "screwed-up" one.)


__________

New to Strobist? Start here | Or jump right to Lighting 101
Got a question? Hit me on Twitter: @Strobist
My current project: The Traveling Photograher's Manifesto


Permalink