Strobist is an online project that was published from 2006 to 2021 by former Baltimore Sun photojournalist David Hobby.
Available here as a completed archive, and presented without advertising, it remains world's most comprehensive source for photographic lighting education.
New to lighting? Welcome. Start with Lighting 101, linked below, as millions of other photographers have done before you. Or scroll down further to access Strobist's other free courses.
Lighting 101 is the core foundation of Strobist. It is a free, start-from-zero tutorial that will teach you the basics of lighting and minimalist lighting gear. Lighting 101 will have you up and running in no time—and at minimal expense.
Lighting 102 is the sequel to Lighting 101. Where L101 was about gear and basic concepts, L102 will teach you how to further understand and control the qualities of your light to make it do your bidding.
Lighting 103 is a deep dive into color. It explores the intersection of light and color to help you give your photos more nuance, realism and depth.
Strobist Lighting Cookbook combines the concepts learned in L101-103 to give you more understanding and fluidity with your lighting. We also explore some of the shoots from a 360-degree/ecosystem perspective.
A Baker's Dozen: Here you'll find a sampling of posts to help you understand the scope of the lighting education on this site.
On Assignment features full walk-throughs of over 170 real-world assignments, complete with discussions ranging from lighting to concept to execution—and even some screw-ups.
It (largely) follows my path as a newspaper shooter and beyond, progressing from simple speedlights to more complex studio flashes.
Sad fact: There are a lot of companies that make some pretty crappy lighting gear, but are still happy to take your money. The Strobist Gear Guide is designed to help you avoid making many of the costly rookie mistakes I made over the first few years of my career.
This is the gear that works for me, day in and day out. It is solid, reliable and will get the job done without destroying your wallet.
Books are gear for your brain. Chosen wisely, they represent some of the best value for dollar you can spend as a learning photographer.
Featured on the Strobist Bookshelf are my current favorites, winnowed from hundreds of books read over the course of my career. It is a relatively short list, but there are solid selections for nearly any lighting photographer.
Since 2018, I've been teaching an annual workshop on how to think more like a photojournalist when you travel with your camera. The Traveling Photographer's Manifesto is, in many ways, the book version of this workshop. Learn more, here.
The Return of a Classic?
*****IMPORTANT UPDATE***** Alas, the reissued Vivitar 285HV is a Vivitar in name only. (They have also morphed into the "Cactus KF36". Same flash.) This article, originally written in 2007, has been updated to reflect that the reissued version has turned out to be famously unreliable. Such a shame. PLEASE read the appended sections below for more info.
__________
To say that the Vivitar 283 and 285 flashes were regarded as workhorses would be rather like calling the VW bug just another popular small car in the 70's.
Consider this little factoid:
Vivitar introduced the 283 in 1972. By 1976, they had already produced their 3,000,000th unit. It's actually a ceremonial flash, made of gold, and it sits in the office of Jim Wellington, who is a Big Cheese at the company.
Jim has been with Vivitar since portable flash was a small pile of magnesium powder. Okay, maybe not quite that long, but Jim has been around the block a few times.
I spoke with Jim last week to get the skinny on the reintroduction of the 285HV. The 285HV is basically a pimped-out 283 that also offers a zoom head and full manual control - just the way we like it. 285HV's are also safe for your digicam, with a ~6v trigger voltage.
PLEASE NOTE that older 285's which are NOT designated as "HV" are NOT voltage safe and can fry your digital baby. Be warned.
The Vivitar 285HV, and its less-versatile sibling, the 283, have been a staple of off-camera lighting for more than a generation. But newer model flashes have gotten more computerized, with TTL functions and wireless IR capability. But they have also gotten price tags to match, heading north of $300 each.
Which is why last year when I started the site, I recommended scrounging for old Nikon SB's. They offer reliable, (and variable) manual flash with a PC jack without the $300 price tag. And at the time of my writing, you could snag them for less than $50.
Alas, the notion of off-camera manual flash gained a tad in popularity over the last year. Those same flashes now regularly go well north of USD $100 - if you can find them. As a side note, I recently picked up a couple of used SB-26's on eBay and you chowderheads bid me past the three-digit mark. Serves me right, I guess.
But now, Vivitar has also noticed the resurgence in off-camera manual flash and has reintroduced the classic workhorse Vivitar 285HV. Actually, some company you never heard of bought the rights to this name from Vivitar and started reproducing the flash. Badly.
BOTTOM LINE: Don't Buy This Flash
I hate to see this -- a company buying the name of a formerly great piece of gear, and then cranking out poor quality versions on the cheap. That's why you can now get a flash that looks just like a V285, but is also labeled a "Cactus" flash.
They are total crap. Don't let the reputation fool you. And sadly, when buying used it is hard to tell whether you are being offered the newer crap version, the mid-aged good version which has a safe sync voltage, or an older version which can kill our camera with very high sync voltages.
Fortunately, there are very good alternatives. Used Nikon flashes (SB-24, -25, -26 and -80 in particular) are great value models from which to choose. Unlike the new crap versions of the once-venerable 285's, they are well made.
__________
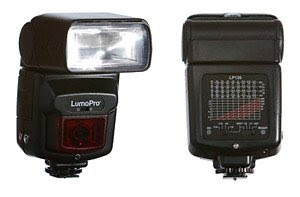
But there are great new alternatives, too. Deserving special consideration is the LumoPro LP160 (much more info here) which has full manual control, a killer slaves and syncs four different ways. (Hot shoe, slave, standard PC and miniphone jacks.)
Plus, it has an unheard of two-year warranty. So unlike the new 285/KF36, there is little to no risk involved.
In short: Please, PLEASE do not be fooled by the great reputation of the Vivitar name. Many, many people made this mistake when the flash was first reintroduced in 2007. Don't get taken.
Sadly, until we found out the the new 285 was in fact a dysfunctional sheep in wolf's clothing, I was responsible for introducing many readers to this dressed-up dog. Which is why I have taken the extraordinary step of completely rewriting an archive post.
I'm new to all this and I dug up my dad's Vivitar 285HV. I just got some Phottix radio triggers. Is it okay to connect them to the old Vivitar? Im scared of frying them!
Ah, the trusty old Vivitar 285. The older ones are great flashes, but with one potentially fatal flaw. You don't want to go sticking that flash on just any camera or remote… Read more »
Step right up, all you DIY-ers. Today's post will point to a few fun projects for those of you with more brains than money.
First off, is this cool Vivitar 283 homebrew varipower hack, courtesy Metropolicity. Turns out the formerly $20 now $35 Varipower VP-1, which makes a Vivitar 283 an infinitely controllable manual flash (over a 5-stop range) is just a plain 'ol 100k linear pot in disguise. Click above to find out how to ape one for just a few bucks.
Speaking of 283's, a Big Honcho at Vivitar just told me how to tell the "digicam-safe older 283's" from the "not safe older 283's" that will smoke your expensive little baby. The following 283's are safe, with a low trigger voltage (~6v):
• Ones marked "made in Korea." • Ones marked "Made in China." • Ones with a red dot in the battery compartment.
According to Vivitar, the above flashes are safe.
Not so the following:
• Any Vivitar 283 marked as "Made in Japan."
These have a synch voltage of 300 volts. Do not, repeat DO NOT, connect it directly to your digicam via hot shoe or PC cord. Or lick it when it is charged up.
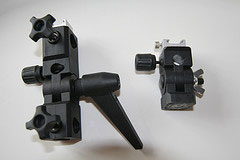
Next up is a little space-saving hack for the umbrella flash bracket. Literally. (He just took a hacksaw to his bracket and played with some bolts and epoxy.)
Click through to see how to tighten up on space and weight the next time you are schlepping your lights up the Andes or something.
And lastly, a neat little project that popped up in a cryptic photo posted in the discussion group. Check out this tutorial on how to build a slave for next to nuthin'.
Here's what I am thinking: With this thingie and the single AA-powered flash from a disposable camera, you could make a little slaved, manual miniflash for accent lights or whatever. You could use the neutral density gels from the free sample packs to control the output, too.
The Vivitar 285HV is a decent option for people looking for a new, inexpensive, manual-capable flash with an external PC jack. But one minor annoyance is the proprietary sync jack.
(C'mon, Vivitar folks. Get a clue already.)
Strobist reader Nathan Kerr has posted a tutorial on how to swap out the weird sync jack for a 3.5mm mono female minijack. This means that you can easily connect a Pocket Wizard, for instance, with a $3.99 mono audio patch cord from Radio Shack.
Much better than being held hostage by the Vivitar Sync Cord Mafia.
I am a big fan of cheap, elegant solutions to problems like this. And the soldering is really pretty straightforward if you are comfy with an iron.
As always, beware the electrical guts of an electronic flash. And don't go licking any capacitors.
UPDATED March 22, 2009, to add latest user feedback on LP120 and YN460. See below. __________
At long last, there are finally a few lower-priced alternatives to cruising eBay for a used Nikon speedlight or forking over a few hundred bucks for a new flagship off-camera flash.
Hit the jump for all the deets on the new LumoPro 120, the Yong Nuo YN460 and the Cactus KF36. __________
Totally In Sync: The LumoPro LP120
So, what if someone came to us and asked what we should include -- and exclude -- on a hot-shoe flash designed for photographers who light?
That's exactly what happened with the new LumoPro LP120, which was commissioned by Midwest Photo in response to the vintage speedlight availability (or lack thereof) and recent Vivitar quality issues.
The LumoPro LP120 was designed specifically for off-camera lighting in the manual mode. The idea was for it to have everything you want -- and nothing you do not want to needlessly pay for.
Major props to Moishe at MPEX for taking on this project. None of the big manufacturers were willing to step up to the plate, so he did it himself.
Features:
• Standard bounce and 180/90 swivel.
• Manual zoom head (non-motorized -- similar in function to the 285.)
• Full manual adjustment down to 1/32 power, with no "missing" levels like the 285.
• Important: There is no auto or TTL capability on this flash.
• Power is said to be equivalent to a 285 -- GN 80 in the normal zoom position. (I have not tested this first hand yet.) It's juiced in the tele position, of course, at the expense of beam width. This number can be greatly affected by the flash's zoom setting and is an easy way to fudge the number. Always go apples to apples.
• Shoe is strong plastic and it is able to be replaced if it breaks.
• Two-year warranty.
• Now, the biggie: Four-way sync. It has a hot shoe, an external PC jack, a 1/8" jack and a built-in optical slave. I did get to test the slave and it rocks. A little directional, but that is good as it gives it added sensitivity. The flash head rotates independently of the slave, so you can aim to your best advantage. __________
The combination of slave and 2-way external sync jack make this one darn near universal. You only have to hard-sync one flash in a multi-flash setting (within reasonable distances) and that one flash can be synched with a hot-shoe based remote, a PC cord or a 1/8" cord. The slave worked just fine around corners indoors in my testing.
This is how I work almost all of the time with my SB-800's, now that I am usually the only photographer in the area when I am shooting. (In multi-photographer settings, you would still want to hardwire or PW everything.)
Price is $129.95, thanks to leaving off the auto and the TTL stuff. The first batch is shipping now from MPEX. Note that the various MPEX kits will henceforth include LP120's instead of Vivitar 285s. (You may be able to swap into a 285 -- I dunno. Don't know why anyone would want to, tho..)
Still unknown: Flash duration at various settings. Factory specs do not list it, and MPEX is looking for someone who can test it. If you are that person, check in on the discussion thread linked below.
UPDATE: Exactly as you would expect, full power flash duration is 1/1000th of a sec and goes down to 1/20,000th of a sec at 1/32nd power.
QnA, discussion and results from early adopters are already being thrown around on this dedicated Flickr thread.
(UPDATE) LP120 Feedback Coming In
The Lumopro LP120s seem to be generaly well-received but there are some reports coming back about switches and WA panels not lining up properly.
The flashes themselves are working fine, but the fit and finish reports are enough to where MPEX is inspecting every flash before it is shipped in a bid to spot any quality issues before they go out.
It's worth noting that MPEX is eating their own cooking on this one, as the flash does come with a 2-year warranty. And any feedback from users is appreciated and will be passed along to the manufacturers for the next run. It is worth the effort to get a standard flash that is both reliable and available.
The discussion thread is here. Please post your questions and/or observations, good or bad. The information is valuable in both cases. __________
The Cheap Date: Yong Nuo YN460
Second, and looking for all the world like an generic SB-800, is the Yong Nuo YN460. It is just coming into the retail pipeline and I got a chance to play with one last week at PMA.
It is small, and has a very slick-looking manual adjustment on the back -- just tap the button to add or subtract a stop of power, down to 1/64th power. It also has a built-in optical slave, which seems to be housed in the flash tube area. This is pretty dumb, IMO, as you cannot orient the slave in a different direction from the head.
The LP120, above, has the slave in the front so you can swivel the flash to catch another flash better -- independent of the direction the head is pointing.
But the YN460 is popping up for under $50 in some of the direct-to-retail Hong Kong shops, too, which is nothing to sneeze at.
Other things that irk me a little:
It looks like an SB-800 or maybe an SB-600 (and appears to take identical head-mounted accessories) but it is two stops less powerful than the SB-800, at least according to some early testing. Also a bummer -- no zoom for the head and no external sync. But if you use hot-shoe-based remotes, that last one is no biggie.
And I could live with that package if I were looking for a rock bottom manual flash. But more worrisome is the reported inconsistency in the output at the low ranges. Not my findings -- that was from an early adopter on the thread linked below. But at less than $50, you'll have to make that call for yourself.
Lotsa pix here, and a discussion thread (with retail sources) here.
(UPDATE) YN460 Feedback
The Yong Nuo YN460 seems to be experiencing rather more variability in build quality. Some people are getting good copies, and some people, like Dan Wang, are getting copies that they have dubbed, "The Demon Flash from Hell":
The YN460 thread is here. Please sound off with your experiences, good or bad. We wanna know. __________
Déjà vu All Over Again: The Cactus KF36
Waitaminnit. This one looks a little familar...
The Vivitar 285HV, once the go-to flash for off-camera manual enthusiasts, died a slow and painful death in the quality-control department. And in the end, Vivitar was bought by Sakar, leaving the (once) venerable flash's future in limbo. It has been revived by the same people who make the Cactus remotes, and rebranded as the Cactus KF36.
Same specs as the old Vivitar, but anybody's guess as to the build quality. Main specs: Bounce/zoom head (non-rotating) partial manual control (1/1, 1/2, 1/4 and 1/16 power -- no 1/8 for some insane reason. GN is 120, but that's in the 85mm zoom mode. (See above.)
It has an "auto" mode which can actually be very useful when hi-speed synching with a G9, etc. In the mixed-blessing dept., it has a proprietary (arrrrrrrrgh) sync jack.
For Pete's sake, people, put a PC or 1/8" mono jack in there. Seriously, the world is not going to come to you on this one. Sony Betamax -- white courtesy phone, please...
Again, quality is yet to be determined. Is it the old (really good) build quality from way back? It is the recent (bad) build quality from more recent times? Is it worse?
We will not know until real-world reports start to come in. If you decide to take one for the team, please report back in here, on the Flickr discussion thread.
The biggest thing going for the Cactus KF36 is the anywhere-friendly slippery-customs shipping policy of Gadget Infinity straight out of Hong Kong.
I'll give them this: They can get anything anywhere in the world pretty quickly, for way cheap.
My favorite "feature" listed on the KF36 product page, and I swear I am not making this up:
Vivitar 285HV's aren't perfect. In fact, the new ones' synch voltage is so low (good for your camera) that it sometimes gets hinky with certain slaves and remotes.
But then, you can get them for less than $100 and they do have manual adjustment and a synch port. But that synch port is a proprietary one, which means $pecial $ynch cords.
No fear. One of the good things about V285's is that they are quite hackable. And if you know a little basic soldering, you can make that synch outlet pretty much whatever you want.
More info, and links, after the jump.
Neil Creek has a detailed how-to post on how to do just that. (We talked about this briefly in the T-Nut post during HD week.)
Couple of important things to remember:
1. Only the new ones are fer-sure safe with your digicams if you hook them up directly. Old ones can fry your camera with a three-digit synch voltage.
2. PLEASE do not mess around with the inside of a flash unless you are comfy with capacitors and how to bleed the potentially widow-making 300 volts out of them.
Monster Flash Garage: 285HV Goes to 1/1024th Power
We think the venerable Vivitar 285HV rocks right out of the box. But it is also a favorite of the mod squad because it's cheap, rugged, and begging to be tweaked.
This version, created by Jonathan Kau is one of the best I have seen yet. And the ten-stop range is only the beginning. Hit the Flickr discussion thread for the full list of capabilities and the how-to steps for you solder jockeys. __________________________________
Quick, what color is the tile that this Turkish candy is sitting on?
If you said green, you should probably hit the jump to learn about how lighting on two planes gives you more control over your photos.
________________
First things first: The tile that the candy on is actually black.
Second, let's walk through the light reader Nionyn used for the shot and see what's what.
The main light is a gridded Vivitar 283, coming in from front camera left. The second light is another Vivitar 283 from back camera right. The third light is yet another 283, gelled green, aimed at the wall which is out of the frame behind the candy sitting on the black tile.
So, what you are seeing in the foreground is the (gelled green) lit wall being reflected in the black tile that the candy is on. In other words, in this shot, the black tile is essentially a mirror.
Since the front tile is black, the green wall is not being contaminated with any pre-existing tone or color from the tile in the photo's foreground. And since the candy is being lit by two gridded 283's, the light hitting the candy is not spilling onto the back wall. Thus, the smooth, intense color around the candy.
The two items (candy and wall) are being lit on two completely discrete planes. And the fact that the tile is reflecting the back wall (because of the camera position) is what brings it all together.
Reader Keith Taylor photographed the owner of a very large camera repair facility for the Business Outlook issue of Gwinnett Magazine. It's a clean, two-light setup that has a lot going for it.
Take a moment to reverse engineer it (it's an easy one) to exercise your lighting muscles.
Then, for a closer look at what works in the lighting -- and a couple ideas on how to tweak it -- hit the jump. ___________
First off, you may remember Keith from his fireman shoot, which was profiled here earlier. Back then, he was using Vivitar 283's. But he has since moved up to AlienBees 400's.
Since Keith is comfy using his speedlights in manual mode, moving to the big flashes is a piece of cake. Everything you learn with a manual speedlight easily translates to the more powerful flashes.
This shot is lit in a similar manner as his fireman shot, except that the front light is coming from pretty much directly over the camera rather than off to camera left. Said front light is a small Westcott softbox. We know it is directly above camera from the way the nose shadow falls. Easy tell.
The backlight comes in at a lowish angle, hard and blue. It's obviously behind the guy, but we also know it is low from the fact that it is lighting the bottoms of the middle-row boxes.
Think for a sec what this establishes for the boxes, lighting-wise. They are pretty close to being exactly cross-lit: High front vs low back.
Also, they are cross-lit with different colors of light. This makes for a very 3-d effect on the boxes and really maps out the texture of the environment in an interesting way.
He went for broke on the blue gel intensity, which is a totally subjective choice. (Think Spinal Tap, at #11 on the voume scale.) One reason I like the blue family of gels is that they include the CTB, or "color temperature blue" group. They correspond to the opposite, CTO (color temperature orange) gels, which turn daylight into tungsten. Which means that you can get both of them in full strength, half, 1/4, 1/8, etc.
You can get a controllable tonal contrast by, say, lighting your subject from the front with a 1/4 CTO and the background with a 1/4 CTB gel, and the warm-vs-cool thing offsets in a neat way. Plus, you can make it subtle, bang them over the head with color, or anything in between.
Keith has the front-back contrast thing working for him. He also has nice internal tonal separation everywhere except for one place: The guy's head.
His head has a little hint of blue going up the left side. But Keith had better cross his fingers and toes if he wants Camera Guy's dark hair to separate from that dark background in the final product.
There are a couple of ways to go after this. The easiest would be to simply raise the backlight some and nuke Mr. Camera Guy to give him an unearthly blue ring around his head. That'd separate that black-on-black tone, fer sure. But it would also look a little weird.
Remembering Keith has a Vivitar 283 kicking around somewhere in his kit, my preference would be to take care of the black-on-black problem by raising that far background tone up a little. Wouldn't take much, either. You could bring it up to two stops below medium grey and it would separate nicely from Camera Guy's dark hair. If you gelled it to the same color as backlight number one, you'd create a full blue area in the center top that would make the first blue backlight look more natural.
You could stick the 283 right behind the backlight, pointing towards the back of the room. Or, depending on the room itself, you could stick it somewhere low in the back of the room and just wash some blue light up on the wall to make his hair separate from the blackness.
But I'm cheating now, right? Just pulling an assumed third flash out of Keith's bag, as if we all had endless light sources to work with.
There is a way he could use his backlight to do everything: Lose the reflector and point the bare bulb straight up.
Downside is, he'll have to make a little blue gel condom for the AB400 flash tube. But once he gets it gelled, that thing sends blue light out in all directions. Then, all you have to do is gobo it where you do not want light.
I would probably gobo it on the sides, and maybe a little on the top as well. I really like what the directional backlight is doing (at least, in the areas where it is happening.) Gobo'ing the top and sides would accomplish a lot. It would keep the directional light coming from the back. It would keep the blue from getting too hot on the sides close to the light. And it would send some blue light towards that back area to separate the guy's head.
See the online version of the Gwinnett Magazine Business Outlook story here, and more of Keith's editorial portraits here:
One difference in the way good lighting photographers think (as compared to the rest of us) is that they think of light as a means of solving a problem. Other shooters just think of light as a way to create a look. And that look can sometimes grow into a starring role in the photo.
I know this because I am as guilty in this department as the next guy. More than most, to be honest.
But the hotshots tend to think of light as a tool -- one of many -- in the final photo. And to them, light is simply a means to an end rather than an end-all.
After you create your light -- but before you start making your final frames -- take a moment to anticipate the problems you'll see later which can be solved with a little tweak. It'll pay off big in your final photos.
And most important, once the light is nailed down, focus all of your attention on photo/subject interaction. This way you'll stand a good chance at grabbing some (well-illuminated) moments. When the light is good and the photog and subject are clicking together, that's a high-odds recipe for success.
In producing a series of portraits for Gwinnett Technical College in Lawrenceville, GA, Strobist reader Keith Taylor chose to use a two-light-zone setup, including gelled backgrounds, to create visual continuity over a series of photos.
The series is a good example of how lighting design can create a unifying theme for portraits shot at different times, with different subjects, and/or in different locations. I want to take a look at his fireman trainee portrait as an example, but you can see his entire Gwinnett Tech set as a slideshow here.
(More on making the fireman shot after the jump.)
Not Scared of the Dark
Here's the setting, a place that would make many newer, available light-oriented photographers cringe. And Lord help you if you are only sporting on-camera flash. But someone who is comfy with lighting -- especially working background flash against foreground flash -- will quickly see how to make good use of the dark environment.
A dark room is a very efficient canvas on which to add light, because you can do a lot with a little. The reason is that you do not have to overcome high, pre-existing light levels to get the effect that you want. In fact, one of the first things I will do when planning light for a room is to see if I can turn the ambient light off.
Not to say that Keith wanted to ignore the ambient light -- far from it. He chose his aperture/shutter combo to correctly expose the ambient coming in on the floor at bottom right. This will help to separate the camera right hand and camera right leg from the background.
The first light he adds is a Vivitar 283, aimed right back at the camera and gelled with twoCTOs to get a super-warm look to the background.
(Cue the Beavis voice: "Heh-heh.. Heh-heh... Fire.. Heh-heh...)
With one flash and two gels, he has taken a long, dark hallway and connoted fire. Why two CTO's? Because one would not be enough for the look he wanted, which was vibrant, off-the-scale warm. You can stack them, you know.
The light is flaring back into the camera, but that's okay. Because Mr. Firefighter Trainee is going to block it in a moment.
Keith already has a working aperture (whatever it happens to be is pretty arbtrary) pulled from the no-flash available light exposure needed to make the continuous-lit floor section correctly exposed. Let's stop here for a moment and see how he could control his flash without leaving the camera.
A Thinking Photographer's Remote Control
Say the flash is a stop too hot and Keith needed to dial it back down one stop for the effect that he wants. Let's also say, for the sake of discussion, that his chosen ambient exposure is 1/15th at f/4. What could he do to only adjust the exposure of the background flash without leaving the camera?
Well, the flash cares about the aperture, and it is one stop too hot (in our little hypothetical scenario) at f/4. So, to knock it down a stop, all you have to do is to expose the scene at f/5.6, right? But moving to 1/15th at f/5.6 is gonna drop your ambient floor tones down a stop, too. So, to compensate for the fact that we have bumped the aperture from f/4 to f/5.6 to knock the flash down, we also change the shutter from 1/15th to 1/8th of a sec.
Now, with a quick settings change, the floor is getting exactly the same exposure (1/15th @ f/4 = 1/8th @ f/5.6) but the flash's exposure has been lessened by one stop. Neat, huh?
I'm telling you: You do not get a physique like mine by unnecessarily walking all the way down that hall to adjust a flash. I'll dial the front flash up or down as my final exposure tweak. It's only a few steps away.
(Now, where are those donuts we got to fuel the day's shoots?)
Remember, to check your background flash light level to see if it even needs adjusting, you would simply turn your hand into a stand-in for the firefighter and hold it between you and the background flash. (I use the hand model thing a lot.) This way you see how the light will look wrapping around a gobo/subject, as it will be in the final image.
(You know you did it, Keith. Where's that photo!)
Now, Light the Front
Next, you add your firefighter and adjust the power output and/or distance of the foreground flash until he he is correctly exposed at your chosen shutter/aperture combo. (But all that really matters for this part is the aperture.) The foreground flash, BTW, is another Vivitar 283 shot into a 60" umbrella at camera upper left.
Here's another frame from the shoot. You can also see where he is hiding the front flash -- in the camera-left doorway. I actually like this one better than the tighter version up top. I think it has more of a "hero" connotation. (What do you guys think?)
But that is just a subjective choice. What is not subjective is the fact that that Keith clearly knows how to create and control an environment with just a couple of 283's.
I run off to another country for a few days, and come back to you guys wearing the lampshade?
Folks, I am at a loss for words. Except to point out that this is probably the first time the following phrase has ever been posted to the internet:
"... One Vivitar 283 ball-bungied to my head w/ a coffee filter diffuser ..."
Flew in last night and was immediately back into the daily grind today with three Sun assignments and 150 miles. (ILoveMyJob. ILoveMyJob. ILoveMyJob.) But I am slowly digging through my email inbox tonight and might even squeeze an On Assignment in before I hit the hay.
But this shot by John Sumrow just made my day, so I had to post it. Click the pic for more info.
What f/stop will your flash give you through an umbrella at ISO 100 on 1/4 power at ten feet?
Not sure? Read on...
Guide numbers are basic, core, old-school flash photography knowledge. And I can all but hear the old-timers rolling their eyes and saying, "Gee, Dave, whaddya gonna tell us about next, bounce flash?"
But we have gotten so far from this kind of thinking, what with TTL everything, eTTL and CLS, that many people have never had occasion to think about guide numbers. Which is a shame, really, because a working knowledge of guide numbers (GN) can do something very cool: Get your exposures in the ballpark on the very first test shot.
Find out how helpful -- and easy -- using GN is after the jump. ____________________________
And Now, a Word From the Math Department
Okay, let's start with the definition. The guide number of a flash is the product of the f/stop of the exposure at a given distance at ISO 100. Wikipedia has a whole page on it here. But that's all pretty math-centered and kinda inverse-squarish. And you really do not need to know that stuff to use GN to zero in on a first exposure.
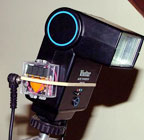
Here's how to use it. On just about any hot-shoe strobe capable of manual, there's a guide number calculator built in. The photo up top is from a Vivitar 285HV, which is a 70's-design manual-capable flash. Let's use this as an example.
The four variables are: F/stop, distance, power and ISO. You plug in any three, and the calculator spits out the fourth. For instance, click here to open the 285 GN dial in hi-res in a new window.
This GN calculator is set for full power manual at ISO 200. It is telling you that, at 30-40 feet, you would get about f/4 out of this flash. And if you set the flash to 1/2 power, you'd get f/2.8 out of it at that distance. Here's the cool thing: If you zoom the head -- even on this old-design flash -- it will move the dial and adjust the result.
Here is an example of more modern guide number calculators. Click here to see it big in a separate window. This display (from an SB-800) is typical of modern GN calculators. Every flash is a little different, but they all work pretty much the same way. One thing to remember: The GN calculator display will only pop up if the flash is at it's direct flash setting, i.e., no bounce. This, for instance, is telling me that I will get f/5.6 at ISO 400 on 1/4 power at 26 feet at the 50mm zoom setting.
Play around with your buttons a bit and you will see how yours works. What I like to do is to already know my ISO, my desired shooting aperture and an estimated flash-to-subject distance. Now, by setting up my GN calculator, I just dial in the different manual power settings until my desired f/stop lines up with my flash-to-subject distance.
So, this is pretty cumbersome and slow and why should you even bother, right?
Well, I'll tell you. The first five or six times you have to dial in your GN calculator and learn where you need to set your flash to get f/4 at, say 10 feet, you'll need the calculator to tell you. Then all of a sudden one day, you'll just know.
And if you learn a good anchor point, like say 1/8 power at 50mm zoom, 13-foot distance at ISO 400 = f/8 (exactly what an SB-800 will do at those settings) you'll quickly start interpolating around that to suit your given situation. And then, you really do not even need your GN calculator to get close on the first test.
"But wait," you say. "I'm a hot shot. I use snoots, grids, umbrellas and gels. Won't that screw it up?"
Yeah, maybe. But consistently so. A snoot will be dead-on with the expected aperture in the center of the beam. Your grid spot might knock it down half a stop. Your shoot-through umbrella might knock it down two stops -- but the difference will be the same, every time. Once you learn how much your umbrella knocks your bare flash down, just adjust for that. Ditto for the gels. A typical full color conversion gel knocks about 2/3 of a stop off of your flash.
If you are having trouble getting a handle on your early test pops -- you know, like getting first shots that are about 5 stops off -- this will zero you in real close, real fast. In fact, there is no faster way to save time on your first test pops than to learn to use your GN calculator.
Until you don't need it any more. Then, you'll be faster yet.
About a gazillion RadioPopper JrX questions came in while Ben and I were enjoying our three-day mancation. I wanted to hit as many of them as practical before getting onto Boot Camp Assignment 3, which is in the on-deck circle.
Lotsa answers -- and some test results -- after the jump.
__________
RP JrX Q&A
Before the Q&A, just a note that continued shooting with the RadioPopper remotes has only increased my confidence in the units.
Their initial reliability is holding up in multiple environments, and I would feel very comfortable taking them out on assignment.
__________
Can the JrX's fire remote cameras?
Yes. You will need to purchase an adapter cord for your particular camera, which will need to have a remote jack on the body. Connection is the same as with PocketWizard remotes, so there are several types of cords available for most popular camera brands.
Are the JrX's compatible with my Cybersyncs/PocketWizards/Cactus/whatevers?
No. You cannot mix and match them (except with other RP units) because the operate on different frequencies and/or with different digital protocols.
In the Article, you say, "Nikon switched into a new system with the '900's, so they are out." Does that means they wont work under SB-900?
They will fire an SB-900 in dumb sync mode, but will not remotely control the power level using the (upcoming) RPCube module. This is true for all flashes which are exclusively iTTL. The restriction also apparently includes some Nissin model flashes, and/or any other model which does not support analog quenching of the flash pulse.
What kind of speedlights will be compatible with the remote power level adjustment?
In addition to immediately supporting the ABs and WLs (the ones with telephone jacks in the backs, at least) Kevin at RP says that most any TTL flash designed to work with Nikon or Canon should be remotely adjustable. Except the SB-900, of course, and any other off-brand flashes which do not support analog quenching. You will need the appropriate brand-fitting RPCube, of course.
There is talk of establishing a crowd-sourced compatibility table (or wiki) on the RP site. I think this is perfect, as RP could not possibly acquire and test every legacy flash -- especially the third-party flashes. I think this is a great idea.
Advice: If you are going this route and find a cheap model of flash that works in variable mode (i.e., some Acme Nikon/Canon equiv. TTL flash) snap up a few on eBay before including that model in the wiki. Just sayin'.
What about high speed sync?
I am reluctant to even bring this up, given the variable quality of info and claims floating around, but here goes.
First, the JrXs as a standalone system are max 1/250th on SLRs. And some SLRs cut it close enough to where you may have to lose the error correction to get your top sync speed. (This is mostly a Canon thing, as they tend to cut it very close on the second curtain at max sync speed.)
As for true, HSS -- no. The RP PX's will, by bridging the signal of the standard, time-pulsed Nikon and Canon protocols, but only for HSS-enabled flashes. The RadioPopper/AlienBee high-speed sync is not true HSS. Here's what is happening:
The flash pulse in some circumstances on an AB is long enough to exist for the entire time the "slit" is traveling across the frame during a high shutter speed exposure. So, yes, while you can technically sync a frame, there are two problems.
One, a tremendous amount of light is wasted, in that it falls on the blackened-out part of the frame while that slit is traveling. That is why your high-speed synced AB looks a lot more like an SB-800 in the power output department. But that is also true with pulsed HSS.
Two, the evenness of coverage is related to the shape of the flash pulse as distributed over time. Which is to say, it is not even at all. The flash pulse ramps up very quickly, and trails off more slowly as the capacitors in the flash discharge over time. (That's why Nikon and Canon pulse the flash signal -- for evenness.)
This will manifest itself as a light variance across the frame that would be brighter at the top or bottom -- depending on the direction the shutter travels in your model of camera.
What about point and shoots?
Ahh, different story there! Point and shoot cameras are more like leaf shutters than SLR shutter. And there is no "traveling slit," which means no worries about the evenness issues. But you have a separate set of concerns.
One, the speed of the remote electronics and trigger protocol. Here, the RP wins over the PocketWizard Plus II's for manual firing of flashes via remote. With my Canon G9 and an SB-800, I max out at just about 1/500th with the PWs but can go much higher with a PC cord (or off-camera TTL cord).
The RP JrXs split the difference -- faster that the PWs, but slower than a cord. All in all, very fast for wireless and with great range.
The other factors are shutter duration and flash pulse length. No matter what, you cannot cram a full-power flash pop (which lasts about 1/1000th of a second) into a 1/2500th of a second shutter exposure.
As you go up in shutter speed, you proportionately lose power settings on the flash. I was getting solid 1/8 and (almost) solid 1/4 power pops wirelessly at 1/1250th of a sec with the Canon G9 and JrX's. That's enough to do some cool things at midday.
FWIW, both equipment shots on this post were done with a Canon G9, at 1/1250th of a sec with flashes at 1/8 and 1/4 power. They were synced with an RP JrX.
Can it remotely adjust my LP120/Vivitar 285/Pile of Magnesium Powder?
Alas, no.
The variably timed "quench pin" approach basically hijacks the TTL protocol and gives you control of when the flash pop is quenched. Which varies the power of the pop. You need that underlying TTL system in the flash for it to work.
So, can my Canon remotely control Nikon flashes?
Triple aces here -- absolutely. ("Nick Turpin, white courtesy phone, please...)
The remotes are working with the TTL (and, in AB's case, variable power circuits) in the flashes themselves. It does not matter what kind of camera the transmitter is sitting on -- so long as you are operating within normal sync speed constraints.
You could set up an SB-800 on group "A", a Canon 580 on group "B" and an AlienBee on group "C" and control the power on each all independently with a Holga if you wanted to. Which is pretty damn cool.
How do the units connect to the hotshoe of your camera? Are they the same as Skyports or do they have a locking mechanism like the PW's?
No lock, but very solid. No exposed antenna to worry about, either. I have absolutely no concerns about the mount or stability. They are very small, and the mount is robust. Still would like to see some sort of lug on the recievers, to keep the sync cords from becoming the strap ...
Just Nikon & Canon? What about us Sony shooters?
Um, you can get a D3X chip on a Sony for under $3k USD. You knew you were going to have to give up something, right?
How do these compare with the new Control TL's from PocketWizard? If money was not an issue, what would the choice be? I want to make the right decision now instead of change my mind at a later date and make an additional purchase.
Lot of variables there. If you are Nikon and you need it now, for instance, it's a no brainer.
But rather than the JrX's, I would consider the RadioPopper PX to be in direct competition with the ControlTL-enabled PWs (TT1, TT5 models). The systems operate in different ways and I would decide based on which features are more valuable to you.
RP's PX system is getting very good user feedback. PW TTL range has been affected by Canon RF interference from some models of flashes, but PW have created workarounds. Upcoming Nikon versions are said to be unaffected by any flash RF issues. (Essentially, the Canon flashes emit far more RF interference than do the Nikon flashes.)
On the other hand, the PW system also nets you about a full stop faster sync. Which is the equivalent of doubling all of your flashes' power rating. Which is nice. And there are increased efficiencies in high speed sync with PW because of the "HyperSync" protocols. In short, faster recycle times and/or more power.
The JrX's fit into another niche -- dumb sync and remote manual control. A completely new branch on the flash remote tree. In present form, I would compare them more to the upcoming Paul Buff remotes which have similar capabilities. RPCubes will greatly increase the universe of remote controllable flashes. But, like the PW Nikon models, they are not available yet.
CR123a Battery Solutions
I figured this was important enough to where it deserved it's own section. So here goes.
CR123A batteries are pretty common, but not so much so that you can expect to pick them up anywhere you need them. And if you buy them at a 7-11, it will be a painful lesson. So, you are either going to have to hoard disposable batts or go with nickel-metal hydride rechargeables (NiMH) rechargeables.
I have tried the Tenergy NiMH's and charger pictured above and they work great. Unlike AA NiMH's, which run at 1.2v (vs. alkalines' 1.5v) these put out the full 3v of the CR123A's lithium version. Additionally, RP says that the JrXs run just fine down to 1.9v, with no real loss in range.
[NOTE: Do not get all fancy and hotwire a (cheaper) 9v battery in there. You will not triple your range -- you will fry your JrX.]
Capacity in the NiMHs is 750MaH, compared to 1300MaH in the lithium CR123A disposables. As a quick test, I left them on overnight (on the receiver -- the transmitter has 1 hr. auto-off) and they worked just fine the next day. This was about a 20-hour test, and RP says the receivers run down just about as fast, whether you are shooting or not.
From what I can tell, there is no reason to believe these are anything other than garden-variety NiMHs. Which means that they will self-drain over a few weeks. Think of a nice, big cup of water -- with a small hole in it.
[UPDATE: Robert, in the comments, says, "Just for clarity, the Tenergy rechargeable cells you show are actually LiFePO4 (lithium iron phosphate) not NiMH (nickel-metal hydride) which is why they are 3.0v (actually ~3.2v) compared to the 1.2-1.5v we are use to with NiMH. The good news is that LiFePO4 tend to have less self-discharge than NiMH."]
Logical solutions:
A) One set of NiMH's, and charge before assignments. (Tenergy supplies both AC and 12v cords for the charger so you can keep them tricking in the car if you want.)
B) Buy one NiMH for each unit and keep a (~92-cent) spare lithium as a backup in case you get caught with your pants down. Lithiums hold their power on the shelf (or in your bag) for a very, very long time.
C) Buy twice the batts you need in NiMH's, and just rotate them out of the chargers before shooting. That way you always have a set charged. I chose this method, as it also gives me double capacity in case of a very heavy shooting session -- and spares in case a battery heads south.
The site I recommended in the initial JrX post was just fine -- and very fast shipping. But I have since found that Amazon sells packages very appropriate to a typical shooter's needs for significantly less.
Example: You can get 6 7NiMH CR123A batts and a dual-source, two-cell smart charger (same Tenergy brand) for $26.99. That's the equivalent of a free charger, compared to the other site.
There are lots more choices on Amazon -- just search "Tenergy" and "CR123A".
For More Information
As of today, the full RadioPopper JrX manual is here.
UPDATE: The Polaroid PL-135 (AKA the rebranded "Triopo TR120") has been unceremoniously pulled from the market just a week or so after it launched.
Has the venerable Sunpak 120J bare bulb flash been reincarnated? By a world-famous company, no less?
Well, no. Not exactly. It's no Sunpak 120J (doesn't have the extra stop of power) and, strictly speaking, it's not really a Polaroid flash per se. Keep reading for the bare facts (rimshot!) on the Polaroid PL-135.
Nothing I blog about, save maybe Jill Greenberg, is as polarizing as is ring flash. You either love it or you hate it.
(The haters are in the minority, BTW, as the RF posts are consistently among the most widely read pieces on the site.)
That said, I'll play Devil's Advocate for a moment.
(More after the jump.)
___________________
Little Tommy G., of Burtonsville, MD, (USA) writes in to say:
" ... I just don't like the look of ring flash, and I'm not sure why all your readers are so excited about this terribly unflattering and uninteresting form of light. Granted, it's new and trendy, but it's not much better than the "3-stops overexposed direct flash" look that was big in all the fashion mags 2-3 years ago.
And it's neat to build stuff, but it doesn't seem worth the time investment to create something that so limits your shooting flexibility. ..."
Well, Tommy, your problem is simply that you are 100% wrong.
(Kidding, of course.)
And I only did the "Little Tommy" thing because this particular person used to rule over me with an iron fist as my assignment editor at The Sun. Actually, those are all valid points, even if coming from a guy whose idea of "shooting flexibility" used to be asking for a weather feature squeezed in between assignments at 2:30 and 3:15.
I digress.
And I'll admit to being a little schizo about the whole ring flash thing. For me, it comes down to how the thing is used.
I think the "up-against-the-wall" one-source ring flash shot is overused and pretty one-dimensional. (That said, I never do get tired of that Lenka photo...)
But I'll admit right here and now that after I finished building my ring light a few days ago, I shot darn near everything and everybody in the house that was up against the wall with it. The cat won't even stay in the same room with me these days.
But the new car smell wears off pretty quickly on that look. Although it is always there to pull out if you need it once in a blue moon.
What does interest me -- fascinates me, actually -- is the idea of a ringlight as an on-axis, secondary light source. And to be honest, I plan on using it more for still life than for people. I like the idea of hard edge light, filled by that 3-D, wrapped light coming from the ring flash.
I start to get more excited when I think of color contrast between the frontal and edge light, too. ___________________
More than anything else, the work of Dan Winters has gotten the ring light stuck on my brain. He uses it in a variety of ways -- as a sole light source, a primary source in a multi-light setup, or as subtle fill.
I could look at Winters' photos for hours on end. (And I have.) I would really like to be able to experiment with some of his techniques on the cheap. A DIY ring flash is not gonna make me Dan, of course. But it will allow me to play with some of his methods and see how I can apply them toward my own style.
If you are into really cool, quiet, cerebral photos, I'd highly recommend a walk through his site, BTW. And if you are a photo editor, you should hire this to shoot something for your mag in every issue. He can make anything look interesting.
Closer to home, for example, reader Michael Hui is doing some neat stuff, too. He is playing with an Alien Bee ABR800, which he uses both alone and in conjunction with other light sources. In the photo at left he used an additional bare Vivitar 285HV from camera left.
It's the latter look that I am drawn to, and I sometimes have to keep myself from faving Hui's pix automatically, as soon as they appear.
In addition to combining the RF with a hard sidelight, Hui is also using it with a multi-source, wrap-lighting scheme that is totally working for me, too.
In short, where some people see a one-trick-pony light, I see a jumping-off point for more creative looks that I simply cannot get with any other light source. So, to that end, I want to learn as much about it as a possibly can.
For now, I am a total newb. But I hope to be doing cool stuff with it soon. ________________
Westcott's Convertible Double-fold Umbrella: Made Just for Us
I had a few minutes after work before dinner was ready tonight, and decided to quickly try out a new toy: The Westcott convertible double-fold umbrella.
Moishe at MPEX actually had these manufactured special (just for us) and he has gotten a big batch of them in. MPEX logo on the side and all. I can't tell you how cool this is that he would go and have something made-to-order like this.
I have known about it since October (these things do take a little time) but just got a chance to play with one for the first time today.
I really like this umbrella.
Here's why. It is efficient when used as either a shoot-through umbrella or as a bounce umbrella. In shoot-through mode, this headshot of my daughter was done with a Vivitar 285HV on just 1/16th power at ASA 400. And I still got f/6.3 as a working aperture.
In shoot-through mode, the beauty of this thing is that it can be used as a very soft light source, because you can put the umbrella very close to the subject. That makes it both soft and efficient if you are trying to squeeze some extra f/stops out of your small flash, which is a good thing.
Here's a wide shot of the setup, which we were racing through before mom called us both to dinner. (Spaghetti night - everybody's happy...)
You can see how large a light source this setup is when you bring it right in close. I picked up some internal lens flare because I included the raw light source in the photo, BTW.
But slip the cover back on that bad boy, and it offers more control of the light spill light, like a traditional umbrella. Even shooting right into the flash with the backing on, it can barely eke out a medium grey through that material. That's my boy, by the way, grabbing some equal time in this shot.
Just like the other Westcott double-folds, it is very compact when collapsed. For you international types a piece of US paper currency, by comparison, is about 15 cm long.
And this umbrella won't set you back much more than a sawbuck, either. At $26, I think it is a very fair price for all of the versatility it offers.
It's lightweight, which is actually good for my purposes. It is not particularly heavy-duty, but with care it should hold up for many assignments. Fortunately, it ships with both a nylon cover and a clear plastic case. This will protect it while in your bag, rattling around in your trunk. That's where your gear takes the hard knocks.
And back to the thought of Midwest proactively having these things made for us, I can't tell you how pleased I am about that.
UPDATE: David has a blog post about them here, with more info.
Here's what I will be playing with this weekend: Just got me a set of the not-yet-released Honl Speed Grids.
I'll be down at Western Kentucky University on Saturday, teaching an in-house lighting day for the PJ students. And we will definitely have to give these a test drive.
One more pic, showing the mounting system more clearly, after the jump. ___________
It mounts via a Speed Strap velcro system (or sticky velcro if you must) and is sized to fit all flashes up to the honker Vivitar 285HV size. (Fits the Viv almost perfectly, and the tension mount is sufficient to keep it in place on anything else.)
First impressions: Solid, nice falloff at the edges, come in two flavors - 1/4 and 1/8. (This is the 1/8.) As always, click the pix for bigger views. I left them open in case you want to embed them anywhere.
Kingston/MPEX Team Up for Special Strobist Memory Card Pricing
This is way cool. Kingston is reaching out to photogs, eager to show that they can run with the Big Dawgs.
Midwest Photo Exchange says, "Hey, we know a lot of photographers."
They sound interested.
I says, "Yeah, and we could put a picture of me on the cards!"
(Sounds of muffled laughter in the background.)
Hey, no prob, 'cause I was, you know, obviously joking...
Long story short, you guys end up with some really good deals on compact flash (and SD) cards. Unfortunately the rebates are U.S. only, there is a limit of two per household and they have a limited amount of cards. So, early bird gets the worm. And get those U.S. citizenship applications in ASAP.
How cheap? How 'bout 8gb CF for $49.95 after rebate? (And 4gb for $23.50 AR.)
UPDATE: Yeah, I guess the prices were pretty good. You guys cleaned out the 4Gb's and 8Gb's. A resupply was expected today but has been pushed back till next week. Plenty more 4's and 8's coming then. Other sizes are still in stock.
The whole lunch special menu is here. No substitutions, and they don't use MSG. ____________________________
Hey, if you are a multinational gear manufacturer who wants to show Strobist readers some luv with special pricing, (you know - Vivitar, Nikon, Porsche...) leave your contact info in the comments. We won't publish it and we'll be in touch.
Especially if there is an "evaluation sample" 911 Turbo involved. In Atlas Grey Metallic.
Reader Joseph S. will be photographing kids sparring against each other in this room at a karate studio. He posted a question on the Flickr threads looking for advice from other readers on how to design the lighting.
I want to think through this one out loud and walk through what I would do and why. But first, take a moment to think how you might approach this shot.
Hint: The first problem you'll need to solve has absolutely nothing to do with light. Solutions (mine, at least) after the jump.
First, The Bad News
Problem number one: How to keep the little guys from accidentally destroying your lighting gear.
Problem number two: How to light the room to where they can move around and still be in good, consistent light.
Problem number three: How to get the light over the heads of the other spectators, and have your stands out of their way, too.
Now, The Good News
The first thing that jumps out at me in this room is that red wall. Sweet. That's a ready-made backdrop, as far as I am concerned.
I will definitely want to use that if I possibly can. In fact, I will choose my shooting height and direction based on keeping that wall as a full backdrop if possible. That means compromising best I can between wideangle (for full body shots up close) and long lens (to keep the wall filling the frame as much as practical) as I shoot.
I'll be shooting along the room divider area opposite the red wall. I will likely be moving left and right as I shoot, staying low, so I am always shooting on a line perpendicular to the red wall. That will keep my red backdrop as large as possible. (Shooting on the angle makes it shrink with distance because of angular perspective.)
The main thing I want to do up top is not to let the ceiling line creep into the photo. So I shoot from an angle as low as possible, and zoom in until the two people just fill the frame. So my first choice would be a wide-to-short-tele zoom for this session.
Also, as far as the background is concerned, is anyone else seeing the possibilities for some cool, specular background portrait shots? Even action portraits. Nice.
Other good news: We have a white, low ceiling. That is going to solve our height issues very easily.
So let's look at three lighting possibilities, each related and each very easy to change to one of the other two options at a moment's notice.
Joseph said he will be using Vivitary 283's and Pocket Wizards. All three of my choices use two speedlights (more powerful lights if you can get your hands on them, or ganged speedlights if you have four flashes) aimed up into the ceilings near room corners.
The ambient exposure in the room is reported to be 1/80 at ASA 400. That means at ASA 400, shooting at 1/250th at f/2.8 is going to underexpose the ambient-lit portion of the shot by 1.7 stops. Perfect. We will shoot at 1/250th at f/2.8 at ASA 400 and try to light the sparring area to f/2.8 at ASA 400.
If you are going to use the ambient as a component of the exposure, you'll have to green your flashes. Then you set your camera to fluorescent white balance and everything reverts to white. Or close to it, at least.
So, here is my thinking, in order from safest to edgy.
Option Number One: Safe Light
The easiest lighting technique of the three is to put a strobe in each corner, behind me (but mostly to the side of me as the room is long and thin) to the left and right. This will give even light that is somewhere between frontal 45's and side-light.
You cannot hide from this light, and everything will look good. The light will be very even across a large area in the center of the room. As they move away from center, one light becomes main and the other becomes fill. Lots of room for error in this setup. As they get very close to the ends of the room, it'll brighten up a little. Test this out beforehand, and know at roughly what point on each side you need to move to f/4.
If that sounds hard, it's not. Try it.
As for power, I would put the greened flashes on 1/2 power and point them up at the ceiling at either a 50mm or 35mm beam spread. Do not point them straight up, or the colored walls will catch some light and color your light in a bad way. Aim them a little out into the room. But not so much that the kids catch any raw light.
(I am assuming he has VP-1 modules on the 283's, which allow a Vivitar 283 to go manual power, since he typically lights with these flashes. If not, choose the yellow auto setting. It is the closest to what you need, aperture-wise, and it should be consistent as the flashes are seeing the same scene all of the time.)
Set up your lights and shoot your hand in front of your face as you walk around the room to test various areas, like this.
I start with 1/2 power as it gives me a better recycle time than full power. If you can get f/2.8 at half power, you're fine. If it is brighter than that, power down your flashes until you get an f/2.8 reading in the center of the room. This will buy you some shorter recycle time.
If the lights are not bright enough, I would bump up to ASA 800. Don't worry - ASA 800, lit, looks way better than you'd expect. If you still cannot get ASA 800 at 1/2 power, go to full power and wait out your recycle. Good (NiMH) rechargeables will help you out there, giving you a 3.5-to-4-second recycle time on full power.
If you cannot get ASA 800-f/2.8 at full power, walk your flashes in some along the wall behind you. Or get more light.
Oh, here's the other thing I do ASAP. Commandeer the mattress in the room and use it to protect whatever corner flash is most likely in the line of fire for the kids. Do not even ask. That's right, all your mattresses are belong to us.
If anyone asks, which is doubtful, tell them that it is for the safety of the kids. This, they cannot argue with. No need to mention that you are simply trying to make sure the little dealers of death do not screw up your speedlights.
Option Number Two: More Interesting
Moving up the food chain a little, I would keep one light in place and move the other to the opposite back corner. This will put your little guys in a nice, soft, ambient-balanced crossfire. This could look really nice, and still be relatively safe.
But it is even more important to move laterally to keep that background perpendicular as you shoot. Now you have a flash/stand and/or ceiling hot spot to watch out for. But the light will look better.
Option Number Three: Edgy
Lastly, I would move both lights to the back. This could look really cool. Yeah, I know what you are thinking: "All rim light? No, thanks..."
But remember, the light is mostly side light. And it is soft and coming from above. Most important, the ambient light is less than two stops below the flash-lit stuff. So the shadow areas will be muted but very visible.
But the caveats from the last lighting scheme are doubled, as you have potential lighting stands and ceiling hot spots creeping in from both sides. You may want to tighten up your zoom a little and shoot in close. But these shots could turn out to be far more interesting than the option other two options.
So, what would you do differently? Hit Joseph with your ideas in the original Flickr thread.
And if you have environments that you are trying to decide how to light, throw up a question of your own. And pix of the area are always a bonus.