Your camera is the key to deeper travel.

_____________________________


Welcome to Strobist


Strobist is an online project that was published from 2006 to 2021 by former Baltimore Sun photojournalist David Hobby.

Available here as a completed archive it remains world's most comprehensive source for photographic lighting education.

New to lighting? Welcome. Start with Lighting 101, linked below, as millions of other photographers have done before you. Or scroll down further to access Strobist's other free courses.


Strobist's Free Online Lighting Courses:
Lighting 101, 102, 103, and Lighting Cookbook


Lighting 101 is the core foundation of Strobist. It is a free, start-from-zero tutorial that will teach you the basics of lighting and minimalist lighting gear. Lighting 101 will have you up and running in no time—and at minimal expense.

Lighting 102 is the sequel to Lighting 101. Where L101 was about gear and basic concepts, L102 will teach you how to further understand and control the qualities of your light to make it do your bidding.

Lighting 103 is a deep dive into color. It explores the intersection of light and color to help you give your photos more nuance, realism and depth.

Strobist Lighting Cookbook combines the concepts learned in L101-103 to give you more understanding and fluidity with your lighting. We also explore some of the shoots from a 360-degree/ecosystem perspective.

A Baker's Dozen: Here you'll find a sampling of posts to help you understand the scope of the lighting education on this site.

From Classroom to Real World: On Assignment


On Assignment features full walk-throughs of over 170 real-world assignments, complete with discussions ranging from lighting to concept to execution—and even some screw-ups. It (largely) follows my path as a newspaper shooter and beyond, progressing from simple speedlights to more complex studio flashes.


Equip Yourself: Recommended Gear


Sad fact: There are a lot of companies that make some pretty crappy lighting gear, but are still happy to take your money. The Strobist Gear Guide is designed to help you avoid making many of the costly rookie mistakes I made over the first few years of my career. This is the gear that works for me, day in and day out. It is solid, reliable and will get the job done without destroying your wallet.


Feed Your Brain: The Strobist Bookshelf


Books are gear for your brain. Chosen wisely, they represent some of the best value for dollar you can spend as a learning photographer. Featured on the Strobist Bookshelf are my current favorites, winnowed from hundreds of books read over the course of my career. It is a relatively short list, but there are solid selections for nearly any lighting photographer.


And Finally, My Own (Post-Strobist) Project:
The Traveling Photographer's Manifesto


Since 2017, I’ve led annual workshops in Cuba and Vietnam focused on thinking like a photojournalist while traveling with your camera. The Traveling Photographer's Manifesto is, in many ways, the book version of that workshop. More, here.


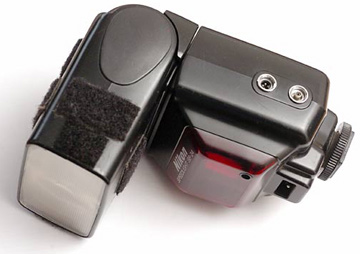
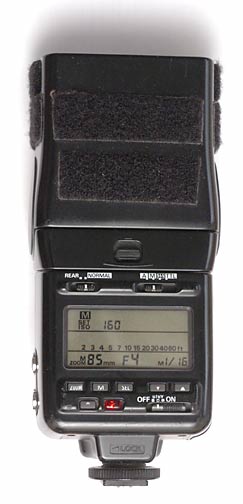
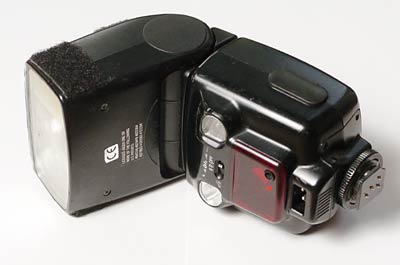
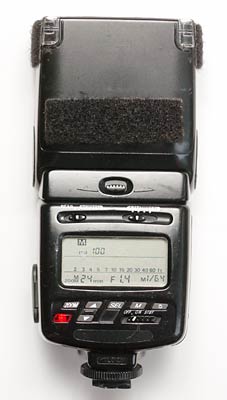
Steal This Flash - The Nikon SB-24


The SB-24, a late-1980's model Nikon speedlight, can be had for as little as $35 on eBay. This is an insane deal, relatively speaking. UPDATE: The days of the $35 Sb-24 are gone forever, thanks to you guys. You can expect to spend $75-$100 now. Sorry.

UPDATE #2: (And this one is better news) You can get a manual for the flash here.

__________


Look at what you get:

• Full manual control, in whole stops, down to 1/16th power.
• An industry standard, external PC synch
• Internally power-zoomed flash head, covering 24mm to 85mm beam spreads
• A jack for an external high-power battery for one-second, full-power manual recycle times.
• Auto and TTL functions, which to us are pretty useless. But if you have a Nikon F4, or N-8008s, knock yourself out.
• High build quality - this was a $200 flash in 1985 dollars.

Dollar for dollar, this is tough to beat for <$50.

Even if you are a Canon shooter, this thing is a no-brainer to snag and make your "off-camera" light. Just keep it in a separate little bag with one of the sweet little 5-section Bogen stands, a double folding umbrella (with stand adapter) and a sych cord, and you are ready to roll.

The Nikon SB-25, -26, -28, -28dx, -800, etc., all offer those same features - and more. And they all get progressively more expensive. (If you see one of these on the cheap, grab it.) But the SB-24 does what you need on the cheap.

These are all well-built, reliable flashes. But the price makes made the Nikon SB-24 a steal.


__________

New to Strobist? Start here | Or jump right to Lighting 101
Now available in audiobook: The Traveling Photograher's Manifesto


Permalink

Nikon SB-700 Speedlight Misses it By This Much

Nikon just announced a new speedlight designed to complement the flagship SB-900. The Nikon SB-700 Speedlight will cost $329.95, and includes some mouth-watering features.

But they have excluded a key feature. Any guesses?

Deets, the PR and a new camera, too. After the jump. Read more »


__________

New to Strobist? Start here | Or jump right to Lighting 101
Now available in audiobook: The Traveling Photograher's Manifesto


Permalink

For a Few Dollars More: The Nikon SB-26

Anyone who has been reading Strobist for a while knows that I think the Nikon SB-24 is the best bet for the starving student's entré into the world of off-camera manual flash. With an external PC connection and full manual control over a 5-stop range, it has what you need without your paying for what you don't.

But for someone with a little flexibility in their budget, the more recent (circa mid-90's) SB-26 may be a better call. And if you are moving from just one flash to two, the SB-26 is a no-brainer. It can be had for around $100 at the time of this writing.

NOTE: If the earlier readers swoop in and snarf up the sub-$100 examples, don't blame me. Well, OK, I guess technically you could blame me, but they were just faster on the draw. So try to wait for more stock or troll eBay for a while to grab a good deal. But bear in mind that you are likely to be bidding against each other for the few days after May 15th, when this post goes up.

The SB-26 does everything the SB-24 does, plus the following:

• Full manual control over a 7 f/stop range.
• A built-in bounce card.
• A built-in diffuser panel for ultra-wide beam width.
• A "delay" function (more on that later.)
• A built-in optical slave. (Schwing!)

Now, before I go into detail on the features, I want to give you a word or two about keeping these vintage flashes alive.

First, USE THEM OFF CAMERA. I'm not making a value judgement (for once) on your lighting skills. It's just that the hot-shoe foot is the vulnerable point on these flashes. An SB-24, or -26, or whatever, could theoretically last you a whole career if it is happily firing on a stationary stand. That's because there is no torque on the hot shoe foot.

But if you are shooting on-camera, say, stalking Sean Penn or English soccer hooligans, well, that's another kettle of fish. You might catch an elbow (or a brick) to the head and your flash foot could go 'bye-bye' real fast.

Even if you use them on stands, a good policy is to not stick them straight out so all of the pressure is on a horizontally-mounted shoe foot. Mount them vertically (or as near to vertical as is practical) and use the swivel head to do the pointing. Way less torque. Way happier flash foot.

That said, if you snap one off, all is not lost. There is a good discussion (and link resources) for getting it fixed (even DIY-style) over at Sportsshooter. (Link will open in a new window directly to the discussion.)

Now, back to our regularly scheduled programming.

The seven f/stop range is really sweet, especially for close-up work. There are times when I have had to dumb that down even a couple more stops with neutral density filters. One-sixteenth power can be way too much at a few inches in distance.

The "delay" mode is, as far as I know, unique to this model of flash. Here's how it works. Say you are using an on-camera flash in the auto (or TTL) mode. You can use the SB-26 in manual mode stuck out in the background somewhere as a back/rim/whatever light and it will wait until the other flash has finished firing before it fires.

Why is this important? Because if it fired at the same time, it could screw up the other flash trying to work in its auto or TTL mode. (Usually this means the main light would not put out enough light. That's bad.)

How does it know when the flash is done? It doesn't. There is simply a "delay" switch on front of the flash. (Set it to "d.")

Does it matter what kind/brand of camera/flash is used for the auto/TTL front light? Nope. (Sweet, huh?)

What does this cost me? Well, other than a few bucks more to get this flash instead of an SB-24 (or -25) it costs you a third of a stop on your max synch speed. Most SB/Nikon combos max out at a 250th synch. This setting limits you to 1/200th, to account for the delay. Not an issue in the environments where you are likely to need to be filling dark backgrounds.

Now, for the other feature that makes this an ideal second light: Built-in optical slave. It'll see your other flash fire and fire the SB-26, either in "real time" or in the delay mode. For our purposes, it'll usually be real-time.

Now, this is not a fantastic slave. But for typical environmental portrait set-ups, for instance, it works great. You can help it along by making the SB-26 the strobe that fires the weaker light of the two, if there is a difference. Theory is, if one flash is going to set off the other (using light) you want the slaved flash to be receiving the bigger shot of light - not the other way around.

The other way to increase your efficiency is to point the front panel (that's where the slave eye is) of the SB-26 at the other light. Since the head rotates and tilts, this is almost never a problem. And of the SB-26 is firing into an umbrella, you're golden. That umbrella acts as a big relector, catching your main light and sending it right into the sensor.

These babies sold for $350 (and adjust that for ten years of inflation) back in the day. And now people have visions of "$B-800's" dancing in their heads, so they sell them for a song. Why, thank you, Mr. Rich Photo Hobbyist Guy.

All in all, a great little light. And believe me, if I was still looking to pick up a couple more of them, you would not be reading this article yet.


__________

New to Strobist? Start here | Or jump right to Lighting 101
Now available in audiobook: The Traveling Photograher's Manifesto


Permalink

Found: Vintage Nikon Flash Heaven

Ain't the web great?

I spent a little time Googling "Nikon SB-24" and some other models, looking for a site that might have a little chart comparing them, and came across a wonderful Nikon fan site run by a guy in Malaysia. It has a full page dedicated to each of the flashes in the Nikon family tree.

It has detailed descriptions of all of the older Nikon flashes that you can use when you are cruising eBay for some bargain off-camera lumens and photons.

Below are several direct links to many of the most appropriate Nikon flashes. These all have PC connections and manual control, so far as I know.

If you are into the old Nikon scene, explore around his site a little. It's a hoot.

SB-24 | SB-25 | SB-26 | SB-27

SB-28 | SB-800 | SB-28dx | SB-80dx


More recent stuff here:

Nikon Flash Comparison Chart

And, just for fun:

A Pictorial History of Nikon Cameras


__________

New to Strobist? Start here | Or jump right to Lighting 101
Now available in audiobook: The Traveling Photograher's Manifesto


Permalink

Hands-On Review: Nikon SB-900 Speedlight

I got a chance to play with a new Nikon SB-900 speedlight over the last few days and I gotta say, it's a pretty sweet flash. Long story short: Nikon has just extended their lead in the flash department.

The only drawback I can see is the "perfectly good" status of the current SB-800. And that $500 price tag, of course.

Should you get one? Swap out all of your SB-800s? Be on the lookout for cheap, used SB-800s and add more?

Hit the jump for the Full Monty review, and a few things you might want to consider.
_________

First impression: It is much bigger than the SB-800. Didn't really seem any heavier, but definitely takes up more space. This is a consideration for a couple of reasons. One, cubic inches matter when on the road. Not so much on a single flash basis, but if you are packing half a dozen SB-900s, you could probably cram seven SB-800's in the same space.

Also, the head is a totally new design and size. This means that your current light modifiers may or may not fit the SB-900, depending on their size and/or mounting flexibility.


So here's that big ol' honker of a head. First glance, it looks to be pretty much the biggest speedlight head going, save maybe the Vivitar 285 HV. It looks bigger than an old SB-26, and certainly bigger than an SB-24.

If you can get past the size, they have done some really cool things with the extra space. The 200mm zoom rocks. Not because I am gonna direct flash with my 70-200 racked out. But because it will concentrate the beam, of light into a smaller area when used off-camera.

Why would you care? Because it effectively gives you a more powerful flash when large swaths of light are not needed. Like doing a hard-light, multi-flash portrait outdoors, for example. You usually would not want to light their feet anyway.

Rather than eat up that needless beam angle with a snoot or grid, you can zoom it in, and get some extra f-stop with the more concentrated beam. This translates into more control over the ambient light level (you can get a darker working f-stop at 1/250th, for example) for more choices in your ambient tones.

Of course, you can get a Better Beamer to stick on just about any flash to do this, but it is not built-in.

The Big Head Advantages do not stop there. It's the most sophisticated refractor/reflector system I have ever seen on a flash. They actually modulate the tube with respect to both the front fresnel and the polished, rear reflector. This gives you the ability to shape the internal qualities of the beam, too.

You can choose a normal (slightly concentrated) pattern, an even more concentrated pattern (again, yet more energy to the center for situations described above) or a near-perfectly even light distribution depending on your lighting needs.

That's a real breakthrough in speedlight design, and brings to a (relatively) small package more of the capabilities of an interchangeable-reflector studio strobe. Big props to Nikon for that.


Other advantages that argue for switching are the new CLS interface. You'll get back the time you spend wading through the CLS menus on your master flash. This would not be a reason to swap out, say, four flashes. But it might be good reason to get one to use as a master.

It's basically a manual switch and a wheel dial -- a very fast an intuitive combo for switching setting in very little time. It took a little digging to find the SU-4 mode, which we like because it activates an awesome built-in slave, but I can confirm it is included and does work it's manual-power slaved-flash magic.

I actually used that mode to sync all of the flashes used to make the shots in this post. More on that later.


Big on the advantage list: Recycle time absolutely rocks at 2 seconds with no accessory battery back. Better circuitry uses the same power source -- with much faster recycling. This is a dream with Ni-MH batts, and the fifth-wheel option is no longer needed for fast shooting. For some, this will warrant swapping out their main, on-camera flash.

The accessory SD-9 battery pack walks that already fast recycle time down to about a second at full power. And it can hobble along on just four extra batts if needed, according to the Nikon guys I spoke with.

Interesting point: The power plug on the SD-9 has two extra nubs which means it will not fit other flashes. But the design looks as if the current SD-8-type plug may fit the SB-900. This is important if you are going to be migrating other existing battery packs to the SB-900.


Thankfully, the PC jack is still there. Big ups to Nikon for including the old-school synching, in addition to the fancy-pants CLS stuff.

One other noteworthy change is that the SB-900 swings both ways -- you can go reverse 180 in either direction. This is especially useful, in that whichever way you mount a remote flash you can have the receiving window facing the master light source.

Before, there were situations in which you had to cheat that angle and lose wireless range as a result. Every flash should have this feature, IMO.


In Sync:

1. It comes with a gel holder, which totally rocks. No more tape and/or velcro. And the dome diffuser fits right over the gel holder, allowing both to be used at once. The bar-coded Nikon gel thing is a little gimmicky -- it sets your camera's WB to the "appropriate" setting. The special Nikon gels could easily be duped with a template and some liquid paper. You will not need to re-up with the official Nikon gels ($$) if you do not want to.

2. Goofy, but cool: At full power, the discharge sounds like a blaster from Star Wars ("pew, pew, pew"). Recycling is almost silent. And oh-so-fast.

3. My seven year-old boy loved the battery compartment: Individual cylindrical battery holes -- like loading a revolver.

4. Thermal shut-down protection -- which can be disabled if you are completely stupid. Cool detail: A "thermometer" in the rear display shows you if you are starting to red-line it.


Out of Sync:

1. Five. Hundred. Dollars.

2. The hot shoe is a new, thicker size that will not fit many current accessory shoes. McNally dropped one out of a Justin Clamp, which is a staple lighting tool. (The Nikon guys mentioned that about 5 times this weekend, Joe. They might be sending the black helicopters after you shortly...)

3. The new AS-21 foot must be used because of the new shoe size. Which would be fine, except for that the metal female 1/4 x 20 insert in the AS-19 has been replaced by mere molded plastic in the AS-21. This will be a problem for people who repeatedly use the AS-21 on an umbrella swivel. That's a design whiff that should not have happened. (More on that here.)


Decision Time

So, that to do?

My biggest problem is, I absolutely love the SB-800s. IMO, many of the added features are great. But I do not think I can justify switching everything out wholesale. Buying just one might be a very good idea -- I can see many instances when those extra features would make for a more useful single flash.

My other problem: They may well choose to discontinue the SB-800, which would be a crying shame. It's either that or create a whole new production line for the SB-900. The SB-800 is small, powerful and does everything. Many will continue to prefer it to the SB-900, given price difference and the fact that the core functionality is the same. Seriously, what's so wrong with this current flash?

But of course, that's how my grandmother felt about her rotary-dial ATT phone, too. I am officially old now.

I know one thing -- if they do drop the SB-800, the '900 is gonna sell a crapload of SB-600 flashes. Thats a huge price gap which many amateurs will not be able to rationalize. And the smart move for new CLS'ers might be one '900 and a few '600's. Who knows.

The SB-900s are already pre-selling like crazy. So Nikon is clearly doing something right. My hope: SB-800s go out of vogue with the doctors, dentists, and rich soccer moms and they all wind up in the used dept and on Ebay for $200 a pop.

'Cause if that happened, I'd pimp out my lighting bag like McNally's. (Only, he'd have 72 SB-900s by then...)


Lighting These Photos

For the top photo (shown again here) I set the subject flashes on SU-4 slave mode in manual, at 1/128th power. Since they were only a few inches away from each other this would be my limiting factor, even dialed down to 1/128th. A quick pop-and-chimp, and I was adjusted to the aperture that gave me a good exposure from each other's close-in light.

I shot these with a new Nikon D700, BTW. We were absolutely swimming in new toys this weekend at Shoot! The Day in NYC. Awesome little camera, that '700. D3 guts in a D300 body. Expect iPhone 3G-esque wait times for a while if you want one.

Anyway, once I got the best shooting aperture for the flash-to-flash light from the subject flashes, I manually adjusted the other lights to look good at the chosen aperture, which I believe was f/16. I shot at a 250th, to nuke the ambient away. I put the flashes on a shiny black table and shot low, to maximize the reflection.


Other lights were:


• An SB-800 aimed at the background from under the table, using the frosted diffuser for an even gradient.

• Two SB-800's as rim lights, which edge-lights all of the shiny black surfaces.

• An on-camera flash in a Ray Flash adapter, which gave me the specular highlights on the front surfaces.


You Tell Me

Nikon shooters: Are you gonna get one? Are you gonna swap out your SB-800s? Why? Why not?

I'm on the fence, and looking for feedback...


__________

New to Strobist? Start here | Or jump right to Lighting 101
Now available in audiobook: The Traveling Photograher's Manifesto


Permalink

Old Masters: The O G Strobists


Way back before SB-800's were a glint in Nikon's eye, the Old Masters were working some serious light. In fact, an intimate understanding of light (and how to reproduce it) was integral to their attaining "Old Master" status to begin with.

There is a discussion thread in the Strobist Flickr Group right now where people are kicking around the subject. Studying the Old Masters to learn more about lighting just happens to be one of my upcoming New Year's resolutions, so this was good timing for me.

We'll be doing a week on Old Masters' light early next year, and I would love to see your suggestions for subject matter. There's a very good catalog site here. Drop by the thread, and/or hit the comments if you want to offer up a favorite artist and/or painting from back in the day. (Be sure to leave us a URL.)
________________


Strobist Info

In Philosopher Meditating, (c. 1631, oil on wood) Rembrandt used an SB-24, at full power with a full CTO gel a large diffuser silk just outside of the window at left.

At right, just out of frame behind the fire, is an SB-26 on 1/16 power with a LumiQuest Ultrabounce and a full CTO gel. Exposure was 1/8th of a sec at 5.6, ISO 400, to pick up the ambient light at the top of the stairs.

The SB-24 was triggered with a Pocket Wizard, the SB-26 by its built-in slave.
________________

:: Old Masters Discussion Thread ::
:: Great Resource: ABC Gallery ::

-30-


__________

New to Strobist? Start here | Or jump right to Lighting 101
Now available in audiobook: The Traveling Photograher's Manifesto


Permalink

Like Martin, Only More Spartan

After seeing the Martin Prihoda Delirium video recently, fellow west-coaster Andrew Jorgensen decided to see if he could get close to the look with a trio of speedlights.

Light is light, and if you can find ways to allow for the differences in power levels, you can do many things with your speedlights that the Big Boys do with their Profotos.

Jorgensen shot four guys from "djHere," a San Diego-based promotions company, for an article in Pacific Magazine. The location was Shelter Island, near San Diego.

He used a Nikon D300, with two SB-800's and a an SB-24. He set one of the SB-800's to slave to the others using the SU-4 slave hack.

That's actually not what the SU-4 mode is really for, but it works great. He used a splitter to sync the other two strobes via one Pocket Wizard. I would have probably just PW'd he SB-24 and set both SB-800's to slave to save running a wire. But his way worked fine, too.


Here's the setup. Even more than the idea of translating Profotos down to speedlights, I like love the Voice-Activated Boom he used to get his main light, shooting through an umbrella, high enough to shoot under it with no stand in the way.

He came fairly close, but was not able to get his backlights high enough because of the distance involved. No secrets there, you just need taller stands, closer distances (for a better angle) or more voice-activated light stand extenders.

Australian photographer Brendan O'Shea used the same triangle light (all small Sunpaks) to shoot the group, "Modern Legion" in an alleyway. (His was done in late March.)

Like Jorgensen, he used a little post work to pop it. Seems to work well for this light. And to O'Shea's credit, he not only was very close to Pihroda's look, but was out there before even seeing that video on the big light technique.

Just two quick examples to show that the idea of looking at the big light stuff and translating down to speedlights can work. You just have to be able to make accommodations for the differences in power.
_________

Related Links:

:: Andrew Jorgensen's Flickr Page ::
:: Brendan O'Shea's Flickr Page ::
:: Original Martin Pihroda Video ::


__________

New to Strobist? Start here | Or jump right to Lighting 101
Now available in audiobook: The Traveling Photograher's Manifesto


Permalink

Bits and Pieces, 12/14/2006

Strobist in National Geographic Traveler

I woke up to a nice surprise this morning when I checked the Flickr discussion threads.

Strobist was mentioned in a "best of the web" photography story in the Jan/Feb 07 issue of National Geographic Traveler magazine. It's all I can do not to go buy a couple of hundred copies and pass them out to total strangers on the street corner. Cool beans.

Thanks much to Strobist reader and Travel Photographer Emeritus Bob Krist for bringing the site to the attention of the writer.


New MPEX Arrivals

This may be rather like dangling meat in front of an alligator, but Moishe got in a selection of used SB-24's and SB-28's. He rates them as 8/10, which means they may have some cosmetic signs of wear, but work just fine. SB-24's (2 available) are $65 each, and the SB-28's (8 available) are $100. Foist come, foist soived.

He is also now carrying the Wein HSH adapter, which slips onto any hotshoe flash to give it a very solid and useful "household" PC connection. If you have a good flash that does not have a PC jack (cough, Canon, cough) these are sweet. They also have a female 1/4x20 socket for mounting purposes.

FYI, Canon flashes are a tight fit on these. You simply pry the lips of the shoe mount on the HSH up a tad with a regular screwdriver and all is well. They are solidly constructed out of metal.

And for you guys in need of a more, uh, Freudian light stand, he got in some LomoPro 10-foot light stands at only $30 each. You outdoor, mix-light shooters - especially the skater types - may find these more useful than the compact stands. And at about half the price, too.

Link: Midwest Photo Exchange


__________

New to Strobist? Start here | Or jump right to Lighting 101
Now available in audiobook: The Traveling Photograher's Manifesto


Permalink

SB-24: Monster Garage Edition

I had a chance to talk to Vadim V. during a lunch break at one of the Seattle seminars. And he showed me his way-cool, bare-bulb-modified SB-24 flash. As if I wasn't drooling enough waiting for lunch already.

He has thrown a photo of it up on Flickr, and you are gonna drool too when you start thinking about what you could do with this. (An early mentor of mine, John Falk, knew a guy who modified 283's this way back in the day.)

The mod was a little more complicated than I imagined, due to an optical feedback circuit near the flash tube. (Vadim works for Microsoft and apparently has an oversized brain.) But how sweet is that flash?

If we are lucky, maybe he will answer questions via his Flickr photo page and some of the solder jockeys among you can make one, too.

Just remember not to lick that 350v capacitor.

-30-


__________

New to Strobist? Start here | Or jump right to Lighting 101
Now available in audiobook: The Traveling Photograher's Manifesto


Permalink

SB-24 vs 285HV Comparison

On the Strobist Flickr discussion threads, reader tmoreau has posted a comparison of the SB-24 vs the Vivitar 285HV.

If you have used both models we'd love to know what you think, too.

IMO, both are good flashes. And with the re-introduction of the 285HV, there is now an easy retail option for a good off-camera flash below the $100 mark.


__________

New to Strobist? Start here | Or jump right to Lighting 101
Now available in audiobook: The Traveling Photograher's Manifesto


Permalink

New Online Source for SB-24 Manual


Thanks to a a tip from Bob in the comments of an archive post, there is now a new source for the much-loved c. 1988 Nikon SB-24 speedlight. This is especially important if you come across a cheaper used one that has long since lost the painted-on labels on the control buttons.

(More info on the flash itself here.)

-30-


__________

New to Strobist? Start here | Or jump right to Lighting 101
Now available in audiobook: The Traveling Photograher's Manifesto


Permalink

Great Used Nikon Flash Source: K.E.H.

Way back when I was a photography-bitten college puke, I used to love to go up to Atlanta to visit my Aunt June and Uncle Percy, who still live in nearby Douglasville.

Uncle Percy, in particular, was The Man, as far as I was concerned.

Why? Because back when I was 7, he let me borrow his real, 35mm camera to take an actual picture. And I was hooked for life.

And the icing on the cake to visiting Atlanta was that Atlanta was where K.E.H. was located.

K.E.H. was a HUGE used photo gear retailer. And I was a salivating kid in a candy store. I simply could not leave the place without buying something.

Fast forward 20+ years. Sadly, they no longer have a retail storefront. But now, they are even bigger. They have grown into a web-based operation as the world's largest used photo gear outlet.

You see them all over the web with the "We Buy Used" banners. But whaddya think they do with all that stuff?

They sell it, is what they do.

The place is Used Nikon Flash Nirvana, for one thing. They don't have an SB-24. They probably have ten of them. In all different conditions and prices. They are a machine.

One thing to consider when viewing their prices: They grade very conservatively. I have always been happily surprised in that regard when buying from them.

So if you are looking to score a Nikon SB-24,25,26,28, etc., check them out.

They are a smorgasboard.


__________

New to Strobist? Start here | Or jump right to Lighting 101
Now available in audiobook: The Traveling Photograher's Manifesto


Permalink

Found: Nikon SB-24 Manual PDF

Kudos to Strobist reader Marc Lacoste, who has tracked down a .pdf version of the Nikon SB-24 speedlight. It is posted online for easy download, here.

Great reading, if you are wondering what all of those rubber "mystery buttons" do on the back of your flash, now that the symbols have long since worn off...

Great find, Marc.


__________

New to Strobist? Start here | Or jump right to Lighting 101
Now available in audiobook: The Traveling Photograher's Manifesto


Permalink

Psst... Wanna Buy a Flash, Cheap?

Get 'em while they're hot:

Retail photo gear bohemoth Adorama apparently has a stash of used Nikon SB-24 strobes in stock, with some going for as little as $45. Yeah, it's probably a fugly one, but still - that's a steal. There's also an "excellent" condition (whatever that means) one for $54, if you are the shallow type who puts high value on appearances (and, thus, would never give me the time of day in high school.)

To go straight to the stash, click here. If you do not know why SB-24's are a bah-gain, click here to learn more.

For you foreigner-types who can't use eBay, this is a good chance to grab one.


__________

New to Strobist? Start here | Or jump right to Lighting 101
Now available in audiobook: The Traveling Photograher's Manifesto


Permalink

Pocket Wizard vs. Nikon CLS: Which is Best For You?

The subject of Pocket Wizard vs. Nikon's "Creative Lighting System" (CLS) is one of those Ford-vs-Chevy, Yankees-vs-Red Sox things that photographers tend to take a little personally.

At least that's the sense I get when I read my e-mails on the subject.

You'd think I was talking about George Bush's Iraq policy or even the ethical ramifications of microstock.

So, at the risk of maxing out my e-mail inbox - and I have a 1-gig capacity - I am going to stupidly wade into this subject with a full article.

But first, this important message from the Strobist corporate legal team:


Terms of Acceptance
Upon being granted permission to read the rest of this article I agree to hold harmless The writer of said article even though his opinions may differ markedly from my own.

I agree not to flame him via e-mail, stalk and/or call him at all hours of the night, pour herbicide on his front lawn, toilet paper his admittedly modest house, say vile things about him at my next camera club meeting, burn him in effigy, attend his next seminar with the sole intention of throwing rotting fruit at him or fart in his general direction.

• I do not agree to these terms.

• I agree to these terms. (Keep reading.)

_______________________________________


Okay, now that we've ditched those guys, here we go.

First, I do realize that there are other ways of synching flashes. You can use PC cords, (home-made or store-bought) other models of radio remotes (including those of several other leading manufacturers, and the "eBay remotes" which have become quite popular with the Strobist folks.

Optical slaves are another method for triggering flashes. As is any combination of the above. But this article is considering the CLS vs PW comparison. Articles on the other methods, including specific comparisons, will appear at a later date. Assuming I survive this one.

I am using the CLS as the example for this comparison, but the features and cost are similar to Canon's equivalent setup.


Basic Description

Nikon CLS is a wireless system that allows line-of-sight, limited range wireless control of remote flashes. A single flash can be controlled, as can several banks of multiple flashes. Or any number in between.

TTL control can be maintained wirelessly, and adjusted to over- or under-compensate exposure. Wireless manual control is also available, as is the ability to change the power on the flashes remotely.

To use these systems, you must purchase a specific model camera and flash(es).

Pocket Wizards are a third-party, digital wireless system. They work with any flash that can be triggered via an external jack. An adapter exists to trigger shoe-mount flashes.

The range, which varies depending on the model, is the longest in the industry - starting at 1,600 feet.


Tale of the Tape

Cost:

Okay, we'll start with a biggie. For comparison purposes, I will consider an SB-800, an SB-600 and a Pocket Wizard-equipped vintage Nikon SB speedlight.

Assuming $70 for an SB-24, -25, etc. and $185 (street) for a Pocket Wizard, the SB-600/CLS system is a winner, assuming you already have a camera with a built-in flash that is capable of employing the CLS system. Step up to an SB-800 and the edge goes to PW.

Winner: Depends on the gear.


Control:

The ability to work in TTL and vary flash settings remotely are not addressed by Pocket Wizard. That said, most remote light shooting is static and set-and-forget, meaning that the lights work fine in constant, manual settings without the need for adjustment. (Hey, you are almost certainly using stationary light stands.)

CLS wins, hands down.


Range:

Usable range, IMO, is one of the biggest advantages of the Pocket Wizards.

Even the "entry level" Pocket Wizards have a range of 1,600 feet. That's about a third of a mile. Is it overkill? Maybe. Do you use them like that very often? No way. But that kind of capability converts to rock-solid reliability at more common distances.

Direction is not limited for Pocket Wizards.

The Nikon CLS has a stated range of 33 feet. But that 33 feet also limited in direction, as flash placement is supposed to be within 30 degrees of the shooting axis. That's not a lot of room for off-axis light. And the ability to spread those lighting angles out is kind of the whole purpose of this stuff.

This is a limitation that, while workable, tends to make you to alter your shooting style to fit the infra-red system's line-of-sight needs.

In my experiments with CLS, I found myself trying to think of lighting schemes which would fit the needs of the system. Conversely, working with PW's frequently causes me to dream up some kind of an extreme placement just because I can.

Is that a valid reason to try a new lighting idea?

My theory is that anything is a valid reason to try a new lighting scheme.

Winner: Pocket Wizard.


Reliability:

I have worked with Pocket Wizards for many years, dating back to their earliest models. Those units, by the way, are compatible with current designs. They are among the most reliable, durable and energy efficient pieces of gear I have every used.

I can only assume that the Nikon and Canon systems are as reliable as the rest of their camera systems. Which is to say, pretty darn reliable.

Winner: A tie, for the sake of argument.


Compatibility:

The infra-red systems are designed to work with specific flashes and camera. They may or may not be completely forward compatible with future models.

CLS and other proprietary systems are always vulnerable to the Next Big Thing. After all, the major camera manufacturers have a vested interest in getting you to trade up. If you are relying on an IR-based, brand-specific system, be prepared to switch out wholesale if the new capabilities and/or backwards compatibility dictates.

Pocket Wizard has thus far embraced a philosophy of full, backward compatibility with all of the older models, while adding features and range to the new ones. They will safely and reliably synch anything with a 60v-or-less trigger voltage. Which are just about any current (and likely future, now that we are digital) flashes on the market - from speedlights to big studio units.

It should be noted that some very old flash gear has synch voltages in the triple-digit range, which can damage a PW receiver. But they would also fry your DSLR if you hoked them up directly.

Compatibility winner: Pocket Wizard.


Remote Camera Operation:

All of that flash synching range offered by Pocket Wizard is also available to you as a remote camera firing capability, providing you purchase the required cord. For instance, with enough PW's you can remotely fire a camera on one channel that, in turn, remotely synchs its own strobes on another channel.

The camera positions that you can enjoy with this capability is limited only by your imagination, secure mounting skills and nerve. (And whether or not you use company-suppplied equipment, if you get my drift.)

Many "how'd they DO that" photos are shot in this manner. And just having the capability frequently prompts you to wonder how you can use it.

When the race horse "Barbaro" broke from the gate early in the 2006 Preakness Stakes, later to tragically break his leg on the official start of the Triple Crown race, I was positioned about 75 yards ahead of the gate with camera "A." Attached to my hot shoe was a PW transmitter, triggered by the camera. Clamped on the top of the starting gate was a PW-receiver-equipped camera "B."

On both fateful starts, I had 8 frames - from two different angles - before the horse had completely emerged from the gate. All from pressing the shutter on camera "A."

Did I know it would work? Yes. Because I had tested it on the previous races that afternoon at ranges far exceeding the working distance for the Preakness race - with a 100% success rate.

The proprietary systems' IR "TV remote control" versions of this capability cannot hope to compete. The PW hardware serves both purposes - synching and remotes.

Winner: Pocket Wizard. No contest.


Which is Best For You?


Which for you? The answer depends on several variables.

First of all, a synch cord or the cheaper, "eBay remotes" might better suit your wallet.

But if choosing between Pocket Wizards and Nikon CLS, you could go either way based on your needs. Some examples:


Amateur/Hobbyist:

If you already have the CLS-enabled gear, by all means go with it. Play within its limitations and enjoy the fun of wireless, off-camera flash. When the time comes to upgrade, look to keep your IR abilities available with your new gear choices. Bear in mind that you are marrying into a system/format with this choice. But Nikon and Canon are both marriage-worthy brands.

If you are looking for a system that will not impose limitations on you -- and will prompt you to push the limits -- consider Pocket Wizards. If you are on the bubble, ask as many Pocket Wizard owners as you can find what they think about their remotes. And ask CLS/eTTL types what they like and do not like about their systems.

Student:

I would go with CLS if your gear already supports it. If not, go with a Gadget Infinity type of remote for starters if you are short on cash. Or just make a couple of long, heavy-duty synch cords and save your money for light. You can postpone the decision until later, when the checks start coming in.

Don't try to compete with the pro shooter on an equipment level. It's the fastest route to ruined credit.

Your advantage: Less gear. More creativity. More energy. And it's okay for you to make mistakes - use that, too.

Part-time Pro:

The answer depends entirely upon what you shoot. If your bread-and-butter assignments are pretty consistent in their scale and methods, and those methods work well with CLS, go with it. If you see yourself expanding into other areas, think long-term and consider building a PW-based system. If you can afford it, you'll never regret it.

Full-time Pro

Living within the restrictions of CLS may be a minor annoyance for a hobbyist, but it seriously limits a pro's ability to do his or her best work. That said, your gear probably already supports CLS (or eTTL) and it can do some amazing things.

So why not use both, as the situation merits?

I certainly gives you the best of both worlds - control, flexibility and speed. And most important, no hurdles toward creating great light for your photos.

________________________________


Have an opinion on this comparison?

Talk about it here.


__________

New to Strobist? Start here | Or jump right to Lighting 101
Now available in audiobook: The Traveling Photograher's Manifesto


Permalink

On Assignment: Dealing With a Difficult Subject

(Photo by Ben Hobby)
You do enough assignments and soon enough you'll have to photograph someone who is (a) picky, (b) knows exactly how they think their photo should be shot, and (c) is not exactly giving you very much raw material to work with, if you know what I mean.

Such was the case for a young-but-enthusiastic Ben Hobby, 5, when I asked him to help me with my profile photo for the new Flickr Strobist Group.

It's Friday night and the missus is off on an overnight Brownie camping trip (big fun) with my daughter, Emily, 7. So it's just us guys. And we have full license to rearrange the living room. (As long as we fix it back exactly the way it was before the girls come home.)

This lighting scheme is a little unusual for me as I used no less than four SB-strobes for this photo. Which is about three more than my lazy butt usually drags out.

It is a continuation of my theme-du-jour, first explored in the Women's Lacrosse Portrait in the last On Assignment.

The kicker here is the background, which is a blank wall lit by an SB-24 (on a stand in a snoot) shot through a ficus tree. I love shooting strobes through houseplants to make interesting light. Luckily, my wife is a certified Green Thumb, or I would shooting light through a plastic house plant.

Technically, this is called using a "cookie," which is short for "cookaloris." And if this technique just got you wondering what else you could shoot a little strobe through to make funky light, well, you are starting to get it, my friends.

Anyway, here is just the background, which was lit by a strobe in a snoot high and to the right (as seen in the bottom photo below.) The pattern is always cool and infinitely variable, depending on where you place the light. Go wild.

(For a quickie one-light portrait, you can fire a single strobe right through the plant and stick a person in that funky light pattern. Just make sure they can see the light through the leaves. Then their eyes will be in the good part of the light, and not in a leaf shadow. Get them away from the wall to get their shadow out of the frame, though.)

And we could have done this with one light, too. But since Pizza Hut for-some-reason takes 45 minutes(?!?!?) to deliver to our house, we had time to do something more complicated.

Ben was a big help, moving the camera around and firing off plenty of test shots as needed while I set up the lights.

Then I would stick him in the chair and adjust the lights further.

If this looks a little 1940's Hollywood, that is because it is similar to the studio-mill "glamour-style" lighting of that era. It's totally cool/retro now (IMO) and a little edgier because a tight snoot (and no fill light) is used for the main light.

This wide shot shows everything. We have one light firing from high right at 1/4 power, through a tree to the background. A snooted SB on 1/16th power (slightly high and at camera left) on the face, and two snooted SB's at 1/64th power as back/rim lights (as in the lacrosse photo.) Click on the photo to bring up a big copy in a new window so you can see what all is going on.

The camera's shutter is set at 1/250th (for the top photo) to minimize ambient light contamination. (I shot at a slow shutter speed for the wide photo to bring up the ambient so you could see the light placement.)

One big mistake: The right backlight (the strobe, itself) cast a shadow in the ficus pattern that I did not notice until just as the pizza was arriving. I could have easily fixed it, but the pizza was hot and us boys were hungry.

Priorities, you know.

Camera: D2h
Lens: Nikkor 85/1.4; 17-35/2.8 for the wide shot
Exposure: 1/250 at f/8; 1/4 @ f/8 for the wide shot
Strobes: 4 (various model) SB units, on manual, on stands
Triggers: 2 on Pocket Wizards, and 2 (SB-26's) used their built-in slaves

Top photo © Ben Hobby - AKA "Strobist 2.0"
Other photos by David Hobby

Next: Lacrosse Cover, v2.0


__________

New to Strobist? Start here | Or jump right to Lighting 101
Now available in audiobook: The Traveling Photograher's Manifesto


Permalink

Pssst. Wanna Buy a Used SB?

Lord knows where he finds this stuff, but MPEX has come across a big pile of used Nikon SB speedlights. Did I tell you this guy knows what we like, or what?

I counted 18 as of Wednesday night. If you are looking for one, they range from $65 for SB-24's to $169 for the SB-28's as of this writing. To get to them, just click through to the Strobist section and scroll down.

(Oh, and if you happen to be burdened by too many Nikon SB's hanging around, they'll be glad to make you an offer. Heh, heh.)


__________

New to Strobist? Start here | Or jump right to Lighting 101
Now available in audiobook: The Traveling Photograher's Manifesto


Permalink

Flash The Bus


So we find out a few days before the TFB_Austin stop that we might actually be able to park the bus inside the venue if we were interested.

(Um, heck yeah, we're interested…)

Within about 5 seconds, it was decided that McNally would light and shoot it as part of the afternoon class. And I knew that Mr. Heinz 57 Speedlights would come up with something typically cool. But I wanted to grab it guerilla-style, before heading off to lunch, so I could have a souvy pic for myself.

Him: 19 cases of gear -- 1,000 pounds worth.
Me: Traveling light: 1 Nikon D7000, a 12-24 and a couple of SB-800s -- no stands, no mods.

Given that, I was happy with the ~3-min, lower-impact bus shot I got during the break. Keep reading for the "McNally wanna-be-on-the-cheap" version, and a link to the Real McCoy…Read more »


__________

New to Strobist? Start here | Or jump right to Lighting 101
Now available in audiobook: The Traveling Photograher's Manifesto


Permalink

Working Around the House

[UPDATE: Results from the shoot-your-own-sales-brochure experiment -- the house received multiple offers over the asking price and sold quickly. Twice, actually, as the first buyers had some trouble putting the financing together at the last moment.

Advice: If you are a decent photographer and are selling your house, most definitely help it to stand out from the competition by spending a day shooting photos of it for your real estate ad. And consider creating a website of your own to really show it off.]

__________

I have been playing architectural photographer this week for a new blog I am working on.

This blog will have one post, and is designed to do one thing -- help us sell our house in a down market.

I have a separate post about the mechanics putting together a blog/brochure. It is mostly designed for general consumption, as I think the idea has worked out really well and might get a little play as a house-selling strategy.

But this lighting post details the problem solving on some of the photos I shot, because any readers heading to the other post for the general real estate / recession stuff probably would not understand our interest in the lighting end of it.

(Heathens...)

Architectural Digest on the cheap, after the jump.
__________


Some General Stuff

Some of the techniques were the same throughout the shoot, which happened over Monday and Tuesday of this week. I had shot some available light stuff earlier, when the daffodils were more in bloom. But most of the lighting pix were done over a couple of days, along with the gazillion other things you have to do to sell your house.

No umbrellas of softboxes were used. Not that I was trying to avoid them. But a Flickr commenter pointed it out after the fact, and I found it interesting. That was mostly a function of lack of space. I was hiding flashes everywhere, and bare lights are smaller. Ceilings (and sometimes walls and doors) were my bounce cards.

No tripods were involved either, which is a little unusual for architectural stuff.

Why? Because Chuck Norris don't need no stinkin' tripod... No, actually, I was working off of an ambient base for most of the shots, and I needed an appropriate exposure to let daylight work as a contributory light source. Mostly pretty comfy handheld range.

Everything was done with two-to-six SB-800's, a D3 and a Nikon small-chip 12-24. That's not a typo, either -- that 12-24 is my FX format wide zoom. It covers full FX frame down to 19mm. I would get an FX-format 14-24, but I simply cannot be trusted with a lens that wide.

Strobe triggering was done optically. That is to say that each shot started with some kind of on-camera flash for fill, which triggered all off-camera SB-800's in SU-4 mode.
__________


Let's start in the living room, shall we?

This picture (final seen up top) is built on the ambient coming through the doors at back right, and the lamps in the room. The ambient exposure is a compromise to pull all three of those continuous light sources in as best as possible. This is a late shot with no flash, and I think I may have opened the ambient up half a stop or so from this level. But you can get the idea.

There are four flashes -- two fill and two accent. I lit the room up to about one stop down with two flashes aimed at the ceiling -- one on camera and one out of frame at camera right.

One accent flash (also camera right) brought the couch and painting up to full exposure from a hard angle. It was a snooted, bare flash. The other accent is hiding behind the tree on the ground playing a little subtle pattern on the ceilings.

Why? No logical reason. Just to do it for a little interest. Kinda like no-underwear Wednesdays.

Exposures? Flash power? Aperture? Couldn't tell you.

I built the ambient highlights exposure as stated, and filled with the bounce flashes for a good baseline exposure. Then I accent-lit to taste. (If that's a little bit Greek to you, you can read more here.)
__________


Almost forgot about the powder room, as I shot it last month. This is lit, but with on-camera flash. This room is only 3x6 feet, so bounce off of the ceiling is a default choice. The trick is going into vampire mode for the mirror.

The solution is to shoot with a very wide lens, vertical, from a very low position. Keep the camera vertical to keep the lines straight. Use the top part of the frame and you just got yourself a poor-man's shift camera -- no reflection.

The other reflection to watch out for is that of your back wall being nuked by the flash. So I angled the flash a little forward to paint a more pleasing reflection of the back wall in the mirror. (Even still, I smoothed it with a little Gaussian blur.)

Exposure is straightforward, but delicate. Exposure at a reasonable aperture with manual (bounce) flash, then dial in the shutter speed until you get exactly the amount of glow you want from the continuous lights. The walls and floor of such a small room act as fill cards, so the shadows magically fill themselves. You actually have very little choice in the matter.

I left the towel a little rumpled just to not be too anal.
__________


The kitchen had me scratching my head for a few days as I wondered how to light it. I wanted to show the whole room, which had no windows -- and lots of very warm CFLs as light sources.

At first, I did not know where I could hide a flash. And in the end, I wound up hiding five speedlights in the frame -- plus one on-camera aimed at the right wall, to trigger the others and fill the front. The room is entirely lit by hidden speedlights, with the only ambient coming through the back door in the living room at rear.


How do I light thee? Let me count the ways.

1. Main fill / trigger light on camera, as mentioned above.

2. Main light in the room: An SB-800 hidden in the overhead fixture. Nifty, huh?

3. Not so nifty: The flash was wedged in off-center with a diffuser dome, so it threw a cockeyed light pattern onto the ceiling. I disguised this somewhat with another SB low and behind the counter. It was snooted and aimed up at the fixture to splash a more even circle of light around it.

4. My over-sink fluorescent lamp was swapped out for an SB which was duct taped to the near cabinet wall. (We had already packed the gaffer's tape.) A sheet of white paper on the underside of the bottom of the cabinet gave a soft bounce surface. This also lit the fruit bowl nicely.

5. Same thing, over the stove, but no paper needed -- the range hood interior was already white.

6. Last but not least, a flash was stuck in the living room and aimed at the ceiling to bring the whole room up. Sliding door daylight was the basis for the ambient exposure.
__________


Here is where I shot the kitchen from. I made this photo later in the evening (we needed the full dark) with two SB-800s and some road flares that we painted white.

Kidding. The fireplace was lit with a few small candles. We shot in the dark with long exposures and the candles really glowed the place up when we opened up that shutter -- even lit the kindling box nicely.

But now the room has to be lit believably. Again, one SB in the overhead fixture (I later cropped that out, but still a perfectly natural spot for a key light. Problem now is contrast. So I fixed that with a fill strobe bouncing into the kitchen at camera left, which smoothed it all out.

Fill was set a coupla stops down. You can see the ratio on the floor at bottom left. Highlights are key-lit, shadows are fill lit. This is the area that shows you how much fill to dial in. Make it look like your eye sees the room normally. No ratios -- salt to taste.

The room was left just a little dark overall, to let the fireplace sing a little bit. We pretty much bought the house the moment we rounded the corner and saw that kitchen fireplace 17 years ago.
__________


As it starts to get dark on (a rainy) Monday night, Susan asks if I remembered to shoot her garden in the back. Of course I did not remember to shoot it, because I am a total moron during allergy season. So I stepped out onto the deck and saw this mix of tungsten light and deep, foggy twilight.

Okay, technically I only saw the foggy evening and imagined the tungsten light, but I knew I could make it if I worked fast in the last few minutes of light. Before I even go back to get a strobe, I metered an ambient shot and dropped the exposure about two stops down. The color was real -- no tungsten white balance needed.

Working very quickly, I grabbed an SB on a stand with a dome diffuser and stuck a 1/2 CTO on it. (I wanted tungsten the way my eye sees tungsten.) Where to put the light? Heck, I am batting pretty good aping our normal fixtures, so I went to the well again. I put it on a stand right next to our deck light, which is on the house edge of the deck, in the middle.

I powered my warmed-up flash to balance the ambient with a couple of test shots and it looked great -- except the shadows were too contrasty. That's easy enough to fix, quick and dirty, with a two-stop-down on-camera flash. It looks great when you are using it to erase contrast with off-axis light. (More on that here.)

If you look at the deck shot bigger, it looks very crisp and 3-D, but legible everywhere. I was rushing fast (gotta get the garden with the last bit of light) but with a little time I would have prolly dropped the fill ratio a bit. Just a matter of taste, tho.
__________


The waning foggy light made the garden look lush, if a little flat. And the garden was way darker then the grass in back. So with the last bit of twilight I grabbed an ambient (somewhere in the 1/4 - 1/2 second range) and exposed for the grass.

A little on-camera fill with the flash zoomed way tighter than the lens gave me a nice center-vignette, and I underexposed that a stop or so. Then I grabbed my stand flash and pulled the dome and gel off for some off-axis light. It came from the far corner of the deck at camera left and was aimed just past the center to feather the key a little.

The ratios are very tight, but even so the two lights bring the garden up to the level of the grass in a very sharp, 3-D way. Bare light sources do that very well, but you do have to keep your fill levels in mind. (Here for bigger.)
__________


Among the fifteen shots I did for the house brochure, this detail of the library master bath shower area went very quickly. It is white-on-white, so again the exposure is delicate. But that is not to say it is difficult.

Bathrooms are just big softboxes -- and you work inside the box. The key light is an SB on a stand in the shower behind the curtain. Aim it at the back right wall and you have a nice, soft source. But even in an all-white room, the fact that the key is behind the curtain means the shadows will be too deep.

An Orbis made quick work of that. Just dial up the fill light in manual mode to taste -- chimp and go. That way, you can keep the whites white, and have just as much contrast range as you want. The ring light fill adds no directional light signature, either.
__________


The last one I am going to mention was a little bit of a challenge to work through. Ben's room is only about 10' x 11', and the loft bed soaks up a lot of that.

Note the two-toned rails on the right side. We had to augment this design after he fell out of bed during the middle of the night. (That'll wake everyone in the house up quickly...) We still have not stained and poly'd the extra rails yet, but he is pretty much in jail up there.

Problem is, there is just no place to hide a flash in here, and my goal is a lit/natural balance. So this one was a little bit of a head-scratcher, too.

The exposure was based on the light streaming in through the window, or more accurately, what that light was doing in the back of the room. No leaves on the tree yet, so the view is not worth saving. Thus, I could let the window blow out a little and also grab some under-bed ambient from the desk lamp.

Now, to build the rest of the frame with flash, but only up to a ratio that looks like normal room light the way your eye sees it. Fill on the far left was from a stand-mounted flash, up high tucked into the corner of the small room. The wall was blue, so we had to correct the bounce color by taping up a shoot of newspaper to get it neutral.

If you ever need to fix the color of the splash your flash makes on the wall, newspapers are a pretty easy fix. For a few more years, anyway.

The other side fill was easier, once I realized that the open closet door out of frame at camera right made a great big reflective light panel when you shot a flash into it. The trick was not overdoing either of the fill lights.

This picture is an rarity in the Hobby household, as we have not actually seen Ben's carpet in several years. It is usually covered in about two feet of Legos, most recently Technics and Mindstorms. He builds these weird robots and vehicles and is teaching himself the programming.

He is even trying to blog a little bit (all by himself, as you can see) but I think we need to work on the "actually developing content" part. To be fair, I must say that his site is better than my blog was at 8-yrs-old.

I digress.

That's it for the lighting stuff. I am working on a more general-audience post on the "buy my house" pseudo-blog idea, which will go up shortly. One more thing, which I will not be mentioning in that post:

If anyone within the sound of this post actually ends up buying the joint, you'd better believe there will be a full Starving Student light kit (with an SB-26) a boxed set of Lighting DVDs and a case of cold, delicious Diet Mountain Dew left behind when we move out.

Just reveal your secret decoder ring flash status after we agree on a price.


__________

New to Strobist? Start here | Or jump right to Lighting 101
Now available in audiobook: The Traveling Photograher's Manifesto


Permalink

Packing Light for Central America

I am headed to the Arenal volcano area of Costa Rica, for a shoot at an ecological institute and for some fun with the family. I have been before, and am looking forward to dodging sticks thrown at us by the howler monkeys.

It is easy to pack when going on a trip just for fun -- a good point-and-shoot and maybe a slaved speedlight. Ditto packing for a straight shooting trip -- bring everything you think you might need.

But this trip is a hybrid of sorts, so I tried to get as much versatility as possible into a single small bag and shoulder sling. For my one-bag eco shoot I'll have five light sources, a stand/umbrella kit, a boom, and all of the light modifiers and grip gear I think I'll need -- plus backups on the critical items.

So, how much crap can you fit into a small bag? . . .
__________


My Limit: One Domke F2 Bag

The Domke F2, seen above, is the standard news photographer bag. I have five of them, most of which are threadbare from many years of hard use. They are not huge, but will swallow up a decent amount of gear. My goal was to get everything into one Domke bag with the standard, 4-square divider -- except the stand kit which will go over the other shoulder. That was a bit of a challenge, as the gear would also include a laptop and storage for photos.

I'm no Chase Jarvis (holy crap!) so the only pack donkey I have to consider is myself. As always, the idea is not choosing what to bring but rather choosing what to leave at home.


So, here it is, unpacked. You can see a bigger version here.

Starting with the body and glass, I am bringing one D300 body (bottom left) which gets me 12 megapixels in a small package. Ditto the glass -- one lens. On the D300, a 24-70 gets me from moderately wide to portrait length. And the Nikon 24-70 f/2.8 is scary sharp and far and away my favorite lens.

As a backup for the body and glass, I'll have a Canon G9 (bottom center). Not ideal, but it is only a backup. It also serves as an (extreme) macro and video in a pinch if I need it plus a voice recorder. The SC-17 TTL cord (upper left) can tie the G9 into a multi-light, off-camera setup very easily. If needed, it'll give me ultra high-speed synch, too.

At bottom left are three SB-800's, one of which is always used as a key light and keeps a 1/4 CTO warming gel permanently attached. You'll remember I said five lights -- that's three speedlights, the pop-up on the D300 (which make a great on-axis fill in a pinch) and whatever ambient is available for my photo. Always consider the ambient as a additional light source.

The last major item is a netbook -- a neat little Acer Aspire One which I picked up for $325 on Amazon. It has a (tiny) solid state hard drive, runs a very stable Linux, and has proven to be quite reliable.

I won't be using this for image processing. It is just for email, website upkeep and Skyping with the house sitter, etc. Speaking of that, I will only have limited net access on the road, so please hold off on all but the absolute most urgent messages until I return. I hope to moderate comments at least once a day, but we'll see how the net access goes.

Next to the netbook is a small 250GB hard drive, a card reader and about 40Gb worth of compact flash cards. I will use the netbook to move the complete shoots onto the portable HD, and keep a second copy of only the loose edit of the best stuff on the cards, erasing all of the crap as I go after offloading to the HD. There is no better way to conserve space than to erase crap as you go.

This gives me one copy of everything -- utter crap and loose edits -- and two copies of anything that has any potential at all. And the second copy of the edits (on the CF cards) is more stable than a second HD.

Starting at left and working right are various power and connector cords, and a set of earbuds for my iPhone and Skyping. My backup for net access is the iPhone, but let's hope it doesn't come to that. Hard to work down a pile of emails quickly with an iPhone. On the two AC cords (netbook and D300 charger) I used Honl speed straps as cable ties, getting me a little double duty there, too.

In the center up top is a Honl shorty and two spaghetti snoots. Dead center are Pocketwizards -- just two, as I can sync the other SB's with their built-in slaves.

Next door is a charger (and extra batt) for the G9, and a small barn door for the SB's. The G9 will take up zero space, as Susan will be carrying that as her camera. (Heh.) Tucked next to the PWs is a dual-point Sharpie, with 2 feet of gaffer's tape wrapped around it. I have no idea what I will use this for at this point, but experience tells me I will almost certainly use it.

The (strapped) stand kit includes a single shoot-thru umbrella, and is held together by two ball bungees, which I am sure will find several more uses during the trip. The stand will work on it's own, but I also expect to use it as a voice-activated boom. The whole thing is light, so all I need is a scrounged helper to save the weight and space of a real boom.

At top right are two more light mods -- a Ray Flash (because it is the smallest of the ring flash adapters) and a LumiQuest SB-III. Having second thoughts on the ring -- might leave that here. Between the snoots, umbrella and the SB-III, I can get a variety of looks while taking up very little space.

Last but not least are two Justin Clamps, which don't pack so well. But they are very useful, so hard not to include. I saved the space in the bag by clamping them onto the strap on the outside.


Advice From a Real Travel Photographer

... which would not be me.

I love to travel and shoot, but Bob Krist is the real deal. His first travel assignment for National Geographic was documenting the separation of Pangea into the five continents that we all recognize today.

Bob has shot travel professionally for the last 30 years, and wrote the book(s) on the subject. His latest is Travel Photography: Documenting the World's People & Places. If it were a college course would best be described as a Survey of Travel Photography.

It is a cover-the-bases book which takes a systematic look at travel photography, from what gear to pack to shooting advice to digital asset management on the road. It is aimed at amateurs, and not so technical when it comes to photographic technique. There is a chapter on light, and some material on off-camera flash, but its strength is that it allows you to be sure you are considering everything.

We sometimes bore down so far into our specific areas of interest that we miss the forest for the trees. The thrust of this book is that it will keep you from completely screwing up the photos from a big trip because of some dumb little thing you would fail to consider.

If you travel a lot and want a look into a long-time pro's approach to travel shooting, it is well worth a read. But I also have been using it as the answer to friends and family members who have asked me for photo advice before a big trip. Those are exactly the guys who are likely to miss something critical (like on-the-road image backups, for example) and Bob covers all of the bases.

If you are already a digital photography stud you might find this book a little basic. For those folks, I would steer them to an earlier book, Spirit of Place, which can be hard to find now. But even then, if you have a friend who is heading out on a big trip I can't think of a nicer thing to do for them than to point them to Bob.


__________

New to Strobist? Start here | Or jump right to Lighting 101
Now available in audiobook: The Traveling Photograher's Manifesto


Permalink