Your camera is the key to deeper travel.

_____________________________


Welcome to Strobist


Strobist is an online project that was published from 2006 to 2021 by former Baltimore Sun photojournalist David Hobby.

Available here as a completed archive it remains world's most comprehensive source for photographic lighting education.

New to lighting? Welcome. Start with Lighting 101, linked below, as millions of other photographers have done before you. Or scroll down further to access Strobist's other free courses.


Strobist's Free Online Lighting Courses:
Lighting 101, 102, 103, and Lighting Cookbook


Lighting 101 is the core foundation of Strobist. It is a free, start-from-zero tutorial that will teach you the basics of lighting and minimalist lighting gear. Lighting 101 will have you up and running in no time—and at minimal expense.

Lighting 102 is the sequel to Lighting 101. Where L101 was about gear and basic concepts, L102 will teach you how to further understand and control the qualities of your light to make it do your bidding.

Lighting 103 is a deep dive into color. It explores the intersection of light and color to help you give your photos more nuance, realism and depth.

Strobist Lighting Cookbook combines the concepts learned in L101-103 to give you more understanding and fluidity with your lighting. We also explore some of the shoots from a 360-degree/ecosystem perspective.

A Baker's Dozen: Here you'll find a sampling of posts to help you understand the scope of the lighting education on this site.

From Classroom to Real World: On Assignment


On Assignment features full walk-throughs of over 170 real-world assignments, complete with discussions ranging from lighting to concept to execution—and even some screw-ups. It (largely) follows my path as a newspaper shooter and beyond, progressing from simple speedlights to more complex studio flashes.


Equip Yourself: Recommended Gear


Sad fact: There are a lot of companies that make some pretty crappy lighting gear, but are still happy to take your money. The Strobist Gear Guide is designed to help you avoid making many of the costly rookie mistakes I made over the first few years of my career. This is the gear that works for me, day in and day out. It is solid, reliable and will get the job done without destroying your wallet.


Feed Your Brain: The Strobist Bookshelf


Books are gear for your brain. Chosen wisely, they represent some of the best value for dollar you can spend as a learning photographer. Featured on the Strobist Bookshelf are my current favorites, winnowed from hundreds of books read over the course of my career. It is a relatively short list, but there are solid selections for nearly any lighting photographer.


And Finally, My Own (Post-Strobist) Project:
The Traveling Photographer's Manifesto


Since 2017, I’ve led annual workshops in Cuba and Vietnam focused on thinking like a photojournalist while traveling with your camera. The Traveling Photographer's Manifesto is, in many ways, the book version of that workshop. More, here.


Lighting 101: Balancing Flash and Ambient, Pt 1

Abstract: Okay, here we go... so far we have only been using flash as a light source. Now we are going to start mixing flash and ambient light!


F/stop, Shutter Speed and Flash

While f/stop and shutter speed both control exposure, for our purposes it is important to know how they do so differently. Shutter is a time-based control. F/stop is a diameter-of-the-lens-hole based control.

Since the light from your flash is pretty much instantaneous, it really does not care about the shutter—as long as you are at or below your camera's top "sync" speed. Which for most cameras is either 1/250th or 1/200th of a second.

Note that there are fancy, flash-pulsing methods which will allow you to sync at higher shutter speeds such as 1/1000th of a second. But (a) they have their drawbacks, and (b) getting into that now would be needlessly complex. So just set that aside.


Two Exposures Happen at the Same Time

Every time you take a flash photo, you are making two exposures simultaneously. You are making an exposure of the ambient light, and an exposure of the flash's light. Whether you take this into account or not, it is happening every time.

The ambient exposure is controlled by the f/stop and the shutter speed. The flash, being instantaneous, is controlled by the aperture.

The photo up top is a good visualization of the fact that two images are being made at once. The shot of Robert, a soldier in the U.S. Army, was made with a slow shutter speed. But I also included a flash, which happened instantaneously and froze Robert irregardless of the shutter speed:

Think of it as two overlaid exposures: Frozen, instantaneous flash exposure, mixed with a slow-shutter-speed ambient exposure. Both are made at once, and both light sources are additive to the exposure.

So you have two exposures to consider in every flash-lit picture: the ambient and the flash. I like to find my ambient exposure first—nothing fancy, just trial and error. Once I have that exposure (in which, remember, the shutter speed must be at or below my camera's sync speed) I have a starting point for my final, lit image.

Next, I'll "dial down" my ambient exposure. This means nothing more than changing my camera's settings to underexpose the ambient. How much? That's your choice. And it will determine the contrast range in your final, lit picture.

Remember, when you move your flash off camera, the difference in location produces shadows in your image. That's what makes your subject look all cool and 3-D. And the depth of your shadows—your contrast range; your drama— is determined by the underlying ambient exposure.


Let's Give This a Test Drive

Below is a portrait I shot of Jessie, a local social media entrepreneur. We are going to use a second flash here, to light the background. But the light balancing principles are exactly the same. They work whether you use one flash, two flashes or a hundred flashes.

Okay then. Let's get her in some shade first, because it's much easier to balance a small flash indoors or in shade rather than competing with the full sun. (But we'll get to that next post.)

Here she is, exposed for normal ambient light in shade:


The exposure here is f/5.0 at a 1/160th of a second. For the record, we are at ISO 200 on the camera's overall sensitivity setting.

It's okay, but kinda "meh," right?

So before we even add any flash, let's crank her down a little bit and create some "drama" in our final image. I am going to close down my aperture and drop her by a little over 2 f/stops. So I am going from f/5.0 to f/11. Nothing else has changed:


Exactly what you'd expect, right? Everything is darker. But there is still legibility everywhere - no big black areas. This legibility is important in the final image. Also, notice that since we closed down the aperture we now have more depth of field and the wall in back is now more in focus.

We have created a "safety net" of darkened ambient exposure. When we add flash, no part of this image will get any darker. So we'll end up with drama PLUS legibility.

Now, let's bring in our flash. (Flashes, actually.) We work with manual flash—for predictability and repeatability. One less variable to screw up. And because of this, adding the right amount of flash exposure to a photo is simple and straightforward.


I'll bring in a flash, on manual power, in an umbrella positioned out of the frame and from camera right. Take a test shot. If the flash is too dim, I'll turn up the power. Say it was at quarter power (on manual, as nearly always) when I made my first frame. If too dark I might turn it up to half power. Or vice versa if it was originally too light.

Also, I am going to do the same thing with a second flash back on the wall. Just to make the wall pop a little bit. And here is the result:


Wow, right? Same exact spot as the first shot above, which was properly exposed open shade. Then we dropped down that exposure to get the sort of "safety-net" ambient-only exposure. Then we lit Jessie (and the back wall.)

This, in a nutshell, is balancing ambient and flash. Everything going forward with your lighting kinda hinges on you getting this. So if you don't understand it, re-read it and stay with it. But be aware that it may not really make sense until you get out there and actually do it.

When working this way, I like to think of my flash as a main (or "key") light and the ambient as my supporting (or "fill") light.


The Process, in steps:

1. Get a full ambient exposure.

2. Drop the exposure down to create a little "drama." How much, is up to you.

3. Bring your subject back up to full exposure by adding flash.


It's Almost Not Fair

How often have you heard this, usually with a tone of superiority:

"I am a purist, I only shoot available light."

(Translation: I am scared shitless of flash.)

As an ambient light photographer, you only have one "correct" exposure. Maybe a little wiggle room if you are being interpretive.

But as a lighting photographer, we control everything in the frame, independently of the other areas, by how and where we expose and add light.

I have been doing this for almost three decades, and I still think that is the coolest thing ever. If you want more detail on the Jessie shoot, it is laid out in more detail (but also assuming a little more knowledge) in the On Assignment section, here.

Otherwise, let's flip the process and use flash to control the harsh shadows created by directional ambient light. Same process, just backwards.
__________


Next: Balancing Flash Intensity With Ambient, Part 2


__________

New to Strobist? Start here | Or jump right to Lighting 101
Now available in audiobook: The Traveling Photograher's Manifesto


Permalink

Lighting 102: Assignment - Balance

We have spent the last three weeks studying light balancing and producing photos in fairly restrictive exercises. We have a lot of people doing the work it takes begin to understand the complete and subtle controls you have over the dance that happens in your photos between strobe and ambient.

You have shot into sunsets, flashed against harsh sun and built up your backgrounds with ambient indoor light. These were three very specific techniques, but they all point to a better understanding of ambient/flash control and balance.

Later, we'll be playing with more than one strobe at a time. But for now, this balance stuff should start to be getting intuitive if you are using one strobe.

I want to detail the techniques for balancing flash and ambient as they relate to actual camera operation, and this send you off on an assignment with a little twist -- and a nice, long deadline.

(More after the jump.)
_______________________


Controlling Your Light from the Camera

Assuming just one flash and ambient light, there are only three combinations with which to control the two variables.


1. To alter flash and ambient levels together:

Remember, flash cares about the aperture and ambient cares about both the aperture and the shutter speed. So to lighten or darken both at once, we adjust the aperture.

If, for instance, our whole scene (flash and ambient) is too dark at f/8, we could move to f/5.6. This would lighten everything by a stop -- flash and ambient alike. Conversely, we could darken the entire scene by going from f/8 to f/11.

2. To alter the ambient level but not the flash:

As we said, flash cares about aperture and ambient cares about both aperture and shutter. So to control the ambient only, we will adjust the shutter but leave the aperture as is. Assuming you are within your sync speed, this will alter only the ambient-lit portions of your photo, as in our coffee table camera shots.

3. To alter the flash-lit area but not the ambient:

This is the most complicated of the three, but only as much as "chocolate/vanilla twist" ice cream is more complicated than either of its components.

Flash cares about aperture, and ambient cares about both aperture and shutter speed. So to alter flash only, we are going to adjust the aperture (which alters both) and compensate for the ambient by adjusting the shutter the other way.

(Sound of 2,000 heads exploding.)

This is not hard at all. Say our ambient is fine, but our flash is not bright enough. Aperture is at f/8 and shutter is at 1/60th, for the sake of argument.

So we open the flash up to f/5.6, which brightens the flash-lit area -- and the ambient, too -- by one stop. Then we close down the shutter to 1/125th, which brings the ambient exposure back to its original exposure value. (1/125 @ f/5.6 = 1/60 @ f/8, right?)

Piece of cake.

To darken only the flash but preserve the ambient exposure component, we would close down the aperture and open the shutter speed by the equal amount.
_________________________

Three slick moves which add up to total control of your lighting world. All in manual. All from the camera.


And Now for the Twist

Everyone will be doing this assignment in the nude.

No, no -- kidding. But I had you for a minute, huh?

No, the twist in this assignment is akin to the difference between algebra and physics. Stay with me on this one.

Algebra is pure math -- or pure torture if you were not a "math person" when you got to algebra. Math as an end to itself. ThisCrapWon'tEvenHelpMeBalanceMyCheckbook math. Math for math's sake.

Whereas physics is math with a purpose. Physics is math getting something done. We are talking "1/2 AT squared tells me where the water balloon will land" math. And that's cool. And your third assignment will hopefully get something done, too.


Assignment #3: Balance

Two of my friends, Rissa Miller and Nathaniel Corn, are both photographers who also happen to be married to each other. A few weeks ago, Rissa sent me an email about a project that she and Nathaniel had been working on along with two other people who I have not yet met. It's called the Thank You Calendar. It is a calendar designed for (and to raise money for) members of the armed services who are recovering from wounds sustained in a very politicized war.

Politics and opinion are the last things on Rissa's and Nate's mind. In fact, they make it a point for the Thank You Calendar to be politically neutral. Which makes this project all the more special, IMO. They are not doing the calendar for the war, or against the war. They are doing it for the people who are caught up in the war. They are neutral, yet they are trying to do some good. (Boy, that's a 180 from most people with a "for" or "against" stake in this thing...)

One hundred percent of the money raised by the Thank You Calendar will go to wounded service members recovering at Walter Reed Medical Center and to their families. The money will go to help fund visits, and buy personal items that they may need as they recover, etc.

What a neat idea. Isn't it amazing what a few people with the ability to make cool pictures can dream up? And here's the thing: There are easily 10,000 people reading this post who are working at this level, photographically. The trick is to look beyond taking pictures of, say, a camera on a coffee table and figure out how you can make the world a little better place with your camera.

So, here's your assignment with the twist:

Photograph someone in mixed flash and ambient light, using what you have learned in the Balance section to control your variables in the manner that you choose. But more important, produce a photo that makes a difference to someone. How it makes a difference, and for whom, is completely up to you.

Try to look beyond the technique to make a photo that is special in some way. Do not get so hung up on the technique that you fail to make a real picture.

Maybe there is a local organization (like a charitable foundation) whose director could use a nice portrait for an annual report.

Perhaps there is a family you know -- a single parent facing tough economic times -- who would love to have a high-quality family portrait for the holidays.

Maybe there is a centenarian in your town that deserves to have their achievement marked with a photograph.

The specifics do not matter. The magnitude of the result is not what is important. The idea matters. And the idea is, what a waste it is to be learning to do such great work only to have it sit on a Flickr page as an end-all.

If you don't want to do this, it is completely your choice. But in the same way it would be a waste of your ability to do a fine photo of a mannequin as an exercise, it would be a wasted opportunity for me not to at least attempt to harness the wonderful pool of talent and goodwill we have built together in this community in such a way as to do some good.

You want time? You got time. The single photo is not due until November 3rd. That's plenty of time to put some thought into it and pull off something neat. We'll take a little breather on the L102 new material to give you time to concentrate on applying what we have learned to an assignment with a little more depth and potential than he first two had.


Here are your tags:

Strobist
Lighting102
Assignment
Balance

and for your best shot, include the tag:

Final

You can see all of the take here. You can see the final edits here. Discussion is here -- and please use this as a clearing house for ideas. You are spread all over the world -- people from 176 countries logged on in September. Duplication of good ideas is fine, even encouraged.

It's a really good feeling to make a good picture. It is a much better feeling to make a good picture that makes a good difference. Thanks for your consideration.

And if you have time, please take a moment to check out the Thank You Calendar as an example of what a few photos can potentially accomplish.


NEXT: Balance Assignment: Discussion


__________

New to Strobist? Start here | Or jump right to Lighting 101
Now available in audiobook: The Traveling Photograher's Manifesto


Permalink

Lighting 102: 3.3 - Balancing Flash/Ambient Indoors

UPDATE: [ Completed exercises | Discussion ]

When last we met, we talked about moving from the idea of balancing a nice, even, back-curtain of sunset light to dealing with a highly directional light source (and learning to use it rather than just fill it.) This week, we are taking it indoors to apply the same principles to light that is less directional, less intense and more diffuse.

The common thread you should be starting to see is that there are two simultaneous exposures going on every time you use flash. This is true whether you make use of the second exposure or not. In fact, even if you are shooting with a disposable point-and-shoot and nuking your drunken frat brother with the flash at about, say, twelve beers into the party, you still have two exposures happening every time you push the button.

The difference between neanderthal and nuanced is learning how to finesse the ambient portion of your exposure. I mean, it's always there anyway, so why not use it?

In fact, the more you understand it, the more you realize that it is at least as useful as another flash. And sometimes even more so.

(More after the jump.)

Typical indoor ambient light, for instance, might be about 1/60th at 4/f at ISO 400. So If I shoot you in that light, available only, you are going to be properly exposed. You'll still probably look pretty bad -- we nailed the quantity, but the quality of the light is likely ugly as it comes from overhead fixtures.

So, I decide to stick an umbrella'd flash up near you and light you that way. After all, I think we have established that you need all of the lighting help you can get, right?

I put my camera at the max synch speed (1/250th) and put my flash on 1/4 power and light you up to f/8. As my umbrella is very close to you (yeesh - look at those wrinkles - I can fix that with soft light) we remember that the light is going to fall off very quickly and go pretty dark by the time it gets back to the wall, right?

So now you look great (all things considered) but the wall on the other side of the room is way too dark. The problem is, the only thing that is lighting the wall is my flash. That's because my ambient exposure is set to 1/250th at f/8, which is underexposing the non-flash-lit portion of the room by four stops.

So let's move from the hypothetical to the practical and do a little exercise in walking the ambient exposure up a little bit to see the effect of various shutter speed on the flash/ambient combo. Rather than use photos of you, dear reader, (we don't want to scare the small children, now do we) I'll use a camera as a stand-in.

In this room (my living room) the daytime ambient exposure is about 1/4th of a sec at f/4 at ISO 200 with the lights out. I have the blinds open so the back part of the room is receiving some light. The camera, in the foreground on a coffee table, is receiving much less.

The first thing I want to do is to establish that, at our starting exposure with no flash, the room would be black:

Here we are, at 1/250th at f/4 with no flash. This stunning exercise in minimalism is, in fact for sale. But only a true art lover would appreciate the beauty and meaning of a photograph like this, so please do not be offended if it appears overpriced.

At a 250th at f/4, the ambient light in the room is 5 stops underexposed. Darn near black, I'd say.

Next we'll add a little flash, in the form of an SB-26 in a shoot-through umbrella. Please forgive the umbrella ribs reflection in the front filter. I was working fast today. Besides, I had already made my artistic statement for the day and I was too bushed to be creative again.

But wait, what's that light on the back wall? Well, we already know that it isn't ambient, so it must be flash. Which is exactly what it is -- spill light from the umbrella.

So, let's open the shutter speed up two thirds of a stop to a 1/160th of a second.

Hmm. The background doesn't get any brighter.

Same thing for 1/100th and 1/60th. (Okay, maybe a tiny bit at 1/60th.)

This is simply because we are working so far from the ambient exposure of the room. If the flash is much more powerful than a given, combined ambient setting, I call that "working above the ambient," as in, "I was shooting flash at f/4, working 4 stops above the ambient."

That tells you that at f/4, my chosen shutter speed was four stops too high for the ambient exposure.

It's not until we get to 1/40th of a second that the ambient starts to creep in, albeit barely.

This is the threshold of the shutter settings at f/4 (and ISO 200) that will allow the ambient to burn into the flash's shadow areas in the photo. So here is where you'd start paying close attention to the TFT screen and adjusting your shutter to get the best effect.

At a shutter speed of 1/25th of a second, things are starting to happen.

Clearly the ambient is starting to make a more pronounced appearance here. Mind you, the camera is staying consistent because it is lit solely by the flash at this point.

The background isn't really usable at this point, exposure-wise. But the light is coming up and I am confident that I can fine-tune it to whatever tone I want.

At a 15th of a second, the background is getting usable.

From here on out (or up, actually) the tone of the background becomes a personal choice. There is no "wrong," as it is now a matter of how much separation I want between the subject and the background.

Remember when we told you to throw the concept of "proper exposure" out of the window? This is what I am talking about: The the exposure reference point is set by how you choose to expose the light falling on the camera. The background can be anywhere in a wide range of tones, with the choice being yours.

At a tenth of a second, my off-white wall is a rich tone, influenced as much by the color of the green-filtered shady light coming through the north-facing window as it is by the ambient portion of the exposure.

Doing an exercise like this (hint, hint) will show you just how much control you have over a situation once you start to understand the concept of balancing strobe and ambient.

At a 6th of a second, we are still below medium grey on the tonal level of the background. But now we are starting to get into a background range that, say, a newspaper might be able to reproduce.

The ultimate medium in which the photo is going to be reproduced will be your guide as to the limits of your chosen ambient fill level. But again, the choice within that range is yours.

One quarter of a sec.

This is my personal choice, as I like the "invisible" quality of the light and ambient combo for this picture. It's a subjective call, but for something like this the light can be made to disappear (not too obvious) and the photo just has a quality edge to it that does not look lit, but just looks nice.

At 0.4 secs (1/2.5) the room starts getting airy.

Remember, the walls are well above medium grey, so the camera considers this an overexposure of the ambient. Again, that "proper exposure" thing is a very fudgeable concept. You might like this frame better. There really is no right or wrong here.

At 0.6 secs, the background looks airier still.

I could go up more on he ambient, but the highlights in the center right portion of the background would start to blow out, which would be distracting (but still not "wrong," IMO.) There is more leeway here than in a Composition 101 paper in 9th grade.

The first concept that you have to learn is that there is a base exposure that will render any scene as black. Indoors, this is frequently an easy exposure to achieve while still being at or below your synch speed. From there, merely opening up the shutter will allow progressively more ambient light into your photo until you get exactly the balance that you want.

Here's something else to think about: Your tripod is another flash unit, but with near-infinite power. Say you are shooting in a huge, cavernous, dimly lit, windowless room. You could umbrella-light someone with a flash in the foreground, and just hold that shutter open until the room was raised exactly to the supporting exposure that you wished. Just lock your camera down on a tripod and leave the shutter open until the whole, "unlit" portion of the room burns in.

I have done it (on a tripod) for 30 seconds at f/2.8. The person swayed just a tad during the exposure. But honestly, that made it look even better. And speaking of movement, one last shot:

Given a quarter second of shutter with which to play, of course I am gonna try a little flash-blur.

But that's not until Part 7, so let's save that for later.


____________________________________

We still haven't finished the balance unit. So this week's exercise is just that, rather than an assignment.

I did these demo shots in ten minutes, literally, from light setup to final frame. It's really no big deal to try something like this in your living room.

The important thing to remember (as it always is when "burning in" ambient against flash) is to have your flash-lit subject in a part of the scene that is receiving less ambient light than the ambient-lit part of the scene. In practice, this usually means shooting into a brighter background and lighting your subject with flash in the foreground.

Remember, the whole distance thing still applies. So keep that flash in close, lest it contaminate your background.

FYI, here is a shot which shows the incredibly difficult and complex setup that was used to make this series of shots.

(That's "Ginger" sniffing the umbrella, by the way. She's not the brightest bulb in a three-pack, but she's very sweet.)

One final note on the umbrella: I "choked up" on the shaft a little but, which means that I did not make full use of the full umbrella as a light source. Reason is (other than that I did not need the full light source at this small distance for the light to be soft) is that I did not want any raw light to spill past the edges of my umbrella and further light the background.

If you are doing the exercises, please tag your photo(s) thusly:

Strobist
Lighting102
exercise
balance
indoors

You can view the completed exercises of others, here. There is a discussion thread set up for this post here.

Finally, given the range of background tones that would have been displayed on the back of your camera, which shutter speed would you have chosen, and why?

Hit us in the comments.


NEXT: Assignment: Balance


__________

New to Strobist? Start here | Or jump right to Lighting 101
Now available in audiobook: The Traveling Photograher's Manifesto


Permalink
How to Photograph Christmas Lights


Normally when we talk about balancing light on Strobist, it usually means balancing ambient with flash. But getting good photos of holiday lights involves a different kind of light balancing: Continuous ambient with fading ambient.

You don't need a high-end camera for great results. You can use a very inexpensive digital camera and do just fine. You don't even need flash. It all comes down to what time of the day you shoot. And a couple of other little tricks.


Timing and Balance

Photo by Troy McCullough

The problem with the vast majority of Christmas lights photos is that most people wait until way too late to start shooting. After it gets completely dark, you can either have the lights or the surroundings properly exposed. But not both.

Conversely, if you were to shoot the lights in the middle of the day, they would not show up at all. The trick is find the sweet spot (actually there is a whole range of sweet spots) where the ambient light and the Christmas lights balance.


Photo by David Hobby, Baltimore Sun

Understanding this will ensure that your photos are way better than those of your neighbors. After all, isn't that what Christmas lights are really about?

How to Do It:

1. Arrive early. The best time to shoot is before it gets totally dark. More specifically, get there before what looks like mix light to your eyes, too. Arriving around sunset will give you time to plan your shot before the good light happens. You may have to ask your subject to turn the lights on early - most people don't flip them on until the good light is already gone.

2. Compose your photo in such a way as to include as much sky as possible in the background. Shooting from a low position can help. Even better: If you have your choice of shooting direction, shoot into the afterglow of the evening sky.

3. Once you get your picture framed, set your camera's white balance for "tungsten," as if you were shooting indoors without flash. All of those little lights are tungsten balanced. As a bonus, the tungsten setting will turn your afterglow sky royal blue once your light balances out. The sky will look great - even if it is a cloudy evening. And your lights will gleam crystal white -- or whatever color they are supposed to be.

[UPDATE: Since 2006 when this was first written, there has been a steady move from tungsten to the use of LED holiday lights. These days, the best approach is still to start with the tungsten setting -- but check your other white balance settings to see which looks best.]

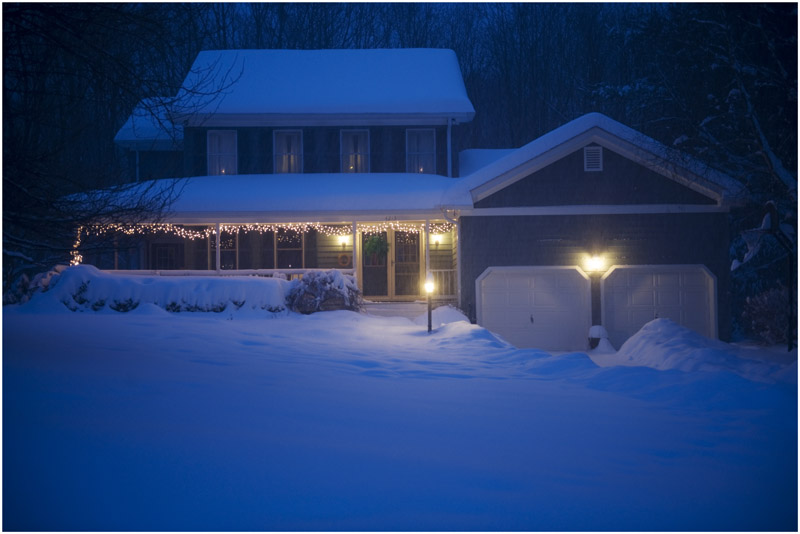
4. A light foreground (like the snow above) or water (as in the boat photo) can give nice foreground interest. See what you can find. In a pinch a reflective car roof will do. As a bonus, it will steady your camera.

5. Use a tripod or a beanbag to steady your camera. You'll be shooting in the range of a quarter second to a full second at twilight. If shooting with a smartphone or tablet, use both hands to brace it against something solid.

6. Now, wait for the light to happen.

Shoot a test shot every minute or so. At first, you'll be exposing for the sky and the lights will appear unimpressive. Check the back of your camera after each shot to watch the Christmas lights appear to "come up" as the ambient light level goes down. Your eye is constantly adjusting to compensate for the dropping light levels, but the changes will be happening nonetheless. Your camera will record them differently from the way that you eye sees them (you can see a much greater contrast range) so shoot and chimp.


Photo by Michael DeHaan

Somewhere in between sunset and full dark, the Christmas lights and the ambient light will start to mix beautifully. You'll have about a 10-minute window which will give you a nice series of subtly different lighting variations. Remembering to keep your camera as still as possible, shooting lots of frames through the mix light. Ones and zeros are free, so don't be stingy. You do not have much time. You can delete the duds (or blurred photos) later.


The trick of using tungsten white balance and shooting through the mix works for all kinds of light-filled scenes, not just the typical holiday lights. Church nativity scenes -- even the annual trip to get a Christmas tree -- look great at mix light.

Incidentally, this time of day is when the architectural photographers make the big bucks. And they are smart enough to tell everyone in their subject building to leave the lights on that night, too.

Once the ambient and artificial lights cross balance in intensity your opportunity will fade quickly, along with the evening light. You will know both are gone when your photos start looking like the "bad light" photos you used to take.

Even if all you have is an inexpensive point-and-shoot camera and no tripod, good results are still within your grasp. Patrick Kunzler, a night photo editor with the Chicago area Daily Herald group of community newspapers, offers this great video tutorial with even 2007 point-and-shoot technology:


Finally...

Afterwards, take a moment and put your camera away. You still have a few minutes to enjoy the scene with your eyes. The human eye has the remarkable ability to compress a large dynamic range into a scene your brain can process. Just relax, soak it in and think about all of the shopping you have left to do.

This is one of the few times that both shooting pictures and enjoying the moment do not conflict with each other.


Next: Hit for Average


__________

New to Strobist? Start here | Or jump right to Lighting 101
Now available in audiobook: The Traveling Photograher's Manifesto


Permalink

Lighting 101:
Balancing Flash With Ambient, Pt 2

Abstract: More light balancing! With a little practice, you can balance a flash with pretty much any light source — from full sunlight, to a starry night.


(Photo by Strobist reader Brent Williamson)

Okay, now let's get out of the shade (or the indoors) and do battle against full sun with our off-camera flashes...

When last we met, we talked about the idea of balancing flash with ambient. We were using the flash as a main light and the ambient as fill, but you do not always have to do it that way.

Straight fill flash is very simple these days, with TTL flashes doing the heavy lifting (i.e., thinking) for you automatically. But doing it the easy way usually means keeping the light on the camera.

The goal here is to start to replace the blah concept of 'fill flash' with that of 'balancing light.' And, more important, to separate the idea of fill flash fill/balance from the rote use of on-camera flash.

The process of using flash to augment (which is a better concept than fill) sunlight is very straightforward. First you are going to start at your camera's highest synch speed, because that'll get you the most flash-friendly aperture. And thus, the most flexibility from your small flash. While you're at it, dial your ASA down as low as it will go to get better quality, too.

Now think about your lighting direction and angle. As opposed to the idea of fill flashing, on-camera, from any angle outside without regard to the sun's direction, using a strobe on a stand effectively gives you two lights to play with. You can balance. You can cross light, You can do both. You'll have more flexible (and consistent) results using this approach.

When you just fill flash from on-camera, true, it does bring up the shadows. But while the flash adds detail it really misses out on the opportunity to improve the depth and quality of the light. So why not do both at the same time?

Step one: Think of the sun as your main light source, and your strobe as a secondary light. You are not just getting rid of raccoon eyes now. You are working with two lights. You have flexibility. You might even have style.

Choose your angle of attack. Maybe you have the sun behind you (on the left side) at a ~45-degree angle. Why would you have your fill on on camera when it might look better lighting from the upper right? On-camera flash limits you. Avoid it if you can.

Maybe you turn the angle around and shoot the subject in profile. Say he is facing to your right. You could have him looking into the sun, which is angled to come from slightly behind his face to provide rim light that is nice, but way too contrasty as is. Just move your strobe over to the left side, elevate it a little, and you have a cool-looking, two-light setup.

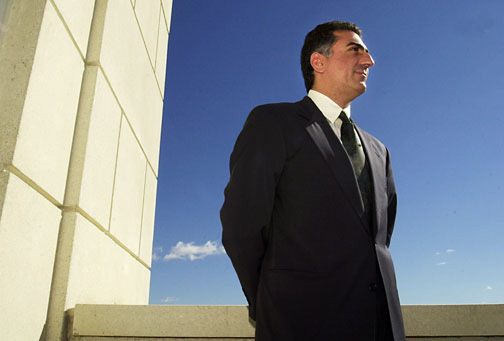
That's exactly what I did for this quick portrait of the son of the exiled Shah of Iran, made for The Baltimore Sun:


Whatever the angle, the technique for balancing is the same. We are basing the exposure on the ambient this time, and bringing the flash up to fill shadows and/or provide light from another direction.

Assuming a sunny ambient light level to balance, set your camera at the highest synch speed (i.e. lowest aperture) to provide a lower aperture and ease the burden on your flash. Now, get your base (ambient) exposure. We'll call it a 250th at f/11 at ASA 200 for the sake of argument.

Now, with your strobe on manual and on a stand, set it to somewhere around a quarter to half power if you are working close. Maybe half to full power if the flash is further away. If you are not lighting a large area (and you usually are not) zoom the flash to a 70mm or 85mm lens angle to make it even more powerful.

Pop a test frame and eyeball it. If your flash-lit area is too bright, dial the flash down or move it back. If it is too dark, dial it up or move it forward.

The thought process is the same whether you are balancing sunlight or starlight. (And when you think about it, sunlight is starlight, isn't it?) Just start with a good ambient exposure — in this case, exposing the stars — add a little flash to give detail where you want. In this case, the underside of a natural arch:


(Photo by Strobist reader Joe Stylos)

Since we are not exactly swimming in ambient light here, the starting point will be a little different. Instead of 1/250th of a sec (or 1/200th, whatever) to control the sun, we'd probably wanna start with our lens wide open and choose a pretty high ISO to get the fastest reasonable shutter speed for the night sky.

Solve your most pressing variable first, then go from there. The process is the same.
__________


The important thing to remember (and why I told you the angle stuff first) is that this is now a starting point to turn your outside "fill" strobe into a true, useful second light source. Experiment.

I used to practice my outdoor lighting skills any time I was assigned to shoot a simple headshot, AKA a mugshot, for the paper. What you have to remember is that they don't know you could do a perfectly good job by just sticking them in the shade for 30 seconds and bolting. Muah-ha-ha, you are now my lighting model for 15 minutes...

Outside? Play with fill light and angles. (You might want to grab something safe in the shade first just in case.)

Inside? Set up a quick umbrella in a corner where one wall is your background and another is your fill card.

I'd turn a mug shot into a head shot, which is just a more professional way to do it. I would get some good (low-pressure) experience with my lighting. And they'd look better in the paper. It's a win-win.

And, contrary to what you might think, most people will be secretly flattered by the effort you are putting in to making a better photo of them.

And one more thing. For you newspaper photogs, stop thinking of them as mug shots from this point forward. A reporter trained monkey can do a mug shot. Start shooting head shots. You'll improve your quality and get into a habit of using light effectively.

Next: Using Gels to Correct Light


__________

New to Strobist? Start here | Or jump right to Lighting 101
Now available in audiobook: The Traveling Photograher's Manifesto


Permalink

Lighting 101: Strobe/Ambient Balance — A Shorthand Way of Thinking


Okay, so by now you should have a decent understanding of how you can balance flash flash with ambient light. In this segment, we'll give that process a little shorthand language to help you understand other photographers when they talk about the way the lit a photo.

Here, I want to accomplish two things:

1. To set you up with a way of quickly understanding and/or communicating how a given photo was balanced, and

2. To not have to repeat full, detailed number-by-number walk-throughs on this process every time we mix flash and ambient. Which is just about every lit photo we shoot.
__________


First, a little confession. Lots of times when I am explaining to someone how a photo was lit, they will want to know everything -- shutter speed, ISO, aperture, flash power settings, etc.

I have to be honest with you -- most of the time I have no idea what those numbers were. It is not that I forgot them. It's just that I didn't care enough about them when I was making the photo to remember them, so they never registered.

No kidding, if you ask a professional PJ, "What's your favorite F/stop?" He or she will know you are talking about the amateurs that sidle up to us at a football game. We are really not that numbers oriented.

Truth be told, I don't think in terms of absolute F/stops and shutter speeds. They are not what is important. It's the relationship between the different light levels that is important.

Take the photo of my friend Shadi, above. It was shot on a hazy, colorless afternoon in Dubai. Here was the process to make this photo:


1. Find the exposure for the ambient. (That's easy - just grab a shot on auto or zero out a manual exposure.)

2. On manual mode, set the camera to underexpose the scene by two stops.

3. Set the camera to tungsten WB, to shift everything from dark grey to dark blue.

4. Light Shadi from the front with a flash with a CTO gel (plus an additional 1/4 CTO gel for extra warmth.)

5. Rim light him (from behind, low) with two ungelled flashes, at about two stops down compared to the main flash. That is the actual relative exposure level hitting Shadi, already accounting for the fact that that the flashes were ungelled. (The gel eats light from the key flash. So the rims might have actually been set 3 to 3 1/2 stops down in terms of absolute power settings.)
__________


If I were talking to another pro about this photo, I would likely just say this:

"We dropped the ambient two stops, shot on tungsten, CTO'd the key light (plus an extra quarter cut) and left the rim lights ungelled, about two stops below the main."

That sentence tells me everything I need to know, because it starts with an assumed reference: They properly exposed key light.

What were the exposure settings? Can't remember, and don't care. It's just not that important.

What is important is the relationship between the flash exposure and the ambient exposure: About two stops. And, just to make things more complex, the fact that we did the tungsten-ambient shift, overgelled the key and left the rims straight.

Understanding this shorthand way of thinking drills into your head that it is the relationships between the lights that matter -- not the absolute settings.

There are two power ratios to think about here: The relationship between the key light and the ambient, and the relationship between the key light and the fill (and/or background) flashes.

Given that our first example was a little complex, lets walk through some familiar photos, thinking and talking in shorthand about the balance.


"Sodium vapor ambient. Shot on daylight, underexposed the wind tunnel by 1 2/3 stops, bare flash behind the fan blades about a stop hot."

So, this tells us that the reference point for the exposure was actually between the exposures for the flash and the ambient. This photo is underexposed by 1 2/3 stops for the ambient, and the flashed area is one stop overexposed.

My ambient is 1 2/3 stops down -- on the wrong color balance -- and my flash is a stop overexposed. This photo should really suck, right?

Honestly, if one area of the frame were "correctly" exposed, it would not be as interesting. The important thing is that I chose these relative brightness levels, without being chained to my camera's ambient meter or the "proper value" of some incident flash meter.

(You can read more about this photo, including those unimportant f/stops and shutter speeds, here.)
__________


Let's try it again:


"Shot on daylight setting in a tungsten room. Exposed for the flash under the orange bowl on Chris' face and dropped the room by a stop and a half."

What's my reference point? The flash's exposure on Chris's face. I put the flash under the bowl on low power, shot a couple of frames until I got the aperture right. (Easier than adjusting that flash.) And then dialed in the shutter to set the ambient to a stop-and-a-half down.

Technically, I supposed I should have shot in tungsten, but why get rid of all of that surreal color? Besides, have you seen Chris Hurtt's natural skin tone at midnight in a bar in a Dubai hotel?

I'm just sayin'.

Thinking about your flash and ambient in terms of their relative (as opposed to absolute) values not only makes you quicker at reverse engineering photos, but makes you quicker at pre-visualizing and creating them, too.
__________


Sometimes you are working so far above the ambient that it is not a component of the exposure at all. Yes, you need to communicate that. But given that you are far enough above the ambient for it not to be an issue it really doesn't matter if you are five stops over, or twelve:


"We killed the ambient; umbrella at camera left, gobo'd to control the reflection on the locker; ring light fill about two stops down."

What was the ISO? The f/stop? The shutter speed? The flash's power settings?

Don't remember, don't care. Because all you need to know to reproduce that look is in the short description above. And if you start thinking about your photos this way, you'll find that the lighting design comes easier and easier.

(More on this assignment here.)
__________


Okay, one more:


"Exposed for flashes in chopper -- one in front cabin, two in back -- and dropped the ambient by three stops."

That is all there is to it, and tells you everything you need to know about lighting and exposing photo.

Again, the absolute settings do not really matter, from a reverse-engineering point of view. They are yours to choose based on what depth of field (or rotor-stopping shutter speed) you want.

(More on this assignment here.)
__________


So, does this stuff make sense? It had better, because you are going to be seeing a lot more of this lingo in the future around here.

Don't worry, it is not like the posts are going to be three sentences long from here on out. (You wish...) There is still a lot of stuff to think about when you are creating and lighting a photo. It's just that we do not really need to re-invent that wheel any more.

Instead, I'll just give you the info in a way that helps you to think on your feet better and link to this page for the newbs.

I realize that the vast majority of the people who read this site are amateurs. But as many times as we'll be going through this process, we should start talking and thinking like pros. And if you just dropped in and this is all Greek to you, definitely give the Balancing Flash and Ambient posts another read...


Next: Reverse Engineering Other Shooters' Light


__________

New to Strobist? Start here | Or jump right to Lighting 101
Now available in audiobook: The Traveling Photograher's Manifesto


Permalink

Get Creative for Additional Light Sources

If you only have one off-camera flash setup, you may feel limited in what you can accomplish by mixing strobe and ambient. But that all depends on how creative you are at scrounging for good ambient light sources.

Take the computer-LCD shot above, shot by DBR Photography, which did not even make use of a flash. While I understand that many of you do not have two identical iMacs sitting around (let alone the bikini-clad model) I'll bet most of you have access to my favorite location continuous light source.

(More after the jump.)

____________________________

See if you can find the scrounged backlights cleverly hidden in this picture.

Did you guess the cars? If you did, you are correct.

Any time you are doing a night (or twilight) shot on location somewhere you may have very well driven a powerful pair of backlights to get there. And it does not have to be a pair, either, as it is very easy to unplug a car headlight to leave just one.

Astragony left them in the frame (to cool effect) but you do not have to. They are great for throwing a raking side/back light across the frame from well off-camera. In this capacity, they can both add texture to a scene and create a separation light on the shadow side of your subject.

Are they bright enough?

Well, yeah. You can make them as bright as you want if you leave the shutter open long enough. This is basic light balancing stuff -- just open that shutter and let the continuous light burn in.

Depending on your tax bracket, you car's headlights might even have a daylight-balanced color temperature, too. Although they are most likely balanced to tungsten. You can work around this in several ways:


• Leave the headlights as tungsten and work in daylight balance with flash. (Just let those headlights go super warm.)

• Gel the flash with a CTO and set your camera's balance to tungsten. This has the added bonus of shifting any lingering daylight-based ambient to blue for more color contrast.

• Gel the headlamp(s) with a CTB gel (Color Temperature Blue -- opposite of CTO) and work in daylight balance. This makes everything daylight balanced.

As far as direction is concerned, you are not limited to backlight with the headlamps. You could shoot your subject in front of a 2-d backdrop (like a wall) with your car parked right behind you, double-front-fill style. Someone shot in profile could look really cool with the flash coming from the side (better yet -- slightly behind on the side) to define the face against that front-light fill.

(Bonus points: Gobo the flash so it does not strike the background, popping some sidelight on the subject that stands out against the background shadow of half of the front-light duo.)

You can even balance with quickly dimming twilight, too. But there is some timing involved. Here are your variables:

• Flash, which is constant and is adjusted by the aperture (or dialing it up or down with manual control.)

• Headlights, constant and adjusted by shutter/aperture combo.

• Twilight, which will be sinking quickly and cares about the shutter and the aperture.


Here's how I would do it. First of all, understand the twight/flash balancing technique, as this process adds a layer of timing to that.

Start early. Set up the environment for your shot, and nail down your poses and angles you'll want as you wait for the sun to cooperate.

Basically, as the ambient and headlight start to come into balance (headlights are constant and the ambient is sinking) you'll be exposing for the flash with the aperture and constantly opening up your shutter to expose for the sinking ambient light.

Through this time, the headlamps will remain constant, so they will have the effect of getting relatively brighter and brighter as you open up your shutter to follow the ambient light down. When they get too bright to look right with the ambient twilight, you are done. But you can always change the look and just balance your flash and headlights, letting the twilight go dark.

This window where everything (flash, twilight and headlamps) works comes and goes pretty quickly. You might not be comfy with the process the first time. So practice on a tree or something earlier if the shoot is important.
_______________________

Have you done a photo using headlights as a second light source? Drop it in our Flickr pool and shoot us a link in the comments.


__________

New to Strobist? Start here | Or jump right to Lighting 101
Now available in audiobook: The Traveling Photograher's Manifesto


Permalink

Lighting in the Dark: Summer Reading


It's still technically summertime in Maryland. But the temps are down, the humidity has eased and -- best of all -- the mosquitos are history. This is prime evening porch time for Emily, my nocturnal bookworm.

I walked out to visit, and to my eye the scene looked great. Unfortunately, it would look like crap in the camera. The tonal range would be far too much for the chip to handle.

But lighting is about controlling that contrast range. And when there is just a tiny bit of ambient, you need an even tinier bit of flash to fix it. Read more »


__________

New to Strobist? Start here | Or jump right to Lighting 101
Now available in audiobook: The Traveling Photograher's Manifesto


Permalink

Lighting 103: Becoming More Intuitive with Color

Abstract: Even an on-camera flash grab shot can be elevated by an intuitive understanding of light and color.


As your understanding of light and color grows, how does it affect your daily shooting? Like most things that seem complex at first, color pretty quickly becomes a secondary thought process, just like tying your shoes.

I just had the above archive photo picked up by a nonprofit, to promote children's books. Looking at it, I'm reminded that creating a natural looking color need not be complicated at all.

This was a little more than a snapshot, done with on-camera flash, and no gels. And the thought process behind the light is a good example of how you'll start to see and control color, even if you're just grabbing a snapshot. Read more »


__________

New to Strobist? Start here | Or jump right to Lighting 101
Now available in audiobook: The Traveling Photograher's Manifesto


Permalink

SLC-0L-01: Flash or Continuous, Light is Light


In Lighting 101, 102 and 103, we learned to control our flashes. In the Strobist Lighting Cookbook, we're expanding that approach to learn to move in a fluid way between flash and continuous light. Read more »


__________

New to Strobist? Start here | Or jump right to Lighting 101
Now available in audiobook: The Traveling Photograher's Manifesto


Permalink

One-Light Real Estate Photography

While down in Florida last month, I found out that my parents' next-door neighbors (and good friends) were selling their house. I was a little bummed, as they are good folks and you hate to see them leave.

But I was even more bummed when I saw the point-and-shoot specials the real estate agent had thrown up on the "for sale" page.

We only had one working flash. But certainly we could do better than that...
__________


One House, One Strobe, No Problem

Okay, to be clear I did bring two SB-800's down to Florida. But I only brought two sets of AA batts, too. (Hey, trying to travel light here.) And when one set of batts gets liberated by the kids to power yet another few hours of continuous Wii playing, two SB-800's become one SB-800.

And to be fair, I am no Scott Hargis, either. He is a magician at speedlighting a house to within a hair's breadth of Architectural Digest. But one SB-800s is better than no SB-800s, so we gave it a whirl anyway.

The trick, as always when using a small light to light a big thing, is to wait for the ambient to come to you.

We wanted to do four looks, with one strobe, in one evening. Each would be an exercise in flash/ambient balance. And each would need to be shot at a different time -- but all at twilight.

First stop was the interior, seen above. For this, we needed to balance flash with two ambient sources -- one fixed and one declining.

The outside light would be constantly falling, and the lamps inside would be constant. Because the flash would be lighting a large area, we needed a decent ISO speed and a large aperture.

If memory serves, we went with ISO 400 at f/4. Don't quote me, but it was at least close to there for the reasons listed above.

So, the f/4 becomes the anchor for the exposure. Using f/4, you chimp a little on the shutter speed to see where the lamps will look best. You want them bright, but not nuclear.

Remember -- they do not have to light the room. The flash will do that. They just have to look good.

Once you get the f/stop and shutter speed, it's simply a matter of waiting for the outside ambient light to drop down to where the windows look good. At that point, we pulled everything together by throwing a flash into the ceiling to bring up the rest of the room.

We had to nuke it - either 1/2 or full power, if I remember correctly. Always gonna take a lot of power to pull this off. If full power is not enough, you have to walk the ISO up until it is. (You'd walk the shutter down to keep the ambient in balance.)

Bonus: The ceiling-bounced flash is gonna pick up some warmth to accentuate the wood in the room. With more time, we would have lit a fire in the fireplace. But honestly, those are usually just for show in Florida anyway.


Moving fast now, we went out front. The front view is very cluttered, graphically speaking. Lots of trees and bushes. So I wanted to highlight the house with some focused light. We backed the flash up behind the camera and over on the left and zoomed it to 105mm.

Half power was more than enough light to pop the house -- and just the house -- to make it stand out against a twilight sky.

Easy balance here: Pop the flash on the house at a 250th of a sec, adjust the aperture until the house looks best, open up the shutter until the background looks best. Quick and easy.

Since the house is being lit by a low, warm light source it almost looks as if the house is being lit by the sunset. When the sunset is, in fact, happening at back camera left.


Next, we went to the back of the house. The ambient is getting much darker and now those interior lights are starting to sing. Nice and bright, relatively speaking.

So now the interior lights are the focal point and the twilight afterglow is secondary, as far as the ambient is concerned. But the house exterior needs bringing up. Given enough aperture and ISO (we were at 400) this is another easy, one-speedlight job.

The flash for this photo needed to light both the house and the trees I used to frame it. So we placed it out a ways at camera right and pumped it all of the way up to full power. (That throw to the house was an easy hundred feet or so. Maybe more.)

By feathering the light (aiming it between the trees and the house -- more toward the house) we could light both objects evenly, even though the house was much further way.


Now that we were done with the three-source-balancing stuff, we could finish off down at the dock. No hurries now, as we could fix the one ambient source no matter how dark it got. For those keeping score, this is the same dock as the one on the left in the tiki hut photos, if you want to get any context.

At this point, this one-light real estate stuff should be making sense. In a fairly dark ambient environment, I stuck a voice-activated light stand (AKA my dad) up on the dock. I had him aim the SB-800 (at 1/4 power, and synched with a Pocket Wizard) high, across the top of the dock. Actually aiming it a little up into the air. This helped to feather the light and keep the left side of the dock (from the camera's perspective) from getting too hot.

Meanwhile, I am down in the water:

Start on a high shutter (1/250th) to kill the ambient. Firing the flash, chimp the various aperture settings until the dock looks good. Open up the shutter until the ambient (post-sunset sky and reflection) looks good.

This stuff is not hard. It's about a three-minute job, and two minutes out of three are spent showing my dad how to hold and aim the flash.
_________


So, there you have it: A quick-and-dirty twilight real estate package, to replace the point-and-shoot nightmare on the "for sale" page.

Not that we couldn't have done a nice job with a point-and-shoot, too...


NEXT: On Assignment: Reluctant Poet


GEAR USED:

(Same setup, all photos)

Nikon D3
Nikon 17-35/2.8
Nikon SB-800
Pocket Wizard Plus II


__________

New to Strobist? Start here | Or jump right to Lighting 101
Now available in audiobook: The Traveling Photograher's Manifesto


Permalink

Lighting 102: 6.2 - Gelling for Tungsten

In the last L102 post, we talked about some of the problems we have to face when gelling to work under fluorescent light. Gelling for tungsten yields similar, but different problems.

Fortunately, tungsten is easier -- and more forgiving.

First of all, when we gel for tungsten, we use an "CTO" gel, which is orange and converts our daylight-balanced flash to tungsten (or incandescent). This means that our little flash has basically been turned into a normal light bulb, as far as light color is concerned.

As you can imagine, this is gonna be pretty orange. But when you are shooting in a tungsten environment, you need to get your light consistent. And CTO'ing the flash makes the flash orange, so your flash and ambient now match. Setting the camera to the tungsten white balance setting (usually denoted by a little "light bulb" symbol) corrects for all of this and brings all of the lights back to daylight.

Except when it doesn't. And there is the rub.

Like fluorescents, tungstens are not always the "correct" color. In fact, a bulb's color can change radically - even moment to moment.

How? By being dimmed.

If you do not believe me, dim down a tungsten light in an otherwise darkened room. Watch as it gets redder and redder. They go almost pure red right before the dim to "off".


TIP: If shooting in a dimmed tungsten room, try to get the lights cranked all the way up. You will get a higher ambient level -- easier for balancing. And you'll get truer tungsten colors -- easier for gelling to balance.


Knowing this, you should now realize that you cannot perfectly balance for all tungsten lights with just a CTO gel. And even if you could balance for everything, you probably would not want to.

First of all, as with our fluorescents, when color converting we can only gel our flashes for something we can reliably correct with white balance settings. And custom white balance is not very useful, because you would have to match the flash's gel pack with the custom color to complete the process.

If you do shoot regularly in, say, the same room with the same whacked-out color, it might be worth it to test a build a gel pack that matches the room light for your flash. Then you could cancel it all out with a custom white balance. But on a daily basis, this is impractical when shooting flash.

Fortunately, flash and tungsten get along pretty well when not perfectly balanced. The main thing is to get your flash correctly CTO'd and balance that at the camera. Then let the ambient tungsten do what it is gonna do.

It frequently will not be perfect, but it will be much better than if you had not gelled at all. And you can also vary the background color effect by how much ambient you choose to include, remembering that the ambient component is controlled with the shutter speed. Balancing down lower with ambient (more stops underexposed) intensifies the color. So bring it up a little so smooth it out.

Long story short, the bad news is that with tungsten, you have a color problem you might not have previously considered. But the good news is that you do not need to be as exacting with tungsten light, so missing it a little is not a tragedy.

CTO and Window Greens explained, we will jump into some fun stuff next -- color key shifting.

NEXT: Assignment: Work That CTO


__________

New to Strobist? Start here | Or jump right to Lighting 101
Now available in audiobook: The Traveling Photograher's Manifesto


Permalink

Lighting 102: 3.2 - Balance | Flash/Sun Crosslighting

UPDATE: Some of you guys are already all over this one. There's a good discussion thread forming already, so there should be plenty of help for the newbs. Please ask technique questions in the Flickr threads rather than the comments.

Last week we talked about creating great light with just one flash and a sunset. (Results here.) But what about those photos which can't be scheduled for the evening?

This week I want to get into the idea of balancing and crosslighting sunlight, and take a look at a Strobist reader who is using this one technique as a calling card. (More after the jump.)

Before we learn how to tame the harsh sunlight, let's take a look at what TTL, on-camera fill flash does so we can have a basic understanding of the concept to better understand how we can expand it. I have nothing against TTL, mind you. There are situations for which it is clearly the best solution. But I cringe at the thought of all of that technology being brought to bear on what turns out to be a boring photo because the light was coming from on-axis.

You have seen the photo before, in the back of your camera or flash manual. It's usually a very nonthreateningly beautiful female Japanese model, posing by a railing with a background of, say a nice lake or harbor scene and perhaps a sailboat or two. The before-and-after photos show the ugly, raccoon-eyes look of the model in harsh sunlight and the improved-but-still-sterile TTL-Matrix-Balanced-Computer-Assisted-Patented-Photographer-Brain-Softening fill light.

Raccoon eyes are the problem, and the pat solution is to pop just enough light in there to fill them. The camera calculates the basic, ambient exposure and pops in a little fill at, say, 1.7 stops down. It fills the harsh shadows and leaves that little "fill flash twinkle" in the eyes.

But geez Louise, with harsh sun and one flash you can do so much better. I mean, even keeping the flash hard (no umbrella) you can get some very cool looks by going off camera. And you only have three decisions to make:


1. At what angle do you want your strobe light and sunlight to hit your subject?

2. How bright to you want to set your ambient?

3. How bright do you want to set your flash?


Boy, that there's some real rocket science right? No, it's not. It a simple series of choices that can leave you with some super cool-looking mid-day photos. Let's run through the thought process and take a look at some of the results you can get.


Taming the Sun

Here's the basic setup. (Like those new, high-impact, 3-D graphics? Yeah, baby...) Click the pic for a bigger view.

It's good to start with the sun coming from behind your subject, out of the frame, on the back/right or back/left side. You'll be throwing hard sunlight against hard strobe light, so lighting-wise you do not care which is coming from where. But your subject would probably rather not look right into the sun.

(The choice to go back right or back left is going to be made by which background you prefer, given the differing sun positions.)

Immediately, you will want to go to your max synch speed, giving you the most open aperture possible and allowing your flash to do the most work with the least output. (This is where having a 500th of a sec synch -- or higher -- at your disposal pays real dividends.) But 1/250th will work fine, too. Below that, it starts getting tougher.

We'll be playing with the ambient in a bit, but for right now let's just grab a decent background exposure and go with it. Remember, you're at your synch speed, so you will do this with the aperture on manual.

This is not some compromise, namby-pamby, mama's boy, try-to-keep-everything-in-range exposure, either. Expose for the sky and environment and let your subject's foreground exposure fall where it may. Make the environment look good. You'll be fixing the foreground in a minute.

This is also the background/separation light for your subject. So do pay a little attention to how that light looks skimming off of your subject, too. You'll be surprised at how good that back/rim looks coming of of the sun side of your subject when you do not have to worry about the shadows in the foreground.

Now, bring your flash in from the opposite side (a little high and at about a 45-degree angle to start) and set it on, say, 1/2 power, with no light mods attached. (You do not have enough power for an umbrella unless you are in very close or you are rocking some serious watt-seconds.) You can warm it with a gel a little if you want. Maybe a 1/4 CTO.

I would start with my flash at about six feet away, on 1/2 power. Pop a frame and chimp. Too dark on the flash-lit side? Move your light in. Too light? Drop it to 1/4 power to get some faster recycle time for a better shooting rhythm. When you balance it right, it'll look like this:

Now, seriously, does this not look better than anything an on-camera fill flash could accomplish? This is by New Zealand shooter Brent Williamson, who uses this light all of the time and does not even appear to own a proper light stand.

It's not an equipment thing. It's a brain thing.

Of course, synch-wise, Nikon and Canon do the wireless thing very well at close range. And this is a situation where your synch connection is gonna be pretty much bullet proof. So definitely use this as a way to amp those family pix if you are so-equipped. You do not even need a stand, either -- just a bystander to hold the flash and point at your subjects.

Here's a setup shot of a different lighting angle situation, also by Brent, which shows the flash acting as more of a backlight. He is crosslighting almost on the 90's (flash a little behind) but the idea is the same. Looks so obvious when the light is in the photo, but click through on the photo and cover the flash/tripod with your hand and see the lighting look without the setup context. Cool huh?

Exposure-wise, your flash has to be pretty close to correct. But you have a half-stop range either way, so don't get too anal retentive about it. Also, after you nail the exposure, move the strobe around a little to find the best lighting angle/height to make your subject look the way you want.

But the exposure on the ambient/background -- that's another story.

Take a look at this third shot by Brent, which is clearly underexposing the background a little. Totally different feel. To get this, you are going to underexpose the background by staying a the synch speed and closing down the aperture -- and cranking up and/or moving in the flash to compensate or the tighter aperture.

It looks so 3-D because the sun and the flash are painting the subject from opposite sides, and you can play with the ambient exposure to let your subject pop as much as you want.

The flash exposure still needs to be on target, but play a little with the ambient portion. It's the concept of straight crosslighting (instead of straight, on-camera fill) that gives you the look. As long as you shoot on the 3/4 (or 1/4) angles to the lights, you are gonna get a really nice, 3-D effect with this light. The ambient light level, which defines the feel of the photo, is up to you.

No assignment this week as we still have several different light balancing approaches to discuss. But as an exercise, you should get out and try this. It's a way-cool look that anyone with a single, off-camera light can get.

Tag your assignments as:

Strobist
Lighting102
exercise
balance
crosslight

You can view the completed exercises of others, here. There is a discussion thread set up for this post here.

_____________________

Related posts:

:: OA: Archeologists ::
:: OA: Taming Harsh Sunlight ::

See also:

: Brent Williamson's Website ::


NEXT: Balancing Flash and Ambient


__________

New to Strobist? Start here | Or jump right to Lighting 101
Now available in audiobook: The Traveling Photograher's Manifesto


Permalink

Nikon D600: Think Twice Before You Jump

UPDATE 9/25/12: Upon testing, the D600 appears to have a pretty sweet sensor -- if the issues noted below are not a concern for you.
__________

Nikon has just officially announced their long-awaited entry-level full-frame body. Full spec reports are everywhere, as Nikon seeds lots of sites with advance info and embargoes them until the hour of release. So I won't duplicate that content here.

But for lighting photographers, the camera has two issues that are of concern. One is minor and (sadly at this point) expected.

But the other is major and quite unexpected. Read more »


__________

New to Strobist? Start here | Or jump right to Lighting 101
Now available in audiobook: The Traveling Photograher's Manifesto


Permalink