New to lighting? Welcome. Start with Lighting 101, linked below, as millions of other photographers have done before you. Or scroll down further to access Strobist's other free courses.
Lighting 101 is the core foundation of Strobist. It is a free, start-from-zero tutorial that will teach you the basics of lighting and minimalist lighting gear. Lighting 101 will have you up and running in no time—and at minimal expense.
Lighting 102 is the sequel to Lighting 101. Where L101 was about gear and basic concepts, L102 will teach you how to further understand and control the qualities of your light to make it do your bidding.
Lighting 103 is a deep dive into color. It explores the intersection of light and color to help you give your photos more nuance, realism and depth.
Strobist Lighting Cookbook combines the concepts learned in L101-103 to give you more understanding and fluidity with your lighting. We also explore some of the shoots from a 360-degree/ecosystem perspective.
A Baker's Dozen: Here you'll find a sampling of posts to help you understand the scope of the lighting education on this site.
On Assignment features full walk-throughs of over 170 real-world assignments, complete with discussions ranging from lighting to concept to execution—and even some screw-ups.
It (largely) follows my path as a newspaper shooter and beyond, progressing from simple speedlights to more complex studio flashes.
Sad fact: There are a lot of companies that make some pretty crappy lighting gear, but are still happy to take your money. The Strobist Gear Guide is designed to help you avoid making many of the costly rookie mistakes I made over the first few years of my career.
This is the gear that works for me, day in and day out. It is solid, reliable and will get the job done without destroying your wallet.
Books are gear for your brain. Chosen wisely, they represent some of the best value for dollar you can spend as a learning photographer.
Featured on the Strobist Bookshelf are my current favorites, winnowed from hundreds of books read over the course of my career. It is a relatively short list, but there are solid selections for nearly any lighting photographer.
Since 2017, I’ve led annual workshops in Cuba and Vietnam focused on thinking like a photojournalist while traveling with your camera. The Traveling Photographer's Manifesto is, in many ways, the book version of that workshop. More, here.
Bert Stephani's Light Stand Box Strip Light
My 7-year-old's favorite playthings are the boxes that used to contain expensive toys. Belgian photographer Bert Stephani apparently thinks the same way.
For the record, I have nothing against store-bought strip lights. It's just that if I have a limited supply of money, I'd rather use it to buy the things I cannot make. And I can make a strip light modifier easier than I can make a D3.
If you in the market for a light stand, don't toss the box that it comes in. And if you are in the market for two light stands, you may be able to get all Martin Schoeller on someone on the cheap.
Today's Special: A Cuppa Joe, With a Squeeze of Lime
If you are into in-person, hands-on learning there are a coupla great new options on the radar. Hit the jump for details on new offerings from Joe McNally and Bert Stephani. __________
McNally has just announced that he has revived the Dobbs Ferry workshops. If you are anywhere in the northeastern US, you'll want to take a look at the new one-day programs that Joe is now doing direct -- i.e., not as part of a third-party organization.
The classes are very small (just Joe and a dozen mouth breathers) and he has set it up as an intense, one-day program which includes a light (heh) breakfast and lunch. They run from 9:15 a.m. until 6:00 p.m., or until your head explodes, whichever comes first.
You EU-types will want to take note of Bert Stephani's new gig, "Squeeze the Lime," in which he and partner-in-crime Pieter Van Impe will be doing lighting seminars of several different lengths and formats.
They have uploaded their first "Squeeze the Lime" video, embedded below. It could be a tad NSFW-ish in your typical US cubicle hell. But it'll play just fine in European offices, where you'll probably want to call your boss and coworkers over to watch along with you.
I am in the air all day today, flying back from Los Angeles. Meanwhile, Bert Stephani is across the pond, pretending he is in L.A. So I will leave you in his able hands, as he invades a public beach with a California Sunbounce Micro and a kickin' pair of ND-8 filters over his eyes.
(Seriously, I love Bert's videos.)
See stills from the shoot on Bert's blog. More info on the CSB here.
Bert Stephani is back, with another episode of shooting a beautiful model in Belgium. In this installment he shows us how to use beer to previsualize a background.
Bert, who is recovering from getting his camera bag stolen in Spain, decided to riff a little on the meetup group shot theme. For this shot, they used no fewer than twenty flashes, all synched by BioWizards.
And FWIW, I have been planning a little local group shot of my own. If you are local to DC, I'll be trolling for volunteers soon (not yet). Hey, somebody's gotta knock Bert off.
UPDATE: Here is a video from the meetup:
_____________
Speaking of meetups, some pretty cool videos have been coming in lately from the various get-togethers. I have posted link to search for them on YouTube. Just make sure your title, tags or description contains the words "strobist" and "meetup" and you should show up in the results.
Bert Stephani, a long-time Strobist reader based in Belgium, has made a quick video on adding a single flash to noonish ambient to get a high-glam look.
Reader's Digest version: Just find some shade, and use your flash as a separation light. (This actually works well on cloudy days with dark backgrounds, too.)
You can see the photos created in the video at decent res by clicking through to Bert's Flickr Stream.
Major props to Bert for doing the video. And especially for the English-dubbed version. ______________________
And thanks to the dozen or so tipsters who told me about it. If you have shot (or found) a cool, lighting-related video, feel free to tip your faithful blogger in the comments.
Belgian Photographer Bert Stephani, Serving Leftovers
Last time it was beer, and this time it is leftovers. Bert, who sent me home from Paris last week with one of his patented background softeners, has pulled some extra footage from the first two episodes for more location lighting tips.
(And being that these are leftovers, remember to add a little water before you microwave them or they will dry out.) _______________________
We are back from Paris and have the kids shipped off to school, where their jet lag now becomes the teachers' problem.
Nothing says "welcome home" like a couple hundred unanswered emails, and I am slowly digging out of my pile of work. So info if you are somewhere in there, please be patient...
(More Paris stuff and pix after the jump.)
Photo at top (by Belgian Photographer Bert Stephani) is from when we were shooting free model Michael, left, using a bare-bulb-lit alcove as a background element.
And yes, Bert's photo is more interesting than mine. But I try to stay away from crotch shots when shooting with 50 witnesses. That's Bert's cheap Russian fisheye bar shot below, too.
I will be posting some of the photos with lighting diagrams and reader-supplied setup shots (no shortage of those, believe you me) in the next couple of days.
Meeting so many of you guys was great fun, especially at the Pub Winston Churchill after. That's the home of Nine-Euro beers, and you don't even get to keep the glass. But the beers make way cool variable warming gels. I very much look forward to getting back there soon.
We ended a little abruptly, (without the normal Q&A) to squeeze in one more setup in before they ran us out of the joint. But please feel free to ask questions and/or continue the discussion on the Paris thread. (Link jumps to first comment after seminar.) If you didn't grab the slideshow off my my laptop during lunch, I will be emailing you a link for the presentation (in .pdf form) shortly. __________________
(More pix, courtesy Karsten Rump, in this slideshow.)
I finally got a chance to meet Peter Geller, of California Sunbounce, at PDN's Photo East shindig up in NYC last week. He had all of CSB's toys strewn out in a way that is very unfair to those of us looking to escape the show with our wallets intact.
Their system is totally comprehensive and can create just about any light-modifying setup you could possible imagine -- if you have the moolah. But if you are a dirt-broke college puke (or perhaps a former Lehman brothers executive) you may have more time than money at this particular point in your life.
If that is your situation, you might want to take a look at this DIY version of the CSB Micro Mini, which is proving to be popular enough to be in a backorder situation on the accompanying flash mounts.
(And check out "we-knew-him-when-he-wasn't-famous" Bert Stephani starring on the Micro Mini webpage, too...)
Back to the DIY. Thanks to reader John Gibney, if you have a little patience and know your way around a sewing machine you can try out a DIY version to see if all this bouncing stuff is right for you. He gives pretty detailed instructions on his blog -- even how to include a 5/8" stud for mounting a flash or sticking the bounce in an umbrella swivel.
It's my birthday today. So I am taking the day off and handing the keys over to "Baritone Bert" Stephani, who is back with another one of his smooth-voiced, small-flash lighting videos from Confessions of a Photographer.
For the newbs, note how quickly and easily Bert constantly adjusts his lighting to vary the effect. He just grabs them and goes, whether he is backing the light up to get more even lighting over a larger area or hitting his model with 12:00-high umbrella for an Iggy Pop look.
Remember, the more you do this stuff the easier and more intuitive it gets. Just do it.
Now, if you'll forgive me, I will be spending the next two hours with my senile self trying to figure out where I left my car keys -- and yelling at kids to get off of my lawn.
UPDATE: Well, I can honestly say that I did not expect this on my birthday... (Thanks, guys!)
Grab your binky and a bottle of water. Bert's back with another "Confessions" video. There's all-new techno-trancy-housey music. And black undies, too...
Regular readers of this site are long familiar with Belgian photographer Bert Stephani. His easy-going manner and slightly warped sense of humor always make for fun learning in his behind-the-scenes shoot videos.
For the last several months, Bert (along with partner Peter Van Impe) have been working pretty much nonstop to produce a new lighting tutorial, "Motivational Light."
Hit the jump for a trailer, links and impressions after 3.5 hours of non-stop Bert. Read more »
Belgian photographer Bert Stephani posted a video last week that hits on a lot of cylinders for me. Taken at face value, it is a cool series of hard-lit shots of a gas-masked runner.
But before you watch the video (after the jump) take a moment to notice all of the things that Bert and his buds are accomplishing with this group shoot.
A Little Stone Soup
First off, Bert is making a cool series of pictures for a photo contest, which is always nice. Second, he is doing a photos to highlight a good cause: Environmental Awareness.
But more important, he is corralling a little peer power to help him create something in a group environment. I talked to Bert in Paris about this idea of freelancer working in somewhat of a vacuum as far as camaraderie is concerned. He lamented the fact that he does not get regular contact with a group of creative people.
I miss that environment from The Sun, too. Not that you guys aren't creative, of course. But it's not the same as working person-to-person with, say, the same group of Saturday shooters for a few years.
He rounded up his shooter friends Ake, Pieter and Didier, and also got help from Dirk, a local model. So, what's in it for everyone? Let's see:
Bert and Dirk get photos that they would not have otherwise gotten. Ake, Didier (who shot video) and Pieter assist, which is always a learning experience. They all have Bert pretty much in their pocket for a later assist, too.
Everyone gets a session of creativity in a group environment, which is always a welcome change of pace from the day-to-day grind of working as an individual freelancer.
It's basically a meetup, using just a few people, wrapped around a specific series of photos. This is a win/win situation that more photographers should employ whenever they have the opportunity. I plan to be doing some of this myself, starting in January.
(Hey, Ake, Bert, Didier, Pieter and Dirk: You free to come to Baltimore to help? Beer's on me.) ____________________
Over the last nine years many cool videos have graced the pages of Strobist.com. Here, in the order in which they originally appeared, are the Top 100.
Windows open in tabs for easier multi-video browsing:
Colorado Photographer David X. Tejada takes us along on another location shoot today. Here's a question for you:
Why does Dave bother to shoot all of these videos?
I have been thinking a lot about this recently, and the bennies are starting to add up in my mind. Hit the jump after watching the video for more on why David in the world would continue to spend time and resources to keep doing this. __________________________
The Bennies of Free TV
Consider:
1. David is sharing his techniques with other photographers, raising the industry's knowledge base one viewer at a time. That benefits everyone.
2. Just the simple, repetitive act of explaining to others what you are doing increases your understanding of your techniques and gives you new ideas. (I can vouch for that one on a daily basis.)
3. David's current clients -- and potential new ones -- get a chance to watch him work in a variety of settings from anywhere in the world, for free. That builds confidence -- especially with clients who may be hiring him from far away. And that leads to more jobs for David.
4. As his videos are watched (and linked and watched again) virally via YouTube, the natural process of the diffusion of knowledge also works for David by giving him more Google search engine juice. __________________________
In this particular video, for our purposes, we'd probably note how David feathers the soft box past the subject to hit the reflector on the left with more light. This creates a more powerful fill reflection and more even one-light lighting ratio. But then, we're lighting geeks.
His clients, on the other hand, would see:
1. How David can easily turn a cluttered conference/storage room into a studio.
2. How quickly David can shoot an entire upper management team, and
3. How nice the final product looks.
I am sure David would echo this sentiment:
To a potential client, this level of transparency inspires far more confidence than merely viewing a portfolio of headshots.
(David, if you are watching, I would love to get your thoughts on this in the comments.)
100% Pure Juice
I would note that YouTube (and Blogger, for that matter) are owned by Google. And guess who indexes metadata and content to the biggest search engine in the world before it even appears on the web? And with careful use of metadata, David's search engine juice gets a little stronger every time someone views a video.
Taken as a whole, this is a cool, positive vicious cycle. David, Bert Stephani, Chase Jarvis and other photogs who understand this are already taking advantage of it.
There are slicker, newer video hosting/embedding sites out there. You think those guys are using YouTube by accident? I don't.
(And don't forget, if you are a pro and showing off your lighting secrets and techniques, tip us off in the comments with a URL for your video.)
Laaaate Wednesday night, Strobist reader Vicki Madden asked, via Twitter:
"Need advice on big job on Friday -- large group in high school gym?" __________
First of all, not even 48 hours before a "big job" is not the best time to be asking for vague advice. And using @Strobist on Twitter probably is not the best venue. (Try the Strobist Flickr group for that kind of urgent stuff.)
But the question happens to set up a good exercise in pre-thinking your lighting for a scary environment -- not to mention getting into the psychology of doing a large group shot. So even though it is short notice, what the hey.
(Also, my "On Assignment" previously slated for today had to be pushed back. Which always makes a reader lighting question way more appealing to me.)
So, Vicki, hit the jump for a detailed walk-thru on how to approach your shoot, with a minimum of gear. __________
First Things First
The minimum lighting setup I would use for this would be three bare speedlights and stands. So I sent Vicki a direct message via Twitter yesterday morning to make sure she could scrounge at least that -- and that there was a full walk-thru was coming on Strobist at 12:00am eastern time.
Here are my assumptions:
One, that she can get ahold of three off-camera sync-able speedlights. Two, that the gym is scary dark, just to make things interesting. Three, that she can scrounge one helper onsite for some help pre-setting the light. And four, let's assume 60 people in the group.
The Gym is Big and The Gym is Dark
And that's the good news.
No, seriously, that is good news. Because with a big group, you're gonna need some distance to light them evenly. And you want dark, too. If this were being done outdoors in the full sun, you'd have no hope of competing with that light level with a few speedlights at any distance. (As in, beyond six feet or so.)
So the dark is working for you, too.
More good news from the gym: Built-in elevation for both you and your lights. Call ahead to make sure the bleachers will be set up for the group shot -- on both sides. Don't leave it to chance, and don't ask meekly, either. (Asking meekly is tantamount to leaving it to chance.)
Call up and say something to the effect of, "Hi, this is Vicki Madden. I am going to be doing the group shot of (whatever) in the gym on Friday, and I need to make sure that both sets of bleachers will be extended at least an hour before the shoot, so we can set up the lighting. Thanks very much."
Call the office, and sound like you make this call every day. The person who answers the phone will not be the person who takes care of the bleachers. But your urgency and authority will be conveyed in their message to the person who will get your bleachers opened up.
And still, arrive a little more than an hour before, and expect to find the bleachers closed. Just expect it and it will not be a stressor when it happens. Track down the gym guy and explain that these are supposed to be open within a few minutes, just to make sure he is on track for your setup time.
Setting Up
You'll be shooting from halfway up one of the sets of bleachers. (The home set, if an emblem is coming into play on the floor.) You'll be halfway up to get some elevation, and to leave some space above your vantage point for your key light.
So, imagine your group in front of you. Place your helper at dead center of what will be the middle of, say, three rows of people fairly tightly packed on the gym floor. Estimate your group and figure out the lens you'll need now, from your shooting position.
Place Your Key
Let's say for the sake of argument, that you are going to key light from over your left shoulder. Set your flash well above you (maybe at the top row if in a high school) in the bleachers. Actually, use the foot rest for the people that would be sitting in the top row. Close the light stand, slide it down in there and open it up, wedged in the foot area. Nice and sturdy.
Set your speedlight on 1/2 power, and zoom it to a telephoto setting -- say, 85mm or 105mm. (The 200mm setting on an SB-900, if you are so blessed, might be a bit tight.) Aim it a few feet over the head of the helper in the dead center of your future group. You are doing this not because of poor aim, you are doing it to evenly feather the light left to right, front to back.
Set your camera to a relatively high shutter speed, say at 1/125th or 1/250th. I am assuming you have crappy weird gym light and that we are doing this all with flash. Let the gym go dark or darkish on the ambient.
You should get about f/2.8 or f/4 on your center group guy. If you cannot get that, raise your ISO to 800 if your camera makes really good files at that ISO. Otherwise, go to full power on your speedlight. (The former is preferable, as it buys you a faster recycle time so you can get more frames shot before wearing out the group's attention span.)
If you have enough light coming from your speedlight, go to f/5.6 and buy yourself some depth of field. Don't believe your speedlight is capable of that? You might be surprised.
Obviously, if you are using monoblocs in this setting, you'll have power and aperture to burn.
Test your key light for a good exposure on your group area in three different places: Dead center, back row furthest away from the key, and front row closest to the key. Since your flash is on a tele setting, you have real control over your beam of light. By firing it over the front row's heads and a little towards the right side of the back row, there will be an angle that give you nice, even exposures all over your group area.
This is called feathering the light, and it is a good way to light large areas evenly. This is because the near areas fall at the edge of the light's beam. So they receive less light, which compensates for the fact that they are closer. Plus, it will light the gym floor around your subjects, feathering it darker as it gets closer to camera the camera position.
Congratulations, your key light is now set.
Place your Separation light
Now, we are going to the bleachers on the other side, caddy corner, up top. We are going to repeat the exact process to create a light that will separate everyone from the dark background, and light up the gym floor in areas missed by the key light.
(Note: Your remotes will have to be able to reach across a gym. If not, you'll need to slave your lights to each other. This should be very easy and effective, as they are essentially pointed right at each other.)
Aim this light over the heads just like the key, and test your exposures while you are at the light. Use that tele zoom setting and there will be an angle that places the entire group at roughly the same exposure. You might want to gobo the front of that light to where it can see your whole group, but not your camera. This will kill any flare from that light coming into your lens.
Now, the Fill
So, that was easy. Now you have hard crosslight evenly lighting your large group. But there are gonna be wicked shadows because we are not taking the mystery vapor ambient into account. We'll fix that with on-axis flash.
This light, like both of your others, is gonna be bare. Why? Because unless you have a 15-foot parabolic reflector, you are not going to do anything with a light softener at this distance other than rob yourself of light intensity. So we are going for hard, efficient and crisp. Those hard shadows created by the key and separation light will be just fine if we can keep them from falling too far.
So get in your eventual shooting position, center bleachers and half-way up. We will place your helper guy in the center again, and dial in your fill light so his shadows look good -- probably about 1.5 stops down or so. No need to get technical -- just do it until he looks good.
You will need to adjust your flash beam to match your lens, so you will get full coverage on your group. Also, feather this light up a little bit, to make for an even fill exposure front-to-back. Makes sense now, huh?
You are closer than the key at your shooting position, so I would expect that 1/8 or 1/4 power might do the trick. Start there and adjust your power level by eye until it looks right. The shadows should look like natural, legible shadows instead of black holes. It's like cooking -- add salt to taste.
Place your fill light on the opposite side of your lens axis as is your key light. For us, that would mean just to the right of your camera lens -- in very close. This way you will get no double shadows, as the key will erase the fill shadows nicely. And the fill will see everything that you can see which would be in the shadow of the key light.
Now, walk your light helper around the group area and test middle, front right, front left, back right, etc. Admire your handiwork.
Your Light is Set. Now What?
Now the group. For our 60 people, I would divide them into three or four rows. Make each row have one more person than the row in front, to make a nice fan and to be able to stagger people. For example, instead of three rows of 20, you'd go 19, 20 and 21.
Before everyone gets there, know who the most important person (or people) is in the group. They go front and center. Or mid-center if they are very tall. Before you shoot, introduce yourself to the Big Cheese and explain that you will probably have a little fun at their expense to keep the group relaxed and engaged. It works.
You are now officially the emcee of a three-ring circus. Work fast and keep people loose. Bring them in and concentrate on four things, quickly:
1. Arrange by height -- short in front row, tall in back. Help people divide themselves by saying something like, "Everyone 5'6" and under in the front row, everyone 5'10 and over to the back row." Adjust as needed for your own numbers as mentioned above.
2. Everyone with glasses goes on the side of your group from which you are using your key light. In our case, camera left.
3. Now, have everyone turn their bodies in toward center on both sides. This not only looks better than straight on, but will naturally kill your key and fill reflections in peoples' glasses on the left-hand side. (Even the fill should miss the glasses, as people will naturally face a little away from the key and fill while turning toward center. It works.)
4. Ask everyone to make sure they can see your key light (tell them which light that is) so everyone will have a lit face. If you can see them, they can also see your on-axis fill. No modeling lights needed. Pop a quick test frame and very quickly check to make sure there is not a major problem. Now is not the time to find a problem. You had testing time for that.
Shoot Fast
Focus on the center of the group, about a third of the way in. That'll maximize your minimal depth of field. At this working distance you should be fine. But keep the group tightly packed, just to help yourself out.
Keep the group engaged at the expense of the Big Cheese. If you are comfy enough to joke with/about that person, the group will be a lot more relaxed and loose. I once told a VP at Northrup Grumman who was surrounded by his subordinates that it was great to see him back in men's clothing. (That's why you give them a heads-up first.)
Give them notice as to when you are going to shoot. As in One, Two, Three (pop). But jump the gun occasionally to miss the anticipatory blinkers. As in, One, Two, (pop) Three. Some people just plan to blink for flashes. Beat them to the punch.
Work fast, mind your recycle time (which you tested) and shoot at least a couple dozen frames. Crack jokes the whole time. Be ready to jump on any reaction with a frame. Don't warn them that this is a last frame. Warn them that "We only have about 30 minutes of this left," and shoot when they react. They will.
Use a big, booming authoritative voice (like in Bert Stephani's excellent group shot example) and be in control the entire time. They need you to do that. Get in, get out fast and have fun.
Good luck, Vicki.
Have a Question?
Shoot it to me in a comment on this post. I will pick the best ones and try to answer them in a future Q&A.


 My 7-year-old's favorite playthings are the boxes that used to contain expensive toys. Belgian photographer Bert Stephani apparently thinks the same way.
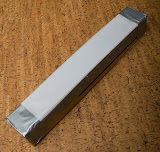 If you in the market for a light stand, don't toss the box that it comes in. And if you are in the market for two light stands, you may be able to get all Martin Schoeller on someone on the cheap.


