Now Your Prints Will Look More Charming

Over at Strobist en Espanol, Rafa has tweaked the HTML code to provide much cleaner printouts of the site. And he was nice enough to do it for the main site, too. (My HTML/CSS skills are pretty bad.)

Now your printouts and .pdfs of Strobist will look much cleaner. Only the editorial portions print, and the text column runs full width. Combined with the fact that it prints as black type on white, (always has) it makes for a cleaner format for those of you who do not like the light-on-dark format.

Some of the series of small pictures will stack a little bit because of the expanded text column, but that is a hard-code thing I will have to work on for each page.

So, if you want to go through and print out L101, or On Assignment for a notebook (or create .pdfs for a PDA) you are all set. All I would ask is that you please do not electronically distribute them, as my kids get to eat only when people actually visit the site itself.

To see the new changes, print out any page on Strobist as a hard copy or as a .pdf. Click on the pic to get to the Welcome Page, for instance.


__________

New to Strobist? Start here | Or jump right to Lighting 101
Got a question? Hit me on Twitter: @Strobist
Have a passport? Join me in Hanoi: X-Peditions Location Workshops


Permalink

Cooking Light: What's Cooking

Still a few days left before the deadline for the Cooking Light, the first full assignment from Lighting 102. But I thought I would share some of the stuff that has come in so far.

Some of you guys are clearly enjoying playing around in the kitchen. There is already a wide range of creative approaches to such a sparse assignment.

All of these photos were pulled from the discussion thread for the assignment. If you are not keeping up with the thread, you are missing out on a lot of good stuff.

There are far too many great shots to pick from already. But these are among the photos that I wish I had shot. Just for equal time's sake, I went with a knife, a fork and a spoon. As always, click on the pic for more info, or to leave a comment.

Remember to get your photos in by August 4th if you are participating realtime. We'll be talking about the assignment at length next Tuesday.

Several of Strobist's readers who are also bloggers are using the assignment as posts on their blogs. Way to go. It takes a gutsy confident photo blogger to to their homework on the air:

:: Meejahor ::
:: HCoyote ::
:: Ken's Photos ::
:: CDB Photo Archive ::
:: Jan Klier's Photo Journey ::

(Keep 'em coming!)

FWIW, I can't help but check out every reference to Strobist that appears on a blog. I find lots of interesting photo-related sites that way. You can easily find many of the sites by clicking here.

And if you are a Technorati-listed blogger and you link in to this site, your blog shows up in the "Explore the Blogs that Link to Us" link at the footer of every single post. That constant introduction of new sites to others is what makes the Blog World turn. Cool, huh?

And for those of you who have not yet turned in a photo: No worries. There is still pleeeeeeenty of time to procrastinate...


__________

New to Strobist? Start here | Or jump right to Lighting 101
Got a question? Hit me on Twitter: @Strobist
Have a passport? Join me in Hanoi: X-Peditions Location Workshops


Permalink

No Hot Shoe? No PC? No Problem.

UPDATE: From the comments, there is a Flickr discussion thread on this technique.

Spanish Strobist translator extraordinaire Rafa B. has a neat little off-camera flash hack on his VacioPerfecto site. It's in Spanish (duh) but you'll get the idea.

He is using a Hama hot shoe slave and a Gadget Infinity remote to synch his hot-shoe-less point-n-shoot camera with an off-camera flash.

Why not just plug the slave into the external flash itself? Because the GI remote can see around corners, of course. Rafa has an example photo on his site.

I do not know how he is controlling the relative levels of the two flashes. I would guess he is running both flashes on manual for consistency and to avoid slaving the pre-flashes.

If you already have the gear (as I suspect more than a few of you do) it certainly seems like it would be worth a try.


__________

New to Strobist? Start here | Or jump right to Lighting 101
Got a question? Hit me on Twitter: @Strobist
Have a passport? Join me in Hanoi: X-Peditions Location Workshops


Permalink

Monster Flash Garage: 285HV Goes to 1/1024th Power

We think the venerable Vivitar 285HV rocks right out of the box. But it is also a favorite of the mod squad because it's cheap, rugged, and begging to be tweaked.

This version, created by Jonathan Kau is one of the best I have seen yet. And the ten-stop range is only the beginning. Hit the Flickr discussion thread for the full list of capabilities and the how-to steps for you solder jockeys.
__________________________________

(Read more on the Vivitar 285.)


__________

New to Strobist? Start here | Or jump right to Lighting 101
Got a question? Hit me on Twitter: @Strobist
Have a passport? Join me in Hanoi: X-Peditions Location Workshops


Permalink

DIY Ball-Bungee Speedlight Soft Box Mount

I don't use my soft boxes very often, as a shoot-through umbrella is a more efficient diffuser, cheaper and more portable. But a soft box does give a nice, rectangular specular highlight, without the visible ribs of an umbrella.

(If there are any ribs visible in my vicinity, I prefer them slow-cooked, and smothered with a Carolina-style, mustard-and-vinegar BBQ sauce...)

But for headshots, a speedlight/soft box combo has plenty of power to work in close -- remember that power/distance relationship. And it gives you those cool, window-like highlights in the eyes.

Quick tip: You can accentuate the window-like specular from a soft box by putting little gaffer's tape dividers on the front panel.

Be sure to take them off when you are done, as the tape will leave permanent residue if you let it stay on and dry out. And do not use duct tape, as it will mar the surface instantly. You can use black masking tape, though.

(I leave mine on, because I like the effect and generally use the soft box or nothing but people.)

Here is her eye up close in that previous frame. She is not really catching the vertical divider, mind you. I was just playing around with a quick and dirty CLS setup here, and not shooting to show the effect. But you can still see the horizontal divider working.

(Did he say CLS? Yes. I am trying to learn more about it to see when it makes sense to use it and explore its limitations.)

Anyhow, back to the ball bungee soft box thing.

As much as I would like to take credit for this idea, I got it from Pat Murphy-Racey, who was on my Purple Team at the Eddie Adams workshop in 1989. Pat used to have a business (and cool website) that sold turn-key arena lighting systems, which is where I found out about what he calls "The Cheater."

He used those thick blue rubber bands you get what you buy broccoli. But I don't like broccoli. So I use ball bungees. The longer models work best (mine are about 8" long, unstretched.) The shorter ones are a very tight fit. If you are using rubber bands, you need four broccoli rubber bands (better get eatin') or maybe those "Live Strong" style rubber band bracelets.

Don't leave them stretched for days on end, though. They'll weaken and snap.

So, here we are, speedring on stand, via the typical umbrella adapter. This will allow you to mount the soft box on a stand and tilt it.

Note that my speedring (that is what the little thing that connects a soft box to a normal flash head is called) has a 1/4x20 female thread in the bottom. I think this is pretty common, but yours may not have it. If not, this system is still good for hand-holding a speedlight and softbox (or for having someone else hold it) for a quickie portrait.

Stretch one band/bungee around as shown. Put the ball on the edge for a firm hold.

If you are using rubber bands, you'll use two in each direction. You could also use a wad of normal rubber bands in place of a single big one, I suppose. But the ball bungees turn out to be very secure, so I recommend those.

By the way, if you can't get ball bungees in your country, you can get them at Amazon for $10 for a pack of 25. They are very useful things to have around the house.

Then you place the other band/bungee across in the other direction. This creates an "H-shape" elastic suspension across the opening of your speedring.

It probably seems pretty obvious by now, but all you do is to wedge your flash into the middle of the bungees. The hold is surprisingly strong.

Remember that you'll want to turn your flash in the appropriate direction to make your beam of light best cover the soft box panel. I like to set my flash to its widest beam spread, and I get good coverage.

Here it is, all assembled and ready for the soft box to be mounted to the speedring. It is very secure. I would have no problem suspending this thing over water, for example.

You can dial your flash way down and take a photo of the front panel of the box to get an idea of how smooth your coverage is. (I.e., do you have a hot spot in the middle of you panel.) You can always use a Sto-Fen or Tupperware as a diffuser to smooth it out. But that eats light, and is really not necessary, IMO.

Remember to swivel the base of your flash independently to expose your infrared sensor if you are triggering via CLS or eTTL. For close-in headshots, the wireless TTL mode will pretty much get you dead-on exposures, as the main subject area will be lit by the flash.

But manual is always available and offers more control and precision, whether you trigger with CLS/eTTL, by PC cord, or by radio remotes.

So, that's one way to mount a speedlight in a softbox. What are your little tricks/gear/hacks for doing this? Share 'em in the comments.


__________

New to Strobist? Start here | Or jump right to Lighting 101
Got a question? Hit me on Twitter: @Strobist
Have a passport? Join me in Hanoi: X-Peditions Location Workshops


Permalink

Sunday Flashbacks: 7/29/07

From June 2006:

• How to quick change a Nikon Lens like a pro, and

• The importance of creating multiple layers of interest in a photograph.

Coming tomorrow: A really cool DIY use for ball bungees (or broccoli rubber bands.)


__________

New to Strobist? Start here | Or jump right to Lighting 101
Got a question? Hit me on Twitter: @Strobist
Have a passport? Join me in Hanoi: X-Peditions Location Workshops


Permalink

Saturday Speedlinks, 7-28-07

Saturday morning - a time to sleep in and wake up to the smell of hot links cooking on the griddle.

We got neat stuff today: More SitBonzo, interactive lighting toys, some smokin' Reuters photographers and a must-read about US Presswire.
________________________________

• David Berman, AKA SitBonzo, is back with another Lighting Slideshow, this time from his colleague Carl Fox.

• A tip from reader Mieng Saetia turns us onto a neat little web page that lets you compare the effects of different light sources.

• And to think I thought it was hot covering football early in the season back in Florida. Well, that's nothing compared to what the Reuters photogs experienced covering the Tour de France.

• Hotter yet is John Harrington's series of articles examining US Presswire's treatment of it's shooters. If you are even thinking about hooking up with USPW, you'll wanna read it.

And finally, an actual job description for an actual, full-time job: Wanted for Hire: Dedicated and Friendly Strobist. (No kidding.)


__________

New to Strobist? Start here | Or jump right to Lighting 101
Got a question? Hit me on Twitter: @Strobist
Have a passport? Join me in Hanoi: X-Peditions Location Workshops


Permalink

Rockin' the House


We have talked before about using small-flash lighting to improve your interior shots. The very first On Assignment was about using a single, off-camera flash to totally amp an interior shot. We also did an OA using three flashes to sculpt a large interior with light.

There was also a unit on interior photography in last summer's Lighting Boot Camp: Assignment | Results

But many of you are way past the Boot Camp stuff now. In fact, several Strobist readers are even doing high-end real estate photography as a primary or supplementary income source.

Take, for example, long-time reader Scott Hargis, whose shot is featured above. He was featured on the site Photography for Real Estate. In the article, he walks you through the small-flash lighting techniques he uses to get such nice stuff with just a few small flashes.

And nice stuff it is -- you can see more of Scott's recent stuff here.

All it takes is a look through your Sunday paper to see the steaming pile of utter crap that passes for typical real estate photography in most areas. I'd think there would be a market just about anywhere for a light-savvy, enterprising young off-camera flasher. (Maybe not if you are in Scott's neck of the woods in San Francisco. He's knocking the cover off of the ball.)

Not to say that there are not hurdles involved. There is a great discussion over on the Flickr threads about how best to educate clients that the good stuff is worth more than the steaming crap. All the usual suspects are showing up: Quality, perceived quality, money, psychology, "days on market," etc. Interesting read.

Last but not least, there is also a Real Estate Photography group on Flickr. Worth reading, whether you are doing this as a career or just wanting to improve your interior shots a bit. You can share advice with people about shooting interiors, whether for Real Estate purposes or not.

Are you using small flashes off-camera for real-estate photography? Post a link in the comments to show us your stuff.


__________

New to Strobist? Start here | Or jump right to Lighting 101
Got a question? Hit me on Twitter: @Strobist
Have a passport? Join me in Hanoi: X-Peditions Location Workshops


Permalink

A Group Shot Master Class


I have long been a fan of Annie Leibovitz' work. Her American Express ad series (way back when) was one of the things that got me really thinking about light as a way to amp my photos.

I have a signed poster framed in my basement that shows every single double-truck from her second book. A very cool gift from my wife, through her connections in the publishing biz.

Each year, Leibovitz does a tri-fold cover group shot of the heavy hitters in Hollywood for Vanity Fair magazine. I was cruising around their website and came across this gallery of the last 13 years worth of images.

Just really neat stuff, and well worth a trip to view the photos if you are looking to see what can really be done with a group shot. Beautiful light, posing, concept, etc. Not easy to do, either. Can you imagine the egos? The logistics?

This has gotta be a lot harder than grabbing a photo of 20 guys at a Elk's Lodge Annual Dinner.

More down-to-earth tip: If you are assigned to do a group shot and cruising for ideas, you can always head down to the local record store (or Best Buy, Borders, etc.) where you'll find thousands of groups shots waiting to give you inspiration.

Nothing beats flipping through stacks of cool images which have already solved many of the same problems you are dealing with. It is a great way to fill your head with new ideas.


__________

New to Strobist? Start here | Or jump right to Lighting 101
Got a question? Hit me on Twitter: @Strobist
Have a passport? Join me in Hanoi: X-Peditions Location Workshops


Permalink

Site Utilities: Search

Over the next few weeks I'll be through some of the utilities on Strobist in the hopes of making the site a little more friendly to the non-power users. There are many general blog functions, like RSS, archives, search, etc., but also some things that are a bit quirky and unique to Strobist.

This time I am going to talk about the search function, which is at the upper left corner of the site. And please note that any search link on this page will obviously produce this page as the first result. Scroll own to see what else gets dragged up.
________________________________

In addition to wading through the archive in the sidebar at right, you can easily find articles using the search function. This is basically a full-text search that includes the subject and title text of every post (600+) since day one. It is very rudimentary, as there are no logical qualifiers (and, not, etc.) But it does go back to the beginning of the blog, which is a good thing.

One downside: It only returns the first 20 or so posts that fit the search. And since I do talk about the same things a lot, this can be a pain.

The answer is to include extra terms. Single terms like "DIY" max out with very recent posts. So be sure to type in additional terms to narrow the search.

Example: Typing the terms DIY macro box gets you to the little carboard studio thing very quickly.

So, what are the serious people searching for?

Here are the top ten searches, in order, as reported by Google Analytics:

1. Gary Fong - WTF??? (Why the Fongster?) Are you guys playing a cruel joke on me? Ironically, there is only one reference to him. And it is in an otherwise intelligent post. Before this post, at least. Sigh.

2. Snoot - There, that's better.

3. Pocket Wizard - Woulda thought that would beat out "snoot." Be sure to use additional terms. (We never shut up about PW's.)

4. Vivitar - Old-skool flashes. But the single term catches everything. Use additional terms if you tap out.

5. Back light - Steady stream of stuff, right back to Lighting 101.

6. Canon G7 - Is that you searching, Chuck Westfall?

7. DIY - Gary Fong takes 1st place and DIY comes in 7th? Excuse me while I go slit my wrists.

8. D70s - (Can't speak. Still trying to get over the Gary Fong thing.)

9. Wedding - (Sorry ladies, I'm taken.)

10. Custom backdrops - Gets you to the ever-popular and beautiful flash-against-the-sunset technique.


__________

New to Strobist? Start here | Or jump right to Lighting 101
Got a question? Hit me on Twitter: @Strobist
Have a passport? Join me in Hanoi: X-Peditions Location Workshops


Permalink

Lighting 102: Assignment - Cooking Light

The first full assignment for Lighting 102 is deceptively simple. You'll be using what we have discussed in both the position and light source sections.

The assignment is to photograph one or more kitchen utensils - knives, forks, spoons, whisks - whatever you like. The look you are going or is that of ordinary object elevated to high art. Or at least commercial art, as this is the kind of thing that might appear as a catalog cover or in a calendar or on the wall of one of those ubiquitous "fast casual" restaurants.

Suggestions:

• K.I.S.S. - Keep it simple, stupid. Less is more. Go for quality over clutter.

• Go beyond the literal subject matter. Use light, form and focal plane to create an evocative photo that is more than the sum of its parts. If Edward Weston can make a pepper look sensual, why not a spoon?

• You may wish to convert your photo to black and white to emphasize form and light, That's fine. It is your choice.

• Your style of lighting will depend on the surface quality of your subject. A wooden spoon will call for very different light than a stainless steel cleaver, for instance.

• Pay attention to your background. If it does not help your photo, it should not be there. Again, K.I.S.S.

The deadline is August 4th. You may tag as many as you wish, but only submit one final image.

For example, you might submit four photos. They would be tagged with:

Strobist
Lighting102
Assignment
Cooking

But your final, single image will have all of those tags, and and additional one:

Final

So your final edit would have as tags:

Strobist
Lighting102
Assignment
Cooking
Final

You can see all turned in pix here, and just the final edits here.

From the comments: If you want to add a "setup" tag to your setup shot, that will allow people to search those images, too. Your choice.

Have fun with it, and do not be scared to experiment and make mistakes. That's the whole point.

The discussion thread for this assignment is here.

___________________________

(The cool knives shot is from the Strobist Faves Gallery, by Martin Danielsson.)


NEXT: Discussion: Cooking Light Assignment


__________

New to Strobist? Start here | Or jump right to Lighting 101
Got a question? Hit me on Twitter: @Strobist
Have a passport? Join me in Hanoi: X-Peditions Location Workshops


Permalink

Fun With Pocket Wizards

First off, I debated even posting about this. But it was so fun I just had to. The names have been obscured to keep this from getting back to me.

Besides, I might want to do it again.

___________________________

I had my bare bones gear bag with me in a local mall this weekend, as I was heading to the Apple Store for a little tech support. My laptop was with me, of course, but I also had a Canon G7, an SB-26 and a set of Pocket Wizards.

You know -- just in case. Month-old news photographer habits die hard.

So I am heading to Mecca The Apple Store, and I pass one of those let-us-shoot-yer-kid places where the fertogerfers wear the dorky photo vests and try to keep the little rugrats smiling for long enough to make a frame that mommy will buy. I kid, of course. But it is probably what I will be doing after you guys finally figure that I am a talentless hack posing as a blogger.

Anyhow...

I would like to state right here and now that no shooting was happening at this point. I was not interfering with a shoot. There was no one there. Did I mention that there were no clients in the store?

What I did see was one of the Photographer Associates playing around with a camera, on top of which sat a Pocket Wizard Plus Model II, set to channel one. She was idly popping off frames, and the flashes were firing.

So, I sit down on a nearby bench in the mall, and reach into my too-cool-for-me new Oakley vertical laptop bag. My hand finds the PW transmitter, sliding over the familiar curved corners by feel. My thumb slides the power switch to "on." My forefinger selects channel one.

(Think Clint Eastwood in an old westen, quietly drawing his six shooter from under his smock as the razor held by a very nervous barber shaves Eastwood's neck a mere quarter inch from the jugular. Just like Clint, my hand just knows where to go.)

Photographer Associate brings the camera up toward her eye. When the camera gets to about neck-high, I fire the Pocket Wizard. Her studio flash goes off.

"Well, that's odd," her face seems to say.

She stares at the camera, lowers it, and starts to bring it up again. At the exact same location on the draw, I fire the flash. She stops in mid lift. She is beginning to detect a pattern. I am trying as hard as heck not to laugh.

Camera down. Nothing.

Camera comes up - neck level (pop.) Down. Neck level (pop.) Down.

She sits there, staring at the camera. Wondering what in the world would cause her flashes to fire every time her camera gets to a certain height.

Neck level (pop.)

(A smartass photographer, without a day job. That's what's causing the flash to fire.)

I do this several more times, all the while thinking, "Please-oh-please-oh-please go get the manager so I can NOT make it pop when they are watching and you try to demonstrate your new altitude-based synching issues. (Then of course I will start right back as soon as the manager leaves.)

But she doesn't bite. She just shakes her head, (no worries - not her camera, right?) puts it down and walked away.

So I head to the Apple Store and got my tech support. And bought some more computer stuff, 'cause I am pretty sure they pump in some kind of gas at The Apple Store that just makes me wanna buy things.

But I'll be back, missus Photographer Associate. And I will have my Pocket Wizard with me. Every time.
________________________________


I am a little troubled at how fun this was for me. And how easily I could spend half an afternoon there doing the same thing again. Because I have that kind of time.

I ask you: Was I being an assho not-very-nice person?

Worse, am I a total dork for finding it so funny?

Would you have done it?

Would you do it again?

What would you do when the manager comes over to her?

Joker, jerk or dork? Hit me in the comments.

(Wonderfully appropriate Devil photo by Strobist reader TuckerUK)


__________

New to Strobist? Start here | Or jump right to Lighting 101
Got a question? Hit me on Twitter: @Strobist
Have a passport? Join me in Hanoi: X-Peditions Location Workshops


Permalink

A Primer on Gels

Mason Trullinger, the reader who has set up photogels.com, posted a cool link to a Guide to Color Filters (right click it to download) publication put out by Rosco.

It is primarily a theatrical lighting how-to, but I found it to be a very interesting reference. I really want to learn more about how to better use gels. So many possibilities.

(Thanks, Mason!)


__________

New to Strobist? Start here | Or jump right to Lighting 101
Got a question? Hit me on Twitter: @Strobist
Have a passport? Join me in Hanoi: X-Peditions Location Workshops


Permalink

Lighting 102: 2.2 - Specular Discussion

You guys have really started to hit your stride with this exercise. I deliberately made it a little looser than the others, as the point was to explore the specular control technique.

There's a great discussion going on in the Flickr thread, and some really cool photos have been submitted. Even right out of the blocks many of you are kicking butt, lighting highly reflective objects with much more control over your highlights.

On a semi-reflective subject, specular highlight size and intensity are defined by the apparent size of the light source.

To control specular highlights on a highly reflective object, you are not lighting the object. Rather you are lighting the area that the object is reflecting back at you. And the portion of your subject that does not reflect can be lit on an entirely different plane, yielding yet more lighting control.

All of the position and apparent size rules apply to each plane. Which either will make your head explode make you realize that you have even more control than you have when lighting a subject on just one plane. Of course, if your subject is not adjacent to the background, you can have yet another plane of light to work with.

Let's look at a couple of your shots as examples.

First off, this clock photo shows what James Rubio picked up from Ming Thein's watch photos, and his set-up shots. (Thanks again, Ming.)

Again, you are shooting reflections of light sources. So whatever you design into those sources is going to define the tonality and shape of your specular highlights. James is using partially backlit typing paper as his light sources.

Simple? Yep. Cheap? Uh-huh. But very effective for shooting small objects.

Here's the setup. You can see here that the key is the edges of the lit area on the pieces of paper. That smooth fall-off defines the edges of his clock highlights.

For small scale stuff, you can get away with using typing paper way more often than you'd think. And the relative inefficiency of the paper (at transmitting light) is no problem, because we know that light is far more powerful when it is close.

This progression of a photo of a disc drive reveals a very clean approach, by Ron Nabity. He is lighting the subject on two planes. In the first photo, he's only using one light, through a small umbrella and lighting from the left.

This lights the scene (including the background) and creates a baseline for the true tonality of the subject, absent the large specular highlights that will define its texture.

Needing a large clean light source, he aims a strobe at the ceiling and uses that as his reflection in the drive platter and other reflective areas. Note that the spindle in the center is already reflecting the left-hand light source, revealing more of the shape of the complex subject.

Mind you, this is happening on completely different planes. So he has complete control over the relative levels of the specular highlight by adjusting the light level on the ceiling.

This looks very nice, actually. Granted, he could have improved the photo by spray painting "Strobist.com," in reverse on his ceiling, of course. Or he could have reflected a product logo, for instance. They point is that you can play with that other lighting plane.

Which is exactly what he did here. Note that the addition of a color gel on the ceiling strobe does not alter the areas of the photo that are not reflecting the ceiling light source. Again, it is because you are lighting on two totally different planes.

Specular highlights are a playground for photographers who know how to control them. (Ron talks about the process behind his photos here, in the discussion thread.)

I recommend reading through the discussion thread of you haven't already. There are lots of people asking (and answering) questions. If you have bouncing around in your mind, they have probably been hit already in the thread. If not, ask away.

Or you can just browse all of the exercise photos submitted by the site's readers.

And be sure to check back in tomorrow, when we will get our first full assignment.


NEXT: Assignment: Cooking Light


__________

New to Strobist? Start here | Or jump right to Lighting 101
Got a question? Hit me on Twitter: @Strobist
Have a passport? Join me in Hanoi: X-Peditions Location Workshops


Permalink

Strobist Readers Shoot Back


I just thought you guys might be interested in seeing what some of your fellow readers have been shooting in the last few weeks. About once a week, I cruise through 500 or so new photos in the pool and pick out my faves for inclusion in the Strobist Reader Gallery.

I go back to it frequently as a source of new ideas. Keeping a lighting file has never been so easy.

(Click on a pic to see who shot it and/or to leave a comment for the photographer.)


For more great Strobist reader photos -- and the occasional cool photo of some DIY lighting gear -- head over to the Strobist Reader Faves Gallery.

Nice stuff, people. (What do you think?)


__________

New to Strobist? Start here | Or jump right to Lighting 101
Got a question? Hit me on Twitter: @Strobist
Have a passport? Join me in Hanoi: X-Peditions Location Workshops


Permalink

Awesome DIY PVC Flash Housing

I have said it before, and I will say it again: The best thing about running a lighting blog is the cool stuff you guys throw at me almost every day.

Exhibit "A" is this inexpensive DIY PVC water resistant ("water proof" does not really exist) housing for an SB-800. Or any small flash, really. It was posted in the comments of this post, which was either inspired cheapskate thinking, or a botched suicide attempt. Not sure which.

The guys over in this wakeboarding discussion board are kicking butt and taking names with water-resistant flashes.

I noticed that they are also using Ewa-Marine bags. Very expensive, though. I'll take the DIY PVC any day.

They are shooting lit shots of one wakeboarder, with another wakeboarder doing the honors by holding a nearby protected flash. Sync is courtesy a Pocket Wizard, which is also tucked inside the housing.

Whaddya wanna bet Chase Jarvis has four of these things built by the end of the week?

A bonus: Since the flash is wrapped in foam, it makes it pretty darn shock resistant, too. I could see using these for tandem rock climbing shots, just in case. Not that I am built for that sort of thing.

This is just pure ingenuity. Kudos to Strobist reader Hildoriffic for the idea, and the drawings, too.

Maybe he'll be nice enough to help us out in the comments with questions. I know I still have some. I have to either source the acrylic as a circular disc, or learn how to cut it.

UPDATE: Commenters to the rescue, once again. You can get the Acrylic here, and Hil says you have to get it a little big and cut it down for a good seal. Looking for a good source or the O-rings now.

Is this thing cool as a moose, or what? I want me one of these. Or maybe three.

I am going to let this design percolate in my head for a few days before I build it, to see if I can get ideas as to how to improve it.

First on the list: A small PVC tube glued along the side of the fixed cap to help the user aim the flash. That means you could run it at 105mm zoon and get better range with more accuracy and lower power. (Thus, shorter recycle times.)

Any other ideas on how to amp this thing?

(BTW, the cool night shot above is by Ryan Taylor, of PrimeProductions.com.)


__________

New to Strobist? Start here | Or jump right to Lighting 101
Got a question? Hit me on Twitter: @Strobist
Have a passport? Join me in Hanoi: X-Peditions Location Workshops


Permalink

A Highly Questionable Post

Last week, a reader started a thread on Flickr with a few questions for me. So I opened it up to the group, with the idea that I would answer at least most of the questions and make a post for today.

It grew way too long to include here without boring most of you silly. But if you are interested, I inserted the Q and A into this Flickr thread.

And I am completely serious about the Wilma and Betty thing.


__________

New to Strobist? Start here | Or jump right to Lighting 101
Got a question? Hit me on Twitter: @Strobist
Have a passport? Join me in Hanoi: X-Peditions Location Workshops


Permalink

Seattle Seminar Registration Opens

UPDATE: Both workshops have filled. For info on the wait list, please see this message in the Seattle Discussion thread.

Thanks,
DH

___________________________________

Registration links for the August 18th and 19th Seattle seminars are at the bottom of this post. The location is the Hilton Seattle Airport Hotel and Conference Center, at 17620 International Boulevard, directly across from SeaTac International Airport.

These are one-day seminars, and will each cover the same material. So you would register for just one, not both. The price is $159.00.

I am setting up a Q and A discussion thread on Flickr here so as to avoid unnecessary clutter for the 99.9% of the site's readers who do not live anywhere near Seattle. Please use that thread for future discussion and questions. I will check it frequently over the next few days.

I will also be posting hotel, restaurant info/links/etc., there momentarily. Locals are encouraged to share info with out-of-towners.

The seminar will follow both the format and course material from the May sessions in London. (Click here for more info.) We'll check in and set up from 9:00 - 9:30 in the morning. Then we'll go until ~12:30, at which time we will break for lunch (on your own) for an hour. There is a restaurant on site and a few others within an easy walk.

The afternoon sessions will go to ~5:30. Maybe a bit later if I have any voice and/or brain cells left. And I hope you'll join me in the hotel bar in later in the evening (times to be determined) for more in-depth discussion of lights. Also darks, ambers, pilsners and the like.

Should you register and later need to change your plans, full refunds will be available until August 10th. After that, I would ask that you simply message me and we'll work together to try to get your seat transferred to someone on the waiting list, should we have one. My highly experienced staff of one (including myself) will do whatever we can to work things out.

I have every intention of being in Seattle on 8/18 and 8/19. The meeting rooms, my hotel room and my flight have been purchased. But if I get, say, hit by a train and I am not able to be in Seattle, refunds will be automatically given. But they will be limited to the purchase price.

I have no way to limit the number of seats via PayPal. So I will be monitoring the progress throughout the morning. As we near filing up, (if we do) I will close out registration and move to a wait list format on the Flickr thread. We will work down that list, in order, to fill the last few seats to avoid overbooking. Any overflow/additional sign-up info will be kept as a waiting list.

(In London, we had several people on the wait list eventually get seats. Things happen, and peoples' plans change.)

The links below will take you to a PayPal site. You do not need to have a PayPal account to register. Upon successful registration, you'll be returned to this site, and an email receipt will be sent to both your email and mine. You should bring this email to the seminar as your receipt. (I will also have a master list.)

Please be sure to click on the correct date that you would like to attend.

Thanks for coming, and I very much look forward to seeing you in Seattle.

_________________________________________

Sign up for Saturday, August 18th

Sign up for Sunday, August 19th

Both seminars have filled. Wait list info is here, in the Seattle discussion thread.


__________

New to Strobist? Start here | Or jump right to Lighting 101
Got a question? Hit me on Twitter: @Strobist
Have a passport? Join me in Hanoi: X-Peditions Location Workshops


Permalink

Sunday Flashback, 7/22/2007

Today's flashbacks take us to May, 2006, where we learn how to make DIY Macro Strip Lights (which were used in this Lacrosse player On Assignment feature.)

For SB-800 owners, there are also links to a great SB-800 resource page and a trailer of Joe McNally's Speed of Light DVD, a high-end CLS tutorial.


__________

New to Strobist? Start here | Or jump right to Lighting 101
Got a question? Hit me on Twitter: @Strobist
Have a passport? Join me in Hanoi: X-Peditions Location Workshops


Permalink

Guess the Boat Got Here...

UPDATE: Spoke too soon. Out of stock again. Must have been a fluke. Guess the big boat is still a-comin'.

The book Light Science and Magic is finally back in stock (NOPE.) at Amazon. (See here for the back story on the delays.)

They were expecting the second printing shipment to arrive in early August, but I guess they sped up the boat from China a little. Hopefully they printed enough to go around this time!

(Thanks for the heads-up in the comments.)


__________

New to Strobist? Start here | Or jump right to Lighting 101
Got a question? Hit me on Twitter: @Strobist
Have a passport? Join me in Hanoi: X-Peditions Location Workshops


Permalink

Speedlinks, 7/21/07

Just a quick reminder that Seattle registration has been pushed back until Sunday due to a conflict with the huge, local Flickr group outing. Info will be posted tomorrow at 8:00a PDT.

I'll also start up a Flickr thread to move the discussion off of the main board in consideration of all of the non-Seattle readers.

Speedlinks

That Old Black Magic: Imagine what I would write about if I had a closet full of SB-800's and some actual talent? Well, you don't have to. Because that's what Dave Black does day in, day out at his Workshop at the Ranch lighting how-to site. Really good, high-end stuff if you are into Nikon CLS. Check it out.

Quack Open the Champagne: What the Duck turned one year old this Tuesday. Reader-generated headlines and all, Aaron is totally breaking the mold of what it means to be a cartoonist. Way to go, man.

PBF, Covering Your Butt: Harrington was on a tear this week, writing about Video shooters making the front page at The Post, the rise of Citizen Photojournalism and Ads on Photographers' Backsides. (That last one was a big topic in Newsphoto at The Sun this week, too.)

I Sync, Therefore I am: Pocket Wizard Multimaxes (the fancy pants ones with all of the premuim, on-demand channels) are back in stock after being MIA in the USA for over four months. MPEX is celebrating with special pricing at $278.00 (add to cart to see new price.)

OT, But Fun: My drop in productivity this week has been largely due to dumb little Superman photography game, wherein you try to shoot his photo as he flies by. Best I can do is 132. (But then, the game uses a Canon camera.) Hit us with your high score in the comments!


__________

New to Strobist? Start here | Or jump right to Lighting 101
Got a question? Hit me on Twitter: @Strobist
Have a passport? Join me in Hanoi: X-Peditions Location Workshops


Permalink

Pimp My Light, Submariner Version

UPDATE: From the comments, this suggestion for the final layer of protection: The Pelican 1060 Micro Case, with clear lid. I would line the inside with white paper and maybe stick a StoFen on the flash, too.

UPDATE #2: We have a winner. Check out this fantastic, DIY PVC housing before trusting your baby to zip-lock bags.

______________

Strobist reader Maneeacc has more guts than I do, sticking an SB-800 underwater to light from below sea level.

Actually, I have done this before. But I would use an S-26 for this task, as it is about $200 less gutsy.

He is using three zip-lock bags to stave off the $320.00 water for long enough to make his photos. I would suggest a mod that will offer more protection for his flash, while giving him better light. First of all, I'd wrap the flash in two layers of (neutral colored) condoms, as they offer form-fitting water protection.

Use the largest sized condom you can find, to avoid overstretching. Which means you get to go into the drugstore and ask, with a perfectly straight face, for the absolute largest sized condoms they sell.

Be sure to use a spacer of some kind if you are gonna shoot at high power levels, so as not to cook the condom to your flash head. Which would be kinda hard to explain to your camera repair tech.

But further, I would suggest putting the flash, slaved, in a decent-sized, frosted white tightly sealed tupperware container. Stick the appropriate amount of weight in there for neutral buoyancy and you are good to go with a safer, softer light source.

That said, if you are gonna go sticking your flashes underwater, you are totally on your own. Test, test, test.

And if you do not have an optical slave, this is one area where Gadget Infinity radios trump Pocket Wizards, for hundred$ of reasons.

(Cool shots, Nafis.)


__________

New to Strobist? Start here | Or jump right to Lighting 101
Got a question? Hit me on Twitter: @Strobist
Have a passport? Join me in Hanoi: X-Peditions Location Workshops


Permalink

Remotely Possible: Wirelessly Fire Your DSLR

Can you trip your shutter wirelessly with your TV remote? You'll never know unless you try.

The RCA Universal Remote model 403 or 404 will apparently fire the shutter of a Nikon D50, D70, D70s or a D80. Probably a D40 and D40x, too, as they use the same Nikon remote control. Just set your manufacturer code to 066, use the TV function and hit VOL+ to fire away.

This last part almost tripped me up: Remembering to set your camera to "remote" mode. This is typically in the single/continuous motor drive function.

I know we have lot of remote controls sitting out there, ya buncha couch potadas. If you find a combo that works with your camera, please post the info on both in the comments. Or you can yak about it here.

(Thanks to Eduardo for the heads-up!)


__________

New to Strobist? Start here | Or jump right to Lighting 101
Got a question? Hit me on Twitter: @Strobist
Have a passport? Join me in Hanoi: X-Peditions Location Workshops


Permalink

Important Seattle Update

It appears that there is a previously planned monthly meeting for Seattle Flickr users this Saturday. And many of them will be out on a whale/wildlife photographing excursion (and incommunicado) all day. So we are moving the opening of registration back 24 hours to Sunday, July 22, 8:00am PDT.

Thanks for your understanding.

-DH


__________

New to Strobist? Start here | Or jump right to Lighting 101
Got a question? Hit me on Twitter: @Strobist
Have a passport? Join me in Hanoi: X-Peditions Location Workshops


Permalink

Chase Jarvis is Everywhere.


Welcome to ACJN, the All Chase Jarvis Network.

First up is Chase Jarvis RAW: New Zealand Spring (above) wherein you get a behind-the-scenes look at the logistics of planning and executing a major sportswear shoot on the other side of the planet. (Unless you happen to live in New Zealand, of course.)

More background info, and Chase answers your questions here.

But wait, there's more: He is also the cover boy on the latest audio issue of LightSource, at StudioLighting.net, where you can hear a really good interview with him here.

(Right click and choose "download" to grab it for your iPod.)

If you just want to, uh, cut to the Chase, his part starts at the 11-minute mark and goes for the majority of the one-hour show.
___________________________________________

Other Chase Jarvis Videos:

:: Ninjas! ::
:: Hasselblad Master Series ::
:: Lust-Worthy Location Laptop Case ::


__________

New to Strobist? Start here | Or jump right to Lighting 101
Got a question? Hit me on Twitter: @Strobist
Have a passport? Join me in Hanoi: X-Peditions Location Workshops


Permalink

Seattle Registration Opens Saturday

UPDATE: It appears that there is a previously planned monthly meeting for Seattle Flickr users this Saturday. And many of them will be out on a whale photographing excursion (and incommunicado) all day. So we are moving the opening of registration back 24 hours to Sunday, July 22, 8:00am PDT.

Thanks for your understanding.

_______________________________

Just a heads-up that registration for both Seattle seminars (Sat, Aug. 18th and Sun, Aug. 19th) opens on Saturday morning, 8:00am PDT, Jul 21 Sunday morning, 8:00am PDT, Jul 22.

The charge is $159 for the full-day seminar. Lunch is on your own, with several options nearby and on-site. Full details will be included with the sign-up post. Payment is via PayPal. You do not have to have a PayPal account to register.

If you want to make sure you get a seat, make a note to sign up quickly. It's not like waiting, finger on the mouse, for concert tix. But the London Saturday seminar sold out in a few hours and I don't want people to miss out if they really want to go.


__________

New to Strobist? Start here | Or jump right to Lighting 101
Got a question? Hit me on Twitter: @Strobist
Have a passport? Join me in Hanoi: X-Peditions Location Workshops


Permalink

A Ping from Ming on the Bling Lighting Thing

So, to look at Ming Thein's watch photos below, you'd think he was working in some sophisticated studio environment with lots of cool lighting gear, right?

He sent me a note (from Kuala Lumpur, Malaysia) with this photo today after waking up to find he had fifty new friend requests after yesterday's post.

I love this setup shot as it shows just how accessible this kind of high-quality light is for macro shooting. He's using Nikon's CLS to control his flashes, but this could easily be done with manual flashes if you do not have CLS-capable gear.

To be honest, this is an area where Nikon's CLS (or Canon's eTTL) is ideally suited. The synching is taken care of, and the exposure will certainly be in the ball park, even though you are doing a fairly complex arrangement of multi-flashes and a highly reflective subject. Just shoot and chimp, and adjust the lighting angles and relative TTL levels as you go. Shooting manually, I would start out with my flashes set at 1/16th power on manual and do just about the same thing.

Special thanks to Ming for synching the flashes on the setup shot, too. It shows exactly how he is creating those soft-edged specular highlights which are making such cool reflections in the glass and metal of the watch. As you can see, he is creating hot spots on the diffusers that do not take up the whole panel, and using the edges of the hot spots.

Don't think you can just jump right in to shooting complex stuff like this though. Ming has been photographing watches for over 40 years, which is how he has slowly discovered all of these techniques. No big surprise there, huh?

Except that I totally made that last part up to echo what your brain was left with as an excuse for why you couldn't do this, too. Ming just turned twenty one yesterday.

(Thanks or the setup shot, Ming. And happy late birthday!)

_______________________________

UPDATE: Ming has been answering questions about his techniques in the comments section of the photo above. Click on it for more info.


__________

New to Strobist? Start here | Or jump right to Lighting 101
Got a question? Hit me on Twitter: @Strobist
Have a passport? Join me in Hanoi: X-Peditions Location Workshops


Permalink

The Hot List, Q2 '07

Every time you buy something on Amazon after clicking through to there from this site, I spontaneously break out into the Happy Dance. Which is a little rough when you buy something at 3:00am.

But hey, bloggers can't be choosers.

Every once in a while, I pull together a list of the most popular items recently purchased by Strobist readers as a barometer for what you guys are into, lighting-wise. Kind of like the New York Times best seller list, but without the cultural significance.

If you are into supporting the site, it's as simple as clicking through to Amazon from any link here.

Muchas gracias, y'all.
_____________________________


The Second Quarter '07 Hot List:

1. Light Science and Magic, 3rd. Ed. | UK (OOS -- due back in stock in early August.)

2. Skin: The Complete Guide to Digitally Lighting, Photographing, and Retouching Faces and Bodies | UK

3. Lighting and the Dramatic Portrait | UK

4. Best Business Practices for Photographers | UK

5. Photo Portfolio Success | UK

6. Esquire Magazine

7. Master Lighting Guide for Portrait Photographers | UK

8. Photojournalism, Fifth Edition: The Professionals' Approach | UK

9. Welcome to Oz: A Cinematic Approach to Still Photography With Photoshop | UK

10. Matters of Light & Depth | UK


__________

New to Strobist? Start here | Or jump right to Lighting 101
Got a question? Hit me on Twitter: @Strobist
Have a passport? Join me in Hanoi: X-Peditions Location Workshops


Permalink

Watch the Light to Light the Watch.

For those wanting to get an idea of just how well you can control specular highlights, I recommend viewing Strobist reader Ming Thein's gallery of watch photographs.

A watch is a tidy little nightmare of complex, reflective surfaces. Specular highlight control is pretty much all you have to work with.

One of Ming's go-to techniques is to shoot a tightly zoomed beam of light through a larger diffuser. He is using the reflection of the edge of the light hitting the diffuser (might want to stop and think about that one) to get lovely edges to his highlights.

Put differently, the light from the flash is not "filling" the diffusion material. The edge, where the light softly ends, is reflected in the watch - just where Ming wants it to be.

Simple technique, elegant light.


__________

New to Strobist? Start here | Or jump right to Lighting 101
Got a question? Hit me on Twitter: @Strobist
Have a passport? Join me in Hanoi: X-Peditions Location Workshops


Permalink

If You are Reading This from Florida

You might be interested in the reader-organized meet-n-shoot planned for August 19, just south of Orlando in Highland Hammock State Park. I'll be in Seattle that weekend, but it sounds like lotsa fun.

Discussion is here on Flickr, and details are on Nick's blog.


__________

New to Strobist? Start here | Or jump right to Lighting 101
Got a question? Hit me on Twitter: @Strobist
Have a passport? Join me in Hanoi: X-Peditions Location Workshops


Permalink

Lighting 102: Unit 2.2 - Specular Highlight Control

Summary: The fourth lighting zone on a given photographic subject is the specular highlight, or reflection of the light source. This can be manipulated in both size and intensity to allow total control over the tonal range of a portion of your subject.
_______________________________

Last week we talked about the diffused highlight, the shadow and the diffused highlight to shadow transfer area. But there is a fourth area, which is usually brighter than the diffused highlight.

The specular highlight is nothing more than the reflection of the light source in the object you are lighting. This reflection is an often overlooked control in lighting design. In it's most basic form, it is simple to grasp and to predict. Explored more fully, it allows you to completely manipulate the tonal structure of your subject.

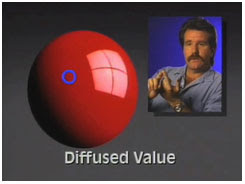
Take a look at the ball up above, lit with a single soft box. It's a frame grab from the excellent lighting DVD's compiled from the 1980's Finelight tapes by Dean Collins. What tones do you see?

You see the true tonality of the ball, which is your mind's visual anchor for judging color and tonal density in the photo. This is noted by the blue circle, and is called the diffused highlight. You see a dark shadow, in the unlit area of the ball. And you see a soft, transitional area between highlight and shadow.

And you see the reflection of the soft box -- or the specular highlight -- inside the diffused highlight area of the ball. (This soft box has been broken into fourths, probably by the use of gaffer's tape strips, to better simulate a window light source. Neat trick.)

Your brain processes all of these relative tonal densities to tell you much about the ball and its environment. You know the color, of course. You know the shape, as revealed by your off-camera light source. You know the approximate size of the light source by the nature of the highlight-to-shadow transition area.

How would your brain discern the surface quality of the ball, without your touching it, just by looking at the photo? By processing the quality of the specular highlight. The specular highlight reveals not only the size and shape of the light source, but the surface quality of the object.

What if the ball were lit by a point-source light, and not a soft box? How would it look different?

Well, the specular would be much smaller. And much brighter. All of that lighting energy would be coming from a small source, so it would have a lot of intensity per square inch. It would be a point-source specular that would almost certainly blow out in term of the brightness.

But the soft box specular is well-contained on the tonal scale because all of that lighting power is spread out over a larger area. As the size of the light source decreases, the intensity of the specular highlight increases. And vice versa.

Light sources can be manipulated to gain control of the specular highlight. I placed my glasses on a pillow and bounced a speedlight off of the ceiling for a light source. With the zoom head set on tele, you can see a decent-sized light source (the partially lit ceiling) reflected in the glasses. But the reflection is distracting in its size and too bright in its intensity.

Now look what happens when I zoom the flash head out to 17mm and light the whole ceiling area above the glasses.

First, the specular fills the whole lens area, making for a far less distracting tone. But on further examination, you can see that the intensity of the specular has been lowered to the point where you can easily see through it. Now it reveals both the surface texture of the glass and detail underneath it.

You can see a couple of really good examples of using specular highlights selectively in these watch photos.

So, when is a glasses reflection not a bad thing? When the intensity of the light is spread out (from a very large light source) such that you can see right through the reflection. The surface texture of the lenses are defined, but detail is still visible through them.

To prove the point I flew in a supermodel at great personal expense and photographed him wearing his (purely cosmetic) glasses in my living room. The illumination was from a speedlight fired into a nearby wall and zoomed to make a huge light source.

See how you can see the surface quality of the glasses, and yet still lose yourself in those devastatingly handsome eyes?

You get the point: Light, spread out over a large enough area, becomes less intense per square inch. So much so, that it can both illuminate and offer partial transparency in the reflections.

Here is a shot from one of the London seminars which featured a student against a darkish room divider. We used the light (in an umbrella) to illuminate Ray. But we get double duty out of it by lining the specular highlight off of the background in such a way as to separate Ray's shadow side (tonally) from the background.

You can see another version of this technique here, where the specular is used to form a halo, of sorts. (From the Rhode Island seminars, scroll down the page.)

This is one of my favorite one-light portrait techniques. Such an elegant result from such a simple setup. Executives in dark-paneled boardrooms or offices look like a million bucks with this soution.

If you are still with me, let's go this one better. (And this was another one of those "Aha!" moments for me when I first learned it.)

Let's try a little mental exercise. What if you could use the specular highlight of a large light source to introduce a new, artificial tonal area in a very dark-skinned subject?

Here's a scenario: You have for a subject a Caribbean islander. And to say that his skin is dark is an understatement. The man looks like blued steel. He shows up in a white shirt just to piss you off. And you need to reproduce him in your paper (as in, printing on Charmin) and hold detail everywhere.

What do you do?

You light him with a soft source from the front is what you do. This creates a three-tone structure for his face.

First, is his true tonality, which your paper can probably not even reproduce if he is properly exposed. And you have to properly expose him to keep the white shirt from blowing out anyway.

Second is the shadow area -- even darker -- which you can only define by separating it from a light background. But third is a tone that you can totally control by varying the angular position (and the distance) of your big light source.

You are lighting him, but fat lot of good that does for you with a very dark diffused highlight. But you are also creating a nice, much lighter tone -- where you want it -- on his face by exploiting the specular highlight from your light source. This is what will reveal your detail and create a beautiful tonal structure which could even reproduce on a old photocopier.

You are not shooting his skin. You are shooting the reflection of your light source on his skin.

When shooting a dark object, form is revealed by specular highlights. When shooting a very light object, form is revealed by the shadows.

And when shooting a highly reflective object, you are basically shooting a reflection of your light source. The stainless steel and cookies On Assignment was a good example of this. The double-diffusion technique described there allows you to define the light source and its edges separately.

The Light Science and Magic book has a tremendous amount of info on specular highlights in chapters four, six and seven.

There is so much you can do with this layer of control.

______________________________


Your exercise this week -- the last before we move onto a few full assignments -- is to choose a 3-d object that is reasonably reflective and explore what you can do by manipulating a specular highlight. I am not being too specific on this one, because I want you to have some room to explore.

You do not need to use an umbrella as a soft source. You can bounce a flash off of the wall of a ceiling to get a soft light source. Or diffuse it through some paper.

Billiard ball, apple, face, whatever. Just create that specular highlight and play with it.

______________________________


Tag your pix with:

strobist
lighting102 (note no spaces)
specular

You can see all of the completed exercises here.

Please use this Flickr thread for discussion and showing off your pix.

_________

NEXT: Discussion: Specular Highlights


__________

New to Strobist? Start here | Or jump right to Lighting 101
Got a question? Hit me on Twitter: @Strobist
Have a passport? Join me in Hanoi: X-Peditions Location Workshops


Permalink

The F Stop's Here

Last year, shooting the Miss USA pageant, I met a New York City-based photographer named Zack Seckler. We spent a while in the media room complaining about our total lack of access in covering what was basically a vacuous, two-week long ode to hairspray and teeth whitener.

The other day I get a "Remember me?" email from Zack. Oh, and by the way, he is starting up a new online photo magazine and could I take a look at it.

One of the downsides of having my contact info in such a public context means I get a lot of emails. I usually get north of 100 a day about brand new online photo magazines (you wouldn't believe) indispensable camera doodads, amazing penis lengthening medications and many, many stunning opportunities to share in the six-figure inheritances of excruciatingly polite Nigerian businesspeople.

But Zack and I had actually shared a photojournalistic day from hell in the press room in the bowels of First Mariner Arena, so I popped over to take a look.

Turns out that Zack's 'zine is a very cool look into the world of hi-end advertising photography. It has photos, photographer interviews, lighting diagrams - the whole nine yards. I don't know about you, but I can't get enough of stuff like this.

It's amazing to a ground-level photog like myself just how much of the high-end stuff is carefully composited from multiple, tightly controlled elements. I do not know if I could work in an environment like that. Not the technical issues. I could learn those. But the idea of being so anal retentive about every tiny piece of a photos, with creative directors signing off on the even the smallest details -- I'd eat a gun within six months.

Which maybe explains why I shoot stuff in cardboard boxes.

Zack's mag is called "The F Stop," and you can see the first issue here. I signed up on the email list, and am looking forward to seeing what he comes up with in the next issue.

Way to go, man. Good stuff.


__________

New to Strobist? Start here | Or jump right to Lighting 101
Got a question? Hit me on Twitter: @Strobist
Have a passport? Join me in Hanoi: X-Peditions Location Workshops


Permalink