Your camera is the key to deeper travel.

_____________________________


Welcome to Strobist


Strobist is an online project that was published from 2006 to 2021 by former Baltimore Sun photojournalist David Hobby.

Available here as a completed archive it remains world's most comprehensive source for photographic lighting education.

New to lighting? Welcome. Start with Lighting 101, linked below, as millions of other photographers have done before you. Or scroll down further to access Strobist's other free courses.


Strobist's Free Online Lighting Courses:
Lighting 101, 102, 103, and Lighting Cookbook


Lighting 101 is the core foundation of Strobist. It is a free, start-from-zero tutorial that will teach you the basics of lighting and minimalist lighting gear. Lighting 101 will have you up and running in no time—and at minimal expense.

Lighting 102 is the sequel to Lighting 101. Where L101 was about gear and basic concepts, L102 will teach you how to further understand and control the qualities of your light to make it do your bidding.

Lighting 103 is a deep dive into color. It explores the intersection of light and color to help you give your photos more nuance, realism and depth.

Strobist Lighting Cookbook combines the concepts learned in L101-103 to give you more understanding and fluidity with your lighting. We also explore some of the shoots from a 360-degree/ecosystem perspective.

A Baker's Dozen: Here you'll find a sampling of posts to help you understand the scope of the lighting education on this site.

From Classroom to Real World: On Assignment


On Assignment features full walk-throughs of over 170 real-world assignments, complete with discussions ranging from lighting to concept to execution—and even some screw-ups. It (largely) follows my path as a newspaper shooter and beyond, progressing from simple speedlights to more complex studio flashes.


Equip Yourself: Recommended Gear


Sad fact: There are a lot of companies that make some pretty crappy lighting gear, but are still happy to take your money. The Strobist Gear Guide is designed to help you avoid making many of the costly rookie mistakes I made over the first few years of my career. This is the gear that works for me, day in and day out. It is solid, reliable and will get the job done without destroying your wallet.


Feed Your Brain: The Strobist Bookshelf


Books are gear for your brain. Chosen wisely, they represent some of the best value for dollar you can spend as a learning photographer. Featured on the Strobist Bookshelf are my current favorites, winnowed from hundreds of books read over the course of my career. It is a relatively short list, but there are solid selections for nearly any lighting photographer.


And Finally, My Own (Post-Strobist) Project:
The Traveling Photographer's Manifesto


Since 2017, I’ve led annual workshops in Cuba and Vietnam focused on thinking like a photojournalist while traveling with your camera. The Traveling Photographer's Manifesto is, in many ways, the book version of that workshop. More, here.


On Assignment


Welcome to the On Assignment archive, where we translate the skills you learned in Lighting 101 to the real world. These posts include many of my own assignments from the last ten years, and you'll see my lighting skills growing right along with your own.

Each On Assignment post links to the next. So if you want, you can eat 'em like peanuts. Enjoy.

-DH


Wind Tunnel
Abstract Concrete
Archeologists
Cicada
Star Gazer
Real Estate Developer
Blind Snoot Portrait
Conference Room Quickie
Lighting Prep Basketball
Taming Harsh Sunlight
Big Gym, Little Lights
Light the Little Stuff
Thinking Outside of The Box
Designing a Backdrop
Lighting for Detail
Guy on a Boat
Dealing with TV's and CRT's
Simple Wall/Snoot Portrait
Make the Ambient Work For You
Use a Second Light to Create Tension
Womens Lacrosse Cover
Lacrosse Cover, v2.0
Free Custom Backdrops: Using Flash into a Sunset
Ant Upton: Soccer Preview Shot
Robert McNary: Shoot Your Kid
Developing an Idea, Part 1: Compact Fluorescent Bulb
Developing an Idea, Part 2: Compact Fluorescent Bulb
5-Minute Test Shot
Shiny, Pretty Things
Pool Portrait
Strobe on a Rope
Tupperware and Trash Bags, Pt. 1 of 3
Tupperware and Trash Bags, Pt. 2 of 3
Tupperware and Trash Bags, Pt. 3 of 3
Soup Up Your $10 DIY Macro Studio
How To Light A Comet
Test Driving the DIY Softbox Grid Spot
Medical Illustrator
Fourth and Long? Punt With a Plant
Shade is Your Friend
Sometimes it's Not the Photo, it's the Process
Zebra Fish and Zygotes
David X. Tejada: Kicking Butt with Small Flashes
Stainless Steel and Cookies
How to Photograph Christmas Lights
Hit for Average
Always Look for a Detail
Book Club Illustration
Lighting a Large Interior
Found Backdrops, Pt. 1
Macaroni and Cheese
Speedlighting a College Gym
Special Q&A: Speedlighting a Gym
Flavored Vodkas
Light the Details
Spring Arts Guide
Munchies
Hero Fan
Spring Desserts
Group Shot: 2 Speedlights, 34 People
Michael in Paris
Eke in Paris
Steve at Google
Nest Egg
Peter Yang: Admiral William Fallon
Golf Feature
Controlling Daylight, Pt. 1
Night Chopper, Pt. 1
Night Chopper, Pt. 2
Fifty Years
One-Light Real Estate Shoot
Reluctant Poet
WiMAX
Manil Suri
Monteverde Institute
Planes and Arrows
Prep Quarterback
Shooting for Social Media
STB: John McIntyre
Climber Hands
Glass Menagerie
Trip Jennings
STB: Gus Sentementes
Earth Treks Pt. 1
Earth Treks Pt. 2
Earth Treks Pt. 3
Gas Station Tacos
Nathan Carlisle
The Soprano
STB: Sian Meades
Guitarist Mark Edwards
Betty Allison
Cellist Caleb Jones
STB: J.D. Roth
Nataniel Welch, Men's Journal
Bionic Arm
Summer Reading
Stink Bugs
Radio Silence
Newspaper Man
David Tejada
Bullet-Proof Glass
HoCoPoLitSo
Frickin' Lasers
Brian England
Inside the Black Box
Plain and Simple Light
Martin Prihoda for Cosmo
Miller Mobley: Chaplain
Finn O'Hara: Mixing Light
John Keatley: Best in Show
Chris Crisman: Self-Investment
Brad Trent: Ocean Master Pt. 1
Brad Trent: Ocean Master Pt. 2
Concert Pianist
Hi-Def Asparagus
Mathieu Young, Moonlighting
Inside the Soft Box
Open Air Studio
Tweaking Dusk
Stephanie Barnes
Theresa Daytner Pt. 1
Theresa Daytner Pt. 2
Soccer Through Sunset
Inside the Box
Caleb Vaughn-Jones
Night Soprano Pt. 1
Night Soprano Pt. 2
Trattoria
Reed Quintet
Hiding Your Flash
Samantha McEwen
Tenor Luke Grooms
On Axis, On Budget
Antonio Beverly
Greg Funnell: Joe Wright
Mathieu Young's Harvest
Smokin' Joe
Toufic Araman's Sunset Resort
ATM Man
Man on a Mission
86-Second Portrait
MarchFourth Marching Band
Light That Isn't There
Hide Key w/Fill
Cheap Portable Studio Pt. 1
Cheap Portable Studio Pt. 2
Cafeteria Lunches
Bluebirds and Stink Bugs
Rebecca Hargrove Pt. 1
Pianist Duo
Martin Prihoda: Priyanka Copra
Flute Duo
Hall Studio
Rebecca Hargrove Pt. 2
Evoking Expression
Scout and a Shoot, Pt. 1
Scout and a Shoot, Pt. 2
Don't Deny the Obvious
Chasing Light: Actress Margo Seibert
Follow-Up QA: Margo Seibert
Loren Wohl's Chokra and Awe
Cellist Carolyn Rosinsky
Avatar
Full-Sun Group Shot
Actor Ben Lurye
Lighting Like Leo
The Light You Don't See
Studio in the Wild
Mum for Fuji
A Leaf and a Dish
Nayan Khanolkar: Alley Cat


__________

New to Strobist? Start here | Or jump right to Lighting 101
Now available in audiobook: The Traveling Photograher's Manifesto


Permalink

Free, Custom Backdrops Delivered Daily: How to Shoot Flash Into a Sunset

Pop Quiz: Within a five-minute margin of error, how many people here know when the sun is going to set in your town tomorrow?

If you don't know that information, you should. You should also know roughly where the sun will set. The sunset's apparent location changes throughout the year - probably more than you think. The time changes all year, too. I make it a point to check the paper once a week or so, to keep the time trend line stuck in my brain.

Along with those two tidbits, knowing a couple of accessible shooting locations that will give you a nice view of the sunset is handy, too.

Why? Because any day of the year, you have a easy photo shoot just waiting in your pocket. Knowing how to do this is a bread-and-butter skill for any aspiring flasher, so we are going to go through it step by step. Hey, no one ever accused me of being too brief.

The best locations are the tops of hills which give you a view of the sky in the east and the west. Why? Because you are going to shoot a very good fall-back portrait just before the sun goes down at all. Then, just 20 minutes later, you are going to knock it right off of the page with a better version.

Here's the scoop.

Having your pre-arranged location and time ready, you plan to meet your subject about 20 minutes before sunset. Tell them to expect to take about an hour. Assuming your subject is punctual, they are going to arrive just in time to shoot a nice, easy golden light (and "available" light, at that) portrait. One hour, one location, two very good (and totally different) looks.

In this example, I was shooting a portrait of some family friends on Monday as a small thank you for the "totally wicked" clothes (that's my seven-year-old girl's extremely positive term) that they passed down to her. Seems that their Sarah (that's her in the photo) who is a couple of years older than my Emily, has "like, the totally coolest" taste in clothing. She's practically her own designer label for my daughter now.

As an aside to the aside, please try to get in the habit of shooting nice photos of your friends whenever possible. Use light. It's great practice for you, wonderful pictures for them and it's darn near free. It's all ones and zeroes - just shoot them on digital and burn them a disc. You can output photos at a drug store for pennies a print now. It's good karma, and you learn in a no-pressure environment.

Back to the pictures.

So, you shoot the easy, golden light available light stuff. It's low, warm and beautiful. Most people would be happy to turn it in, but you have moved on to the next level now. So this is your fallback in case the good stuff goes wrong.

Available light stuff shot, you relax and watch the sunset. I have heard that there is similarly good light to be had each morning. But I would not know about that, as it happens long before I wake up.

When the sun drops below the horizon, it's back to work for you. Choose your background angle (uh, think "west") and your camera position. You will probably want to shoot from a low angle to exploit the afterglow.

Set up your main light, probably off to one side at ~45 degrees and up a little. Umbrellas or softboxes work well for this one, although you can hard light (or snoot) it, too. Let your subject matter and desired effect guide you.

If you are using a second light, set it up, too. I usually like to cross light with the main, with a hard light source dialed way down. Do not forget to gobo the back/side light to control glare.

From here on out, the sequence and exposures are designed to maximize your shooting time. This is not the only way to do it, but I like to work this way to squeeze out about 20 minutes of shooting time.

First, set your ASA to the lowest limit, and set your shutter to your maximum synch speed. Now set your front light to full power. This will let you get started as soon as possible. The back (cross) strobe light, if used, will be dialed down quite a bit. And for the sake of simplicity, I am going to proceed as if we are just using a front light. If you can do one, you can do two. But start with one.

OK, your shutter speed is on max synch. Synch up the flash - off camera, Bucko - and do a test shot of your hand at what will be your subject's position. Shoot it with the flash at full flash power. If you are using a small flash and diffusing it with an umbrella or whatever, you will still need to be pretty close to your light. Adjust your aperture and test to find out what the correct aperture will be for a full power flash. The background will be overexposed at this point. No problem.

Let's say ends up being f/5.6, just for argument. So now you have a shutter speed and an aperture. When the exposure for the afterglow drops to that exposure, you can begin shooting. The light will not last very long, so you'll want to milk it for all of the time you can get.

NOTE: There will still be enough light when your shooting window opens to easily focus on your subject. But it will drop pretty quickly, and you can extend your shooting time by bringing a flashlight to aim at your subject periodically to aid focusing. Good for finding gear after dark, too. Just a thought.


Once your shooting window opens, your ambient light will change pretty quickly. And you have a couple of options on dealing with it. First, you can simply open up your shutter speed to balance the ambient as it dims. Remember to vary your shutter speed when shooting, too. There is no "right" exposure. Moving the shutter speed will over- or under-expose the background. Airy, normal or dramatic. It's personal choice and all available to you moment to moment.

If you have an external high voltage battery pack, long recycle times will not be an issue. But if you are running AA's, you will want to drop to half (maybe even quarter) power on the flash as soon as the ambient light level will let you. It sounds like a complicated dance, but it is very intuitive with the TFT screen on the back. I easily shot four individual people and then the group of four in about a ten-minute window.

You may wish to practice one evening with hard light, as it will be stronger and give you a longer shooting window. The first or second time you do this, you will probably find yourself bogged down by trying to remember the details as the light changes. But keep at it - it gets smooth and effortless with practice. And the ability to do this any evening is a valuable skill.

As the light drops, power your flash down (on manual, of course) until you get to your lowest practical working aperture. Then you will start lowering your shutter speeds as the light drops further. Move the camera during the exposure. Experiment with subject movement. You will already have some good stuff in the can, so use the last part of the light to stretch for something really cool. I have made some nice shots at one-second (and longer) exposures on sunset shoots.

Just remember the shutter will affect the background. The aperture will affect background and the subject. Adjusting the flash's output will affect just the subject. Raising the ASA a little will buy you a few more minutes of shooting. Total control at your fingertips. Go wild.

Save a little bit of light to collect gear by. Or bring a flashlight. No sense in leaving some passerby a free lens the next day, right?

Kids, athletes, businessmen - whatever. Just about anyone looks good against a sunset's afterglow. Just stick a little shoe-mount flash off to the side and they'll look like a Fortune Magazine cover.

And the custom-made, one of a kind backdrops are totally free.

Next: Ant Upton: Soccer Preview Shot


__________

New to Strobist? Start here | Or jump right to Lighting 101
Now available in audiobook: The Traveling Photograher's Manifesto


Permalink

Site Utilities: Search

Over the next few weeks I'll be through some of the utilities on Strobist in the hopes of making the site a little more friendly to the non-power users. There are many general blog functions, like RSS, archives, search, etc., but also some things that are a bit quirky and unique to Strobist.

This time I am going to talk about the search function, which is at the upper left corner of the site. And please note that any search link on this page will obviously produce this page as the first result. Scroll own to see what else gets dragged up.
________________________________

In addition to wading through the archive in the sidebar at right, you can easily find articles using the search function. This is basically a full-text search that includes the subject and title text of every post (600+) since day one. It is very rudimentary, as there are no logical qualifiers (and, not, etc.) But it does go back to the beginning of the blog, which is a good thing.

One downside: It only returns the first 20 or so posts that fit the search. And since I do talk about the same things a lot, this can be a pain.

The answer is to include extra terms. Single terms like "DIY" max out with very recent posts. So be sure to type in additional terms to narrow the search.

Example: Typing the terms DIY macro box gets you to the little carboard studio thing very quickly.

So, what are the serious people searching for?

Here are the top ten searches, in order, as reported by Google Analytics:

1. Gary Fong - WTF??? (Why the Fongster?) Are you guys playing a cruel joke on me? Ironically, there is only one reference to him. And it is in an otherwise intelligent post. Before this post, at least. Sigh.

2. Snoot - There, that's better.

3. Pocket Wizard - Woulda thought that would beat out "snoot." Be sure to use additional terms. (We never shut up about PW's.)

4. Vivitar - Old-skool flashes. But the single term catches everything. Use additional terms if you tap out.

5. Back light - Steady stream of stuff, right back to Lighting 101.

6. Canon G7 - Is that you searching, Chuck Westfall?

7. DIY - Gary Fong takes 1st place and DIY comes in 7th? Excuse me while I go slit my wrists.

8. D70s - (Can't speak. Still trying to get over the Gary Fong thing.)

9. Wedding - (Sorry ladies, I'm taken.)

10. Custom backdrops - Gets you to the ever-popular and beautiful flash-against-the-sunset technique.


__________

New to Strobist? Start here | Or jump right to Lighting 101
Now available in audiobook: The Traveling Photograher's Manifesto


Permalink

Lacrosse Head Shot: v2.0

A couple of weeks ago, I built the macro strip lights to solve a problem with a small product shot. But I was also thinking that they might come in handy in other situations.

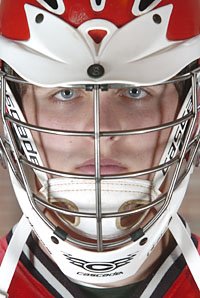
This week's cover shoot featured a lacrosse player in a helmet, and the strip lights were just the ticket to get some light up in there in a controllable way.

Additionally, this assignment is a good example of being flexible while shooting a pre-conceived shot. So I want to go through the shot process in a fair amount of detail.

Each feature assignment offers a full-page cover and a large inside photo that runs with the story. So we know just what kind of play we are going to get, and can plan the shots accordingly.

That tends to lead to a decent amount of preconception on my part, as I usually do not have a lot of time and want to be able to pull off both shots without spending too much time with on-site planning.

So, with several ideas floating around in my head, I arrived at the high school to shoot the cover. The pre-conceived ideas all involved using lights in an action shot on the field. Alas, I arrived just in time for the afternoon showers. Which nixed all of the on-field light ideas right away.

A hastily arranged "plan B" was to shoot him in a small portico that was very dark, except for an orange-ish sodium vapor security light up and to camera right. The background was a shade-lit brick wall in the distance.

I threw an 80-200/2.8, which is my bread-and-butter portrait lens, on a D2h and set up in the portico.

For the first attempt, I positioned two Nikon SB-26's on manual (in the strip lights) oriented vertically. I quickly saw that including the lacrosse stick ruined the symmetry of the picture. So we lost the stick right away.

The lights got up under the helmet, but looked better when lowered and shot at an upward angle into his face. I exposed the ambient for the brick wall (in back) at 1/250th, to get my easiest aperture for the flash to balance. He was heavily shaded by the portico, so the flashes were lighting a relatively darkened subject, which made the two different planes very easy to control.

Next, the flashes were balanced with the ambient background, which put me at 1/4 power (on manual.)

Everything fit, exposure-wise. But I did not like the bricks being so literal in the background.

The easy solution was to crop in some. I am a big advocate of getting anything out of your photo that does not help it.

This worked, but I didn't like losing the context and lines of the full helmet. And the background was in the same color family as the guy's school colors, so it seemed a shame to waste it.


The portico was dark enough to allow me to open the shutter on the background with little foreground effect, so I opened up to 1/30th to abstract the bricks a little.

I could see that I was getting closer, but still no cigar. I liked the colors, but I did not like the idea of an easily identifiable brick wall background in an iconic head shot.


So I started jerking the camera left to right as I shot. This brought the expected odd looks from the subject. But after I explained that I was doing it for effect (and not having a seizure) he understood.

Closer, but not there yet.

The next change was to try to zoom the lens during the exposure instead of jerking it.

That worked, and produced the photo you saw up top. It connoted motion, and made the bricks an abstract design that kept the school color scheme.

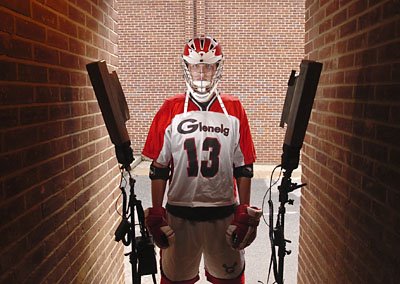
Here is the lighting set-up, shot static at 1/250th.

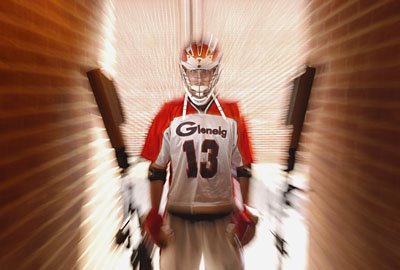
And here is the same tell-all shot with the shutter opened up, and with a "zoom pull" during the exposure. Note that I went from wide-to-tele while zooming. Also, you'll want to start a little too wide, and be in the process of zooming while you press the shutter.

Total time to set up lights was about 5 mins. Total time to complete the shoot after that was another 4 mins.

When you are working with small, light equipment that needs no A/C power, you really can do something cool in next to no time.

I am happy with this shot for a few reasons.

First, I liked the idea of pulling together a "plan B" when the rain came.

Second, I like the progression of keeping what was good and changing what was bad about the photo on a quick, real-time basis.

Third, I love the dual strip reflection on the face mask. Takes a problem with lit helmet shots and turns it into an asset. Look almost gladatorial, if that's a word.

Room for improvement? Yup. Always is.

On a do-over, I would have worked his expression a little, to go with the dynamic lighting theme.

I might have warmed the flashes up a little with a 1/2 CTO, too. Just personal preference. I warmed his face up a tad in Photoshop for the final. But this is one of those shots where you could have gone a little over-the-top with the gels.

So, that's it. All over but the commenting. Questions? Answers? Rants?

Fire at will.


Next: Free Custom Backdrops: Using Flash into a Sunset


__________

New to Strobist? Start here | Or jump right to Lighting 101
Now available in audiobook: The Traveling Photograher's Manifesto


Permalink

Lighting 102 - 3.1 Balancing Light: Twilight

For the available-light photographer, the idea of exposure is a fairly simple and static concept.

There is a correct exposure for a given ambient light scene. Sure, you can tweak it, say, half a stop up or down. But go much beyond that, and you move beyond "artistic license" to "I screwed up."

But what is the correct exposure when your photo can have as many different zones of varying light levels as you have flashes? The correct exposure is what you say it is. And you say it by establishing a zone of (traditionally) correct exposure on your main subject using the flash.

If you are looking for a touchstone in this process, that's it. Establishing a correct exposure on your primary subject allows you to do whatever you want with the exposure levels in the rest of the frame. And you can go far beyond the "correct exposure" range of an ambient-only, evenly lit scene. And look like you knew what you were doing.

In short, "screwed up" becomes "artistic license" when you have established an exposure reference point with your light on your main subject. (More after the jump.)

To really understand the concept of balancing light, many of you will have to expand your concept of a so-called proper exposure. After all, you are creating a scene that has precisely the tonal range that you want it to. You can use this ability to compress the tonal range of a photo, or to expand it. It's up to you.

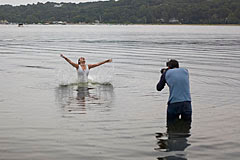
Take this scene photo which includes long-time Strobist reader Ryan Brenizer. Exposing for the model, the sky is washed out. Exposing for the sky, the model would be too dark.

But with flash, you can expose correctly for both. By adjusting the shutter speed and aperture to get exactly the desired tone in the sky and then filling the model with flash sufficient to raise her exposure to the aperture you happen to be using, you get this:

In addition to turning the water into diamonds with his flash, Ryan has compressed the tonal range of this scene to where everything fits in the histogram rather nicely, thank you.

So, is Ryan shooting at the correct exposure? Yes. Or no, depending on exactly how he wants the background to look.

Ryan shot this photo at 1/250th at f/3.2 at ASA 160. He could easily open his shutter speed up to, say, 1/125 and lighten the background. Or, he could up the power on his flash by a stop, close his aperture down a stop (to f/5.0 - a partial stop between f/4.0 and f/5.6) and reset his shutter to 250th to darken the background.

How does that work? Let's look more closely.

The background is lit by ambient light. It is controlled by a combination of the aperture and the shutter speed. The model is exposed by the flash. (She would be significantly underexposed without the flash.) So as long as the model is receiving the correct amount of light from the flash, the background can be placed at whatever tone the photographer wants.

What if Ryan cranked up the power on his flash 2 and 1/3 stops to where it lit the model to f/8? (He would then set his aperture to f/8 to correctly expose her.)

But what about the shutter speed? The new shutter speed to get the same effect on the background would be 1/50th of a second. (We simply open up the shutter 2 1/3 stops to neutralize the fact that we closed down the aperture 2 1/3 stops.) Thus, the exposure on the background has not changed.

We did this step to get away from our 1/250th of a second sync speed, and give us some "playing around" room with the shutter speed.

So now, imagine you are Ryan, wading in the water, shooting at 1/50th at f/8 and getting the same tones as we see above. Now, say you drop the shutter to 1/100th. What happens?

Model lady does not change. She wants f/8 from the flash and that is what she is getting. But the background gets one stop darker. You have just increased the contrast range of the photo. Darker, moodier and looking completely different. And I'm thinking those water diamonds are really popping now.

Drop the shutter down to 1/200th. Darker still -- but not black yet. Completely different feel to this photo than with the other two.

Which is correct? They all are -- just different. "Correct" is determined by the exposure on the model -- and that is set by the flash (and choosing the corresponding aperture that makes her look well-exposed.)

But the sky? That's up to you. Airy, normal, moody, black -- it's all good. And it is all available to you.

What you have is two different photos -- each with its own exposure -- being compressed into one scene. There is a flash exposure, which happens instantaneously and is controlled with the aperture. Then you have an ambient exposure which happens over time and is controlled by a combination of the aperture and the shutter speed.
_____________________


Now, You Do it

Our first light balancing exercise will be very similar to Ryan's setup, except that you will probably stay dry and you probably won't have a beautiful model to work with. (If you want to stick a gorgeous model into the water to do this, knock yourself out.)

Drag a partner out to an area where you have a fairly low horizon and a view of the western sky. Go out at about sunset and wait for the twilight sky to meter (continuous light level) at your sync speed (probably a 250th) at f/5.6 at a reasonable ASA (ASA 200 or 400.)

Now shoot a photo of your model using the correctly exposed twilight sky as a backdrop. He/she will be too dark.

Next, light your subject with a flash so that he/she is correctly exposed at f/5.6. You can do this with hard or soft light, on-camera or off-camera light -- I don't care. We are working on balancing light here.

Shoot a few frames of your subject this way. Talk with them. Tell them how good they look. Show them the images on the back of the camera. You are doing this to (a) build rapport and (b) to keep them around for a few more minutes.

Pretty soon the twilight background will drop to 1/125. Adjust your shutter and keep shooting. Next it'll go to 1/60th. Adjust your shutter and keep shooting.

But now, also shoot some frames at 1/125, to underexpose the background by a stop. And try a few at 1/250th to underexpose by two stops. You should see a very different feel in these photos, but they should all look okay, as does the underexposed sky in this photo, by Jonathan Shears.

When the background drops to 1/30th instead of opening up the shutter to compensate, turn the power on your flash down by one stop. (If you were shooting at 1/4 power, move to 1/8.) Now, instead of opening up from 1/60th at f/5/6 to 1/30th at f/5.6, you're opening to 1/60 at f/4 and adjusting your flash to compensate. This buys you more shooting time before you get into the "Hail Mary" range of shutter speeds.

The next time the sky drops another stop in exposure, power down your flash another stop and move to f/2.8. if this sounds difficult, it is not. Try it.

As your light drops lower still, keep opening up your shutter. Play with different speeds to see the effect on the background. But remember to choose the correct aperture to expose your subject correctly with the flash.

You will soon have too little light to focus. But before that happens, you'll have a lot of cool photos, with a range of background looks.

If you want to post some, tag them:

Strobist
Lighting102
Balance
Twilight


You can see the tagged photos here. If you would like to talk about it, I have set up a thread here.

There's lots more coming on the light balancing front, so no need to get fancy yet. Next week, we'll be looking at how to do this kind of thing in full daylight.
________________________

Related post:

:: On Assignment: Custom Backdrops Delivered Daily ::


NEXT: Crosslight: Balancing With the Sun


__________

New to Strobist? Start here | Or jump right to Lighting 101
Now available in audiobook: The Traveling Photograher's Manifesto


Permalink

Home Depot Week: More Backgrounds

Ever wish your commanding officer significant other would let you have a section of the wall to paint as a backdrop in any style you choose whenever you want?

You can, if you are willing to spend seven bucks. That's what a sheet of 4x8', 1/2" drywall goes for these days. If you are doing the home studio thing, or shooting in your garage, it's a no brainer. And at $7 plus the cost of paint, you can do one any time you want a visual theme to tie together a series of portraits or product shots.

(More after the jump.)
__________________________

For the portraits, you would just lean the painted sheet against a wall very carefully. ("I promise won't mess it up, honey!") Then pull out your speedlights and you are in business.

FWIW, I am lobbying for a permanent section of the basement as "paintable backdrop space" in our next house. (It's not looking great at this point, but I am very early in the process. I'll keep you posted.)

Granted, drywall looks like crap until you paint it. But no worries, as HD can help you there, too. They have people in the paint section just dying to tell you how to sponge, rag, roll, splatter, exfoliate -- whatever you want.

There are brochures in the color palette areas of the paint display that will get you thinking. Or you can go with a solid color if you want.

Wanna get one of those cool specular background shots, for instance? Just paint with a semi-gloss and choose a dark color. Bingo.

One particularly good book that they offer is "Decorative Painting: Expert Advice from Home Depot" ($14.95.) It contains more ideas for painted backdrops than you can shake a stirring stick at.

The drywall thing is not just for portraits, either. You can cut the stuff easily and make a corner out of two 4x4 pieces. Presto, instant alcove for still-life shots.

Here's a trick: To cut the drywall, you score one side with a utility knife (using a straight edge as a guide) and gently snap it. Do this carefully, and you can preserve the paper on the opposite side to make a nice, joined temporary corner for a shoot.

As for location, if you have no place inside that is suitable for shooting just lean your custom drywall backdrop against the side of a building on the shade side (or in the evening) and shoot away.


__________

New to Strobist? Start here | Or jump right to Lighting 101
Now available in audiobook: The Traveling Photograher's Manifesto


Permalink

DIY: $10 Custom Wooden Backdrop Mount


Do you have painted canvas backdrop, or other textile, that you use for portraits?

Why clamp it up to a crossbar (and crop the top) every time you use it, when for about $10 you can build a permanent wooden mounting bar that begs to be included in the frame?

Such was this morning's project.Read more »


__________

New to Strobist? Start here | Or jump right to Lighting 101
Now available in audiobook: The Traveling Photograher's Manifesto


Permalink